If you own an Android TV Box and wish to update its firmware, the Amlogic USB Burning Tool is the ideal solution. This flash tool is specifically designed to address “Get Key Failed” errors and facilitate firmware upgrades for your device. The Amlogic USB Burning Tool is compatible exclusively with Windows PCs and can be used to update any Amlogic-based Android TV boxes featuring .img firmware files.
In this article, we introduce the Amlogic USB Burning Tool and explain how to update your Android TV Box’s firmware using this handy application. We provide a download link and step-by-step installation instructions below. It’s important to note that Android TV boxes typically utilize firmware files with .img extensions, which differ from other firmware files that contain multiple components.
What is Amlogic USB Burning Tool?
Like Android smartphones, there is a wave of several other Android products in the recent past that has connected us more with the technology and made it more streamlined. And being an Android device, these Android smart products are often treated with firmware updates that are meant to increase the overall facility or functions of the device. Although these updates are not very frequent, only a few companies can push out more updates for their Android devices. However, the updates are being sent over the OTA, but often these are not the case as we are stuck with a .img file of the update, which we have to update manually.
Here comes into picture the Amlogic USB burning tool. However, you should note that this tool is only for Amlogic devices, so it is advised to check whether your device is Amlogic based device. Amlogic USB Burning tool is a small firmware upgrading tool meant for the Microsoft Windows platform. You can flash firmware to any Amlogic based device or Amlogic powered chipset. So, you can make use of the Amlogic USB burning tool to upgrade the Amlogic-powered device to a new firmware.
Page Contents
- Features of the Amlogic USB Burning Tool?
- Download Amlogic USB Burning Tool
- FAQ about Amlogic USB Burning Tool
- What is Amlogic USB Burning Tool?
- Why should I use the Amlogic USB Burning Tool?
- Is Amlogic USB Burning Tool compatible with all Amlogic devices?
- What operating systems does the Amlogic USB Burning Tool support?
- Can I use the Amlogic USB Burning Tool on a Mac or Linux computer?
- How do I use the Amlogic USB Burning Tool to flash firmware on my device?
- Conclusion:
Features of the Amlogic USB Burning Tool?
Now that we know that you can flash firmware files to any Amlogic powered device using the Amlogic USB burning tool, let us take a look at what more you can do with this tool via a list of features of the Amlogic USB burning tool:
- Installer: It needs to be installed on your PC by simply downloading the installation file and executing it. This also makes it easy to burn firmware to USB as you will be using a computer, for that matter.
- Flash Firmware: You can make use of the Amlogic USB Burning Tool to update the firmware of your Amlogic chipset-powered device. You can do that easily by:
- First, launch the Amlogic Burning tool on your PC.
- Load the firmware file by heading over to File>>Import Image (.img).
- Connect your Amlogic powered device to the PC.
- Click the Start button to begin the flashing process.
- Other Functions: You can also perform several other functions to your Amlogic powered device using this tool like erase data, erase flash, erase the bootloader, overwrite key. The Erase Flash further supports four types of flash: Normal erase, Force erase, Erase all, Force Erase all.
- Languages: The Amlogic USB Burning tool comes in multiple languages like English and Chinese, making it easier for the users of both worlds to use it.
Download Amlogic USB Burning Tool
Here is the download link for the Amlogic USB Burning Tool.
| v3.2.0 (Latest) | Download Link |
You May Also Like,
- Download Rockchip batch Flash Tool
- Download Intel Phone Flash Tool
- Download Rockchip Driver Assistant
- Google USB Drivers
How To Flash/Upgrade Firmware on Android TV Box Using Amlogiv USB Burning Tool
Now let’s look at the exact steps you must follow to flash the firmware image file on your Android TV Box. Before installation, you have to keep in mind some guidelines.
Pre-Requisites
- Make sure that the Android TV box is connected to your PC
- Power on the TV should with the power adapter
- This USB tool only supports on Windows PC
Installation Guide
Step-1 Download the Amlogic USB tool zip file and extract it to the PC.
Step-2 In the folder, you have the InstallDriver.exe. This will install the required drivers for Amlogic TV boxes.
Step-3 First, connect your device to the PC, then click the Driver Installation wizard.
Step-4 Open the folder “USB_Burning_Tool” >> then click the “USB_Burning_Tool.exe” to start the USB burning tool.
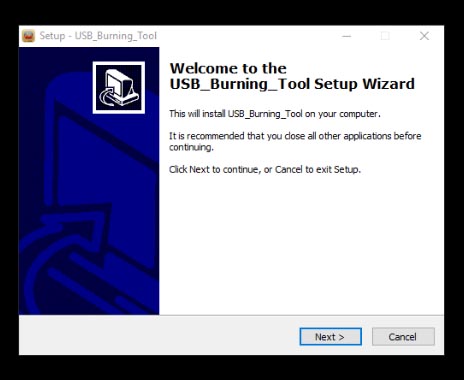
Step-5 Once the setup wizard opens, click yes to all the options.
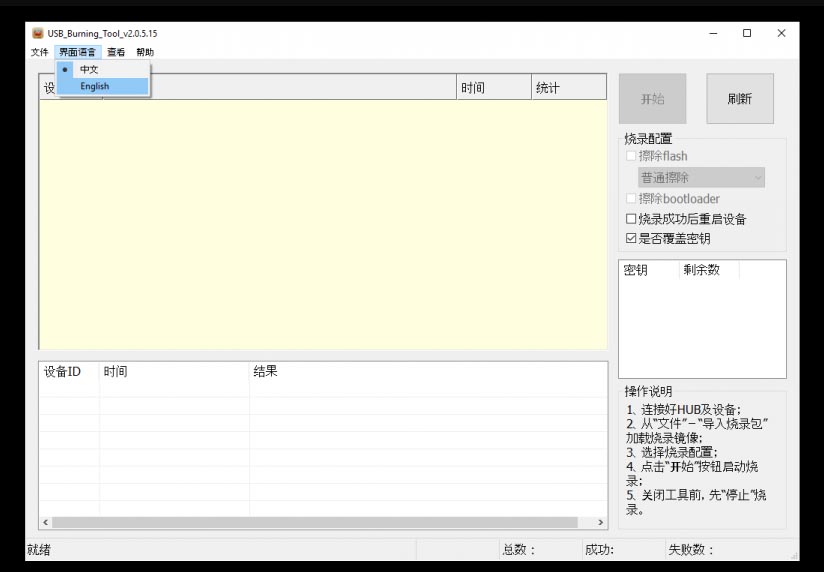
Step-6 Click the second option on the top bar to reveal the option for changing the language.
Step-7 You have to put your device into recovery mode. This is differently done on all TV boxes. Some have little reset holes, and some have buttons on the bottom of your device.
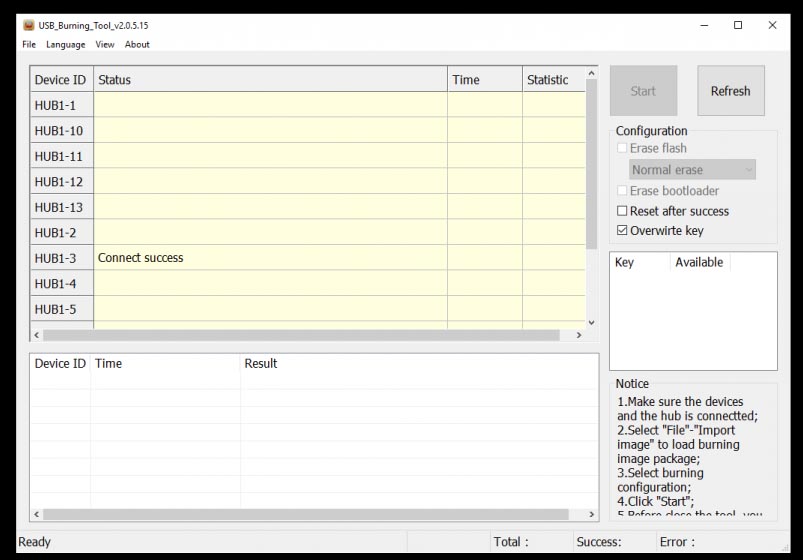
Step-8 Connect your Android TV box to your PC to upgrade your firmware when it’s in recovery mode. If done correctly, you will have a connect success like in the image below.
Step-9 Now, click on the File option and browse to find your firmware .img file.
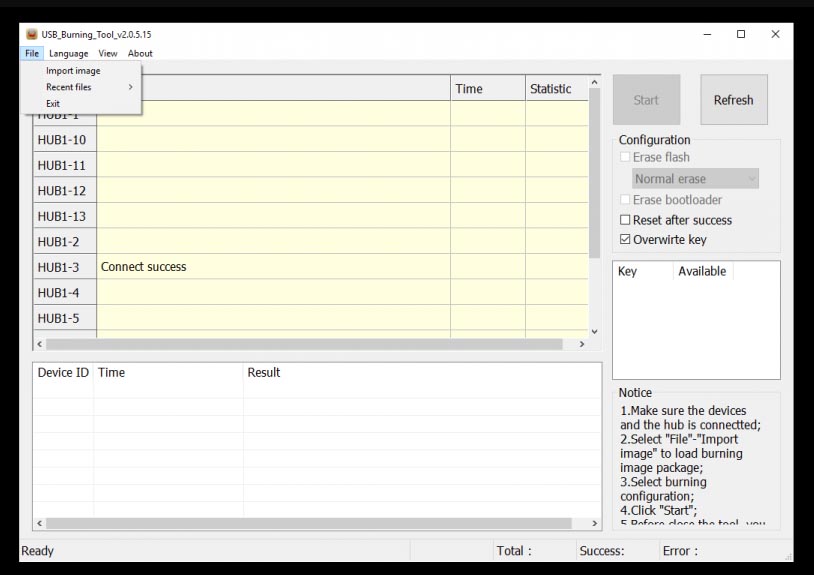
Step-10 Make sure to untick the overwrite key box
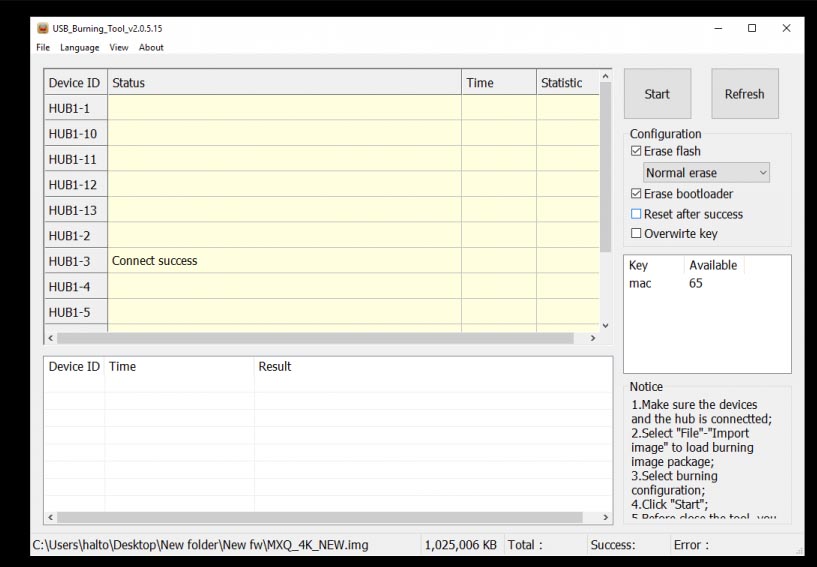
Step-11 Click Start to begin the firmware upgrade process.
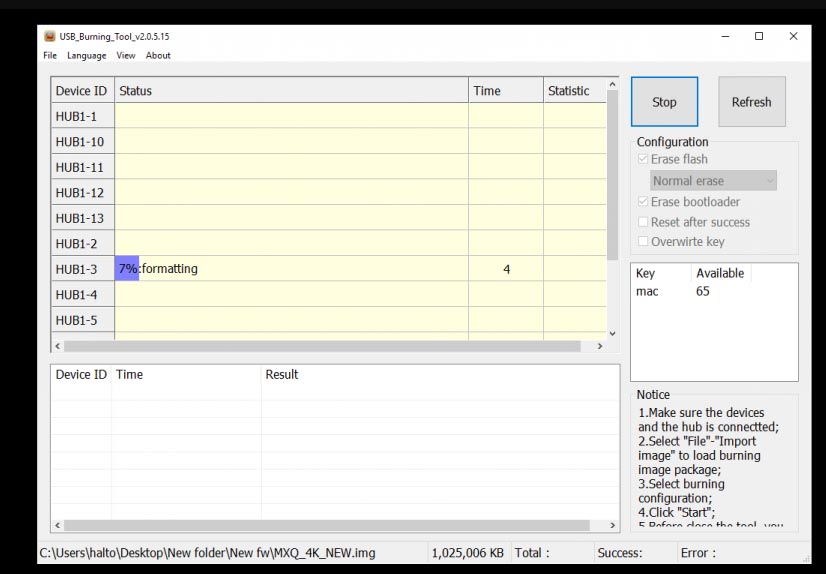
Step-12 Wait for a while; the firmware upgradation is taking place. After it finishes, click on Stop.
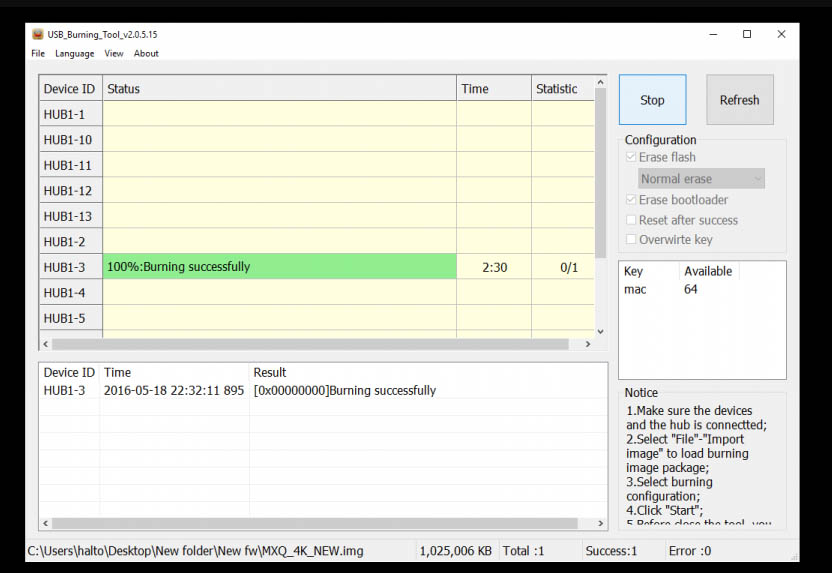
So, that’s it, guys. Now the firmware on your Android TV Box is updated.
FAQ about Amlogic USB Burning Tool
What is Amlogic USB Burning Tool?
Amlogic USB Burning Tool is a Windows-based utility that allows you to flash or update the firmware on devices with Amlogic processors. This tool is commonly used for Android TV boxes, tablets, and other devices powered by Amlogic chipsets.
Why should I use the Amlogic USB Burning Tool?
If you have a device with an Amlogic processor and need to update its firmware, install a custom ROM, or unbrick the device, the Amlogic USB Burning Tool is the recommended solution. It provides an easy-to-use interface for flashing firmware onto Amlogic-based devices.
Is Amlogic USB Burning Tool compatible with all Amlogic devices?
While the tool is designed to work with most Amlogic devices, compatibility may vary depending on the specific device model and firmware version. It is recommended to check the device manufacturer’s website or support forums for compatibility information before using the tool.
What operating systems does the Amlogic USB Burning Tool support?
Amlogic USB Burning Tool is compatible with Windows operating systems, including Windows XP, Windows 7, Windows 8, and Windows 10.
Can I use the Amlogic USB Burning Tool on a Mac or Linux computer?
The Amlogic USB Burning Tool is not natively compatible with Mac or Linux operating systems. However, you can try using a virtual machine or emulator, such as VirtualBox or VMware, to run Windows on your Mac or Linux computer and then use the tool.
How do I use the Amlogic USB Burning Tool to flash firmware on my device?
To use the Amlogic USB Burning Tool, follow these steps:
- Download and install the Amlogic USB Burning Tool on your Windows computer.
- Download the firmware file compatible with your device.
- Launch the Amlogic USB Burning Tool and click “File” > “Import Image” to load the firmware file.
- Connect your Amlogic device to your computer using a USB cable, ensuring the device is in recovery mode or bootloader mode.
- The tool should detect your device, and you can click the “Start” button to begin the flashing process.
- Wait for the process to complete, and your device will reboot with the new firmware installed.
Note that the exact steps and requirements may vary depending on your device model and firmware. Always follow the specific instructions provided by the device manufacturer or in support forums.
Conclusion:
In conclusion, the Amlogic USB Burning Tool is an essential utility for anyone looking to update, install custom firmware, or unbrick their Amlogic-powered devices. The Windows-based tool provides a user-friendly interface for flashing firmware on a variety of Amlogic devices. By following the steps provided in this guide, you can ensure a successful firmware update and improve your device’s performance and stability.
We hope this article has been informative and helpful in understanding the Amlogic USB Burning Tool’s features and usage. Your feedback is crucial for us to improve our content and provide better guides in the future. Please feel free to leave a comment or share your experience using the Amlogic USB Burning Tool. We’re eager to hear your thoughts and address any questions or concerns you may have.

HI
i have A95x max tv box… it does not have a small reset botton on the side or the bottom of it !
how can i pot it to recovery mood to flash the new firmwear please ?
my tv box is stuck and want boot all the way too ..
Hassan
There’s a reset button inside the AV jack port for the A95X MAX. You can use a toothpick or similar to press.
Hi anyone know what is the latest firm ware for mxq pro 4 k box is 7.1.2 thanks ?
how do i proceed after pressing reser? I can’t navigate in the reboot menu – the remote control doesn’t respond and other buttons don’t have the device :-(
Where’s the recovery button for Tanix tx5 Max.
Hi my max 96 only have time in the digital panel and able to show HD and USB but HDMI connection monitor show no signal. Reset button no help only reset time. Will i get changes to work if i flash the firmware or even can i go to flash the firmware seem nothing work except only show boot in the digital panal.
my h96 mini does not have any physical buttons
The button is INSIDE the av port – right at the back. You can use a toothpick (just break the sharpest bit off), and push it through to the back. It’s there.
Da bi došli do restart dugmeta na Tanix TX5 MAX morate ga rastaviti. Dugme je kod LCD Displeja
Hi is anyone know how to fix mxq 4K android box keep disconnecting when I use the lan wire any idea ? Thanks
Uboot/get common command result error — any ideas how to fix
Sajnos nem jó a fordítás. Megpróbálom másképp.
I would like to explain that we tried to upgrade a Beelink Gt1 Ultimate Tv-Box, but there was a problem because it has only started for 30 minutes since then. The second problem is that it starts with the OLD version which is not going well! We tried to add another version, but after each version is assumed, there is a restart, which means there is a 30 minute wait again and when it starts, there is the old version! Could you help me?
Kb.,jól van lefordítva…
I have a H96 Max X2 Android Box and have downloaded the firmware for it.
Q: Do I have to install both the mac file AND the mac_wireless file when updating.
My box will not accept wireless.
Your assistance please.
Thanks
David
hi i have followed your steps and my box is not connecting i have a h96 max 3318 box any help please as my box is broke with just red light showing thanks
The update was successful but it reduced the memory from 2GB to 1GB.
How to fix it?
I cant seem to find the reset button on “Mecool M8S Pro W”. I read somewhere that I need to open the box and short some specific pins. Can anyone shed some light on this..?
Error : UBOOT/Partition _aml_dtb/Verify patition/Error result. Please help me
How to intall firmware went get error at 7%. I use tanix tx3 max.
Hi there, good advice. We’re encouraged by your articles here. Hopefully soon i’m going to be publishing top notch blog pages similar to this. Thumbs up!!
Hello, I must be doing something very wrong when updating by sd cardbecause most tutorials about updating a A95X MAX S905X2 4gb ram 64gb rom are wrong/ incomplete and a latest version good working stock img is very difficult to find. Especially a uncorrupted img file. I asumed it would have better support. I don’t want to use atvexperience v3 because it doesn’t run as smooth as it should be. Or developers need to develop a better stable version with record functions and internal hdd support… So my preferences goes to the latest stock update but img is corrupted somehow or I’m missing an important step that’s unmentioned. Do I need to rename the img file or do I need to ad a file to something as I did everything in correct order to update by sd card but my tv box doesn’t find a working file when I try updating? It’s a bit frustrating. Please any help and better support would be so delightful. Thank you very much.
I AM GETTING ERROR AS ” (0X00000 OFF) GET KEY FAILED” WHILE FLASHING FIRMWARE FOR MY H96 PRO PLUS ANDROID TV BOX WITH AMLOGIC S912 PROCESSOR. HOW TO RECTIFY IT?
Deu certo!! minha Box voltou a funcionar.
Muito Obrigado!
How to flash mi TV box s & flash tool name plzz help me
Does not work. After loading the img file into the USB Burning tool I get the following error: “key file configurate wrong” and it does not load the file any further. Unable to flash the device. Something is very wrong with the file.
Dugme je na dnu audio konektora, mozes ga pritisnuti cepkalicom za zube
if I don’t have the cable can I use a usb
I have updated this pie file with memory card but my Android box stuck on x96 mini logo not working
Buenas noches, actualice mi tv box y me pide Escanear el control remoto y de allí no pasa.
Img software downloaded, dtv does not work
A message appears
can no you detect no demod \ tuner
Please, my MXQ PRO 4K TV BOX (Android/rk322x_box/rk322x_box7.1.2./NHG47K/Ish01141129userdebug/test-keys) got stuck and at the moment in recovery mode. Every efforts to factory reset it failed. Kindly send me the right software to upgrade it. I would be grateful if my request is given urgent attention. Thanks.
Device not detected. MXQ pro 4k
What isthe actual Firmware for MXQ pro 4k ? Even fiemware not accepted by USB Burning tool ,,2.2,2.5,2.6 etc. Several attempts fail. FAKE
Hello,
I read thru your article. and i think it will help me unbrick mya X88 Pro X3,, bricked or stuck in boot only after installing supersu.
Questions:
How long do i press the reset button in the AV jack for it to reset and when do i do the reset?
How do i connect the tv box – X88 pro x3 to the PC? do i just use a usb male to usb male cable from box to PC?
Thanks. and hope it will unbrick my new gadget.
Hi,
for those having a hard time going into recovery mode for the X88 Pro X3:
1. Connect the USB cable to the PC. Make sure the speaker sound is on.
2. Use toothpick and press the bottom hole of AV jack, you, will hear a soft click. Keep it pressed,
3. Connect the dc adaptor of tv box, once inserted immediately have someone help you connect the other end of the USB Cable to the X88.
4. Wait for the PC to produce a sound, then remove the toothpick.
5. Check if the USB Burn Tool has the Connect Success.
if not try again using the procedure mentioned above, took me two tries to get it.
Hope this helps
Kotak A95X f4 saya tiada lampu pada box..adapter plug saya cuba ke box lain ok menyala..perlukah saya updated firmware box saya?