Are you struggling with your slow and poor-performing laptop? One common reason for this is 100% Disk Usage. This guide will explain to you some appropriate solutions to solve the 100% disk usage problem in Windows 10. However, this method will help you reduce disk usage to use your hard Disk for a very long time.
Well, 100% disk usage is a widespread problem in Windows PC or laptops. However, if you buy a computer that doesn’t have an SSD, then you may have to suffer from this problem in the long run. This is because SSDs have an excellent data transfer rate, but your HDD might not offer you that speed. That is the main reason why you face 100% disk usage error and your laptop or PC struggles while high-end work execution.
Anyway, this guide will help you fix this. Also, you don’t need to be an expert to fix this problem cause the procedures we explain here are very simple and straightforward that one can efficiently perform.
Also Read
Page Contents
- How To Fix 100% Disk Usage in Windows 10 | A Complete Guide
- Fix 1: Reboot Your PC
- Fix 2: Change Energy Options from Balanced to High Performance
- Fix 3: Fix Your StorAHCI.sys Driver
- Fix 4: Disable Windows Search
- Fix 5: Disable SuperFetch Service
- Fix 6: Change Settings in Google Chrome and Skype
- Fix 7: Disable Antivirus Software
- Fix 8: Uninstall Flash Player Updates
- Fix 9: Reset Virtual Memory
- Fix 10: Disable Windows Update Service
- Fix 11: Perform a Disk Check
How To Fix 100% Disk Usage in Windows 10 | A Complete Guide
Before we head towards the steps to fix this problem, let us first discuss how you will know if your PC has this problem. Well, to know this, you need to check out some symptoms on your Windows PC. Now, what are those symptoms?
- Your system started lagging.
- It takes more time to open any application or software.
- Whenever you open the task manager, you will see it in the processes tab under to Disk % section. It will notify that 100% used.
- Sometimes your PC starts sudden crash and rebooted automatically.
So, these were some possible symptoms that you need to monitor if you possess a system that doesn’t have SSD. Now, if you find that your PC has all these symptoms, then it’s time to clean up your Disk so that you can again start to experience a smooth user interface on your PC. So, here are some available fixes:
Fix 1: Reboot Your PC
Before performing anything, make sure you reboot your system, as this will automatically clean some of the temporary cache files and data. So, I recommend you reboot your system, then perform the fixed mentioned below:
Fix 2: Change Energy Options from Balanced to High Performance
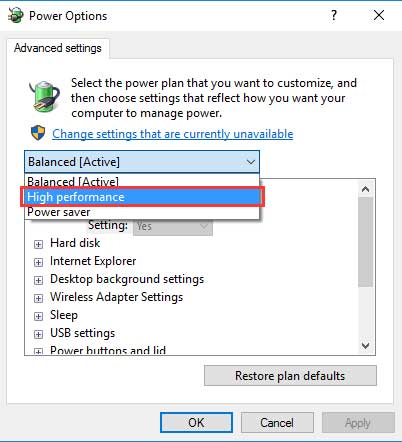
Many players worldwide reported that by changing the energy option to high-performance mode, the 100% disk usage issue gets resolved. So, you may also try this as it has a proven track record of fixing this issue. You need to hover to the Power Options inside the control panel to your energy option to a high-performance setting.
Then, simply click on the Change plan settings followed by Change advanced power settings. Now, simply from the drop-down menu box, set it to High performance and also check if the other setting available there is set to its default value or not.
Fix 3: Fix Your StorAHCI.sys Driver
It has been observed that due to some firmware bugs, this kind of issue occurs even if you have an SSD-based Windows PC. So, in that case, you can fix this 100% disk usage error just by fixing your StorAHCI.sys drivers. Here are the steps to do so:
Step 1:Check if You Are Running the Inbox AHCI Driver
- Firstly, hit the Win+R to invoke the Run box, then type devmgmt.msc inside the text field and press the OK button.
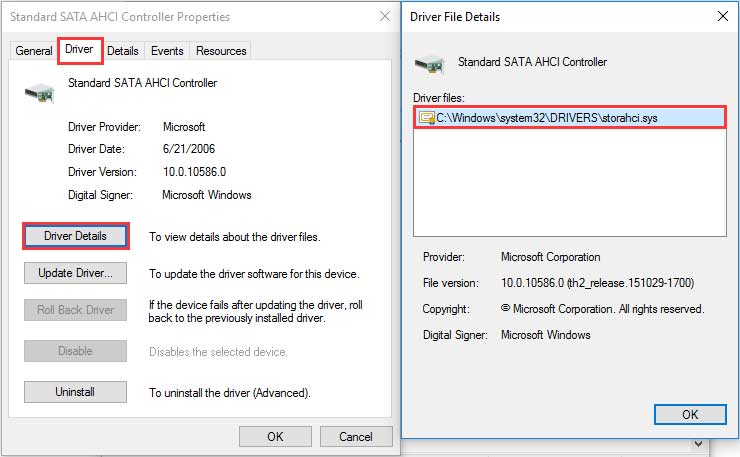
- Now, navigate to the IDE ATA/ATAPI Controllers, and then you need to right-click on the Standard SATA AHCI Controller and click on the Properties button.
- After that, switch to the Driver tab and tap on the Driver Details. If you notice that there is storahci.sys in the list, this means that you are running the inbox driver.
Step 2: Disable MSI for the Controller in the Registry
- In the Standard SATA AHCI Controller, and shift to the Details tab. Then, click on the Device instance path option.
- Now, open the Run box and type regedit and select the Ok button.
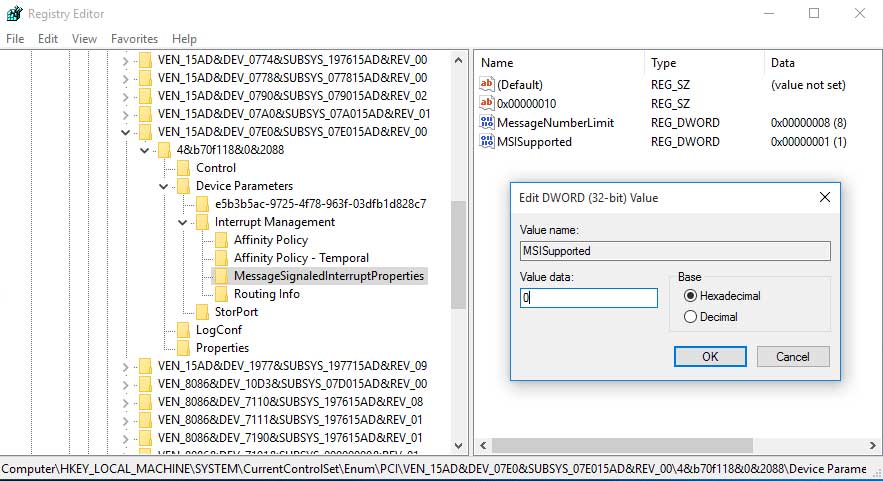
- Now, hover to the: “HKEY_LOCAL_MACHINE\System\CurrentControlSet\Enum\PCI\<AHCI Controller>\Device Parameters\Interrupt Management\MessageSignaledInterruptProperties”,
- After that, modify the MSISupported key value from 1 to 0. Then, reboot your system to make the changes.
Fix 4: Disable Windows Search
There are two methods of doing so. So, let’s look at those steps:
Method 1: Temporarily Disable Windows Search
- Firstly, open the command prompt with admin rights and permits its user account control.
- Now, type net.exe stop “Windows search”, and press the Enter button.
Method 2: Permanently Disable Windows Search
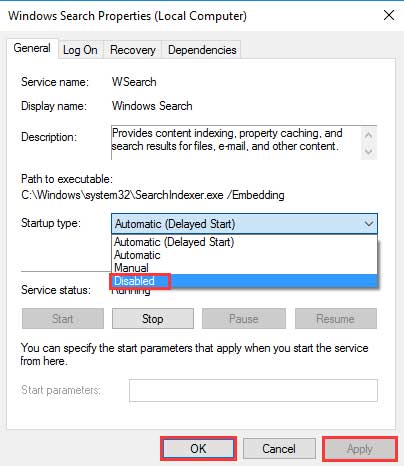
- Open Run box and use services.msc in the Run box text field and press Enter.
- Now, find the Windows Search option from the list and double-click on it. This will hover you towards the Properties window.
- After that, hit the Disabled button and select Apply option. Now, save the settings by simply clicking on the OK button.
Fix 5: Disable SuperFetch Service
It is another effective fix that you must try. SuperFetch services generally decrease your system’s load time. But, sometimes it may also be caused this kind of issue. So, it is better to try disabling it and then checking if the 100% disk usage error disappears. Here are the steps to disable it on your Windows PC:
- Hit the Win+X keys simultaneously, then from the pop-up menu, select the Command Prompt (Admin) and give it permission of users to control
- After that, use the command net.exe stop superfetch inside the cmd window and press the enter key.
Fix 6: Change Settings in Google Chrome and Skype
Many users reported that they fixed the 100% disk usage error on their Windows PC by doing this. So, you can also try this out. Who knows that this may fix your problem. Here are steps to do so:
For Google Chrome:
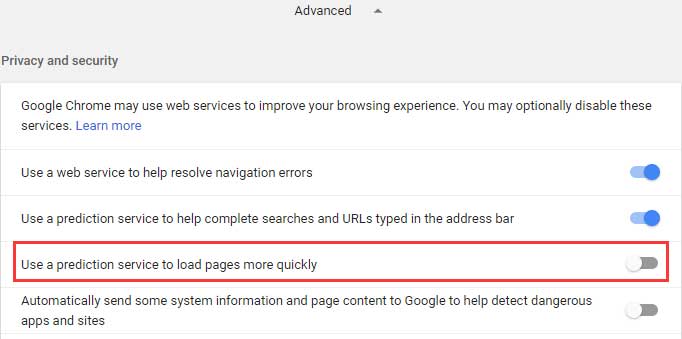
- Open Google Chrome on your PC and hover to the Settings.
- Now, locate and click on the Advanced button.
- After that, go to the Privacy and Security tab. Now, turned off the option “Use a prediction service to load pages more quickly.” Also, make sure that the Continue running background apps when Google Chrome is closed turned off. If not, then you can turn it off from System settings.
For Skype:
- First of all, close your Skype application using task manager.
- Now, launch the Windows Explorer and hove to the C:\Program Files (x86)\Skype\Phone\.
- Then, right-click on Skype.exe and click on the Properties from the drop-down menu. Then, shift to the Security tab and click on the Edit button.
- Then, select the ALL APPLICATION PACKAGES and checkmark the box located in front of the Write. Now, click on Apply followed by OK to save the changes you’ve made.

Also Read: How to Enable Hibernation Feature in Windows 11
Fix 7: Disable Antivirus Software
Yeah! I know you might be thinking that doing this, your PC is at risk of malware attack. But, I’m not telling you to disabled it permanently. Yes, you can disable it for a while in order to check if the Antivirus is the main culprit for this 100% disk usage error. However, if you find that this does not have any role behind this error, you can enable it thereafter. This is a simple procedure. You just need to open your Antivirus and toggle the button located in front of the Real-time protection option. That’s it. After that, open the task manager and check if it is now showing a 100% disk usage error or not.
Fix 8: Uninstall Flash Player Updates
Many players find this a helpful fix for the particular mentioned error. So, you may also try this. Sometimes, the flash player driver update contains several fixed bugs by rolling out another update. Therefore, it might be possible that the recent update contains some temporary bugs or glitches.
Anyway, if you want to uninstall your flash player update, so, first of all, go to the Windows Settings. Then, select the Update & Security option. After that, click on the Windows Update, followed by Advanced Options. Now, simply select the View your update history and hit the Uninstall updates button. Then, it will uninstall the flash player updates.
Fix 9: Reset Virtual Memory
- Use the Win+Pause/Break keys to open the System information. After that, select the Advanced system settings option from the system information window.
- Now, head towards the Advanced tab, and select the Settings options.
- Then click on the Advanced tab, and in the virtual menu section, select the Change option.
- Now, uncheck the box located in front of Automatically manage paging file size for all drives. After that, select your system drive and change the Initial size and Maximum size of your virtual memory.
- Once done, hit the Set button and to proceed further, click on the OK button.
- Now, remove all temporary cache data from your Windows PC using the Run box.
Fix 10: Disable Windows Update Service
If you still face the 100% disk usage error, then I recommend you disable your automatic Windows update service. This will help you to choose which update you want to install on your PC to save your disk space. Although this looks so weird, still many users find this method very useful. So, you may also try this once.
Fix 11: Perform a Disk Check
This is the best option to find out which file or folder causes the issue. You can use a third-party disk checkup software easily available Google. You just need to do is, simply download and install it on your PC. After that, launch it and perform a full disk checkup. In the free version, you may not get the full disk checkup option. But, yeah! You will get the quick disk check option in the free version, so instead, you can use this.
So, these were some methods to fix out the 100% disk usage error on your Windows PC. I hope this guide helped you. Further, if you have any doubt regarding today’s topic, feel free to ask us in the comment section.

Something is definitely missing..
(a) Resolve PCI-Express Firmware Bug :- you have not indicated what to do with the copied text about the driver properties.
(b) Disable Diagnostic Tracking in windows 10 :- the cmd command (sc config “DiagTrack” start= disab sc stop “DiagTrack”) when applied it throws error