Diablo 4 is one of the highly anticipated action role-playing video games by Blizzard Entertainment that has gone so far in the gaming community and gained so much appreciation. Though this title is doing really well and has been rated quite positively across the world, it does have some bugs or errors just like other games. Meanwhile, some players have encountered the Diablo 4 access violation c0000005 error on their PC whenever trying to launch the game.
It mostly occurs due to a corrupted or missing game file, background running programs, not granting permissions to run the application, security protection blocking, conflicts with the graphics driver, issues with the disk drive, running the game in windowed mode, and more. The chances are high that you’re also encountering the “Unhandled Exception: Access_Violation (C0000005)” error at your end and it basically prevents you to get into the Diablo IV game on the Windows PC.
Also Read

Page Contents
How to Fix Diablo 4 Access Violation C0000005 Error
Luckily, here we’ve shared with you a couple of possible workarounds that should come in handy. Make sure to follow all methods one by one until the problem gets fixed completely. So, without further ado, let’s jump into it.
1. Reboot the PC
First of all, you can do is simply reboot the PC to ensure there is no issue with the temporary glitch on the system or cache data whatsoever. In some cases, a normal restart of the system might come in handy to fix several issues and errors.
2. Update Diablo IV
We should also recommend you check the game update manually via the Battle.net client to avoid potential glitches that can come with the outdated game version. An outdated game patch version mostly triggers bugs or stability issues which can be fixed by following the steps below.
- Open the Battle.net launcher > Click on the Blizzard logo from the top left corner.
- Go to Settings > Click on Game Install/Update.
- Scroll down to the bottom > Click on Apply latest updates and download future patch data for recently played games to enable it.
- Next, click on Done to save changes > Restart the Battle.net launcher to apply changes.
- It’ll update the game to the available version automatically.
3. Repair the Game Files
Sometimes missing or corrupted game files might trigger several issues that can occur game launching conflicts. You can follow the steps below to verify and repair the installed game files on the PC.
- Open the Battle.net client on your PC.
- Click on the Diablo IV game > Click on OPTIONS (Gear icon).
- Next, click on Scan and Repair > Click on Begin Scan.
- Wait for the verification process to complete.
- Once done, close the Battle.net launcher, and restart your PC.
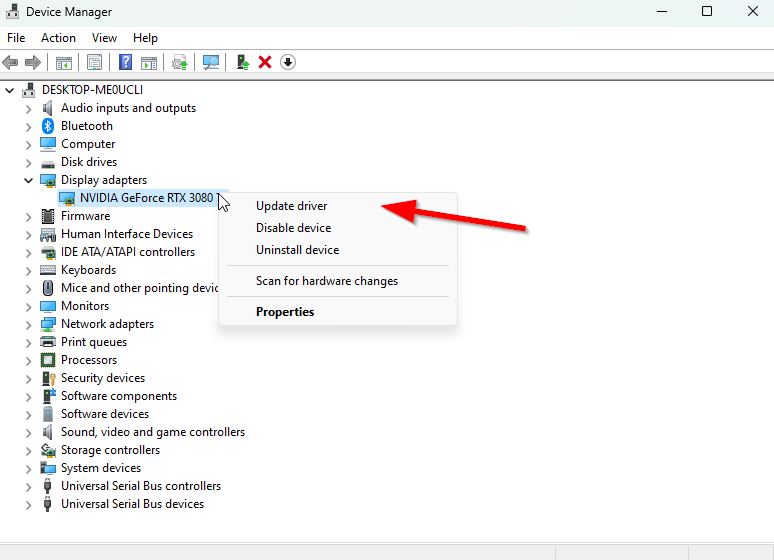
4. Update Graphics Drivers
Checking for the graphics driver update on the PC is highly recommended by following the steps below. By doing so, you’ll be able to install the latest update, which will fix several graphical issues with the program. To do so:
- Right-click on the Start Menu to open the Quick Link Menu.
- Click on Device Manager from the list to open it.
- Double-click on Display adapters to expand it.

- Right-click on the dedicated graphics card that you’re using.
- Click on Update driver > Choose Search automatically for drivers.
- The system will automatically check for the available update.
- If an update is available, it’ll automatically download and install the latest version.
- Once done, ensure to restart your PC to apply the changes.
If there is no update available on the PC then make sure to visit the official manufacturer website of the graphics card and manually grab the latest version. Search for the particular graphics card model by the following links.
5. Disable Windows Firewall or Antivirus
The chances are high enough that maybe your default Windows Defender Firewall protection or any third-party antivirus program is preventing the ongoing connections or game files to run properly. So, make sure to temporarily disable or turn off the real-time protection and firewall protection.
- Click on the Start Menu > Type firewall.
- Select Windows Defender Firewall from the search result.
- Now, click on Turn Windows Defender Firewall on or off from the left pane.
- A new page will open > Select the Turn off Windows Defender Firewall (not recommended) option for both the Private & Public Network Settings.
- Once selected, click on OK to save changes.
- Finally, restart your computer.
You have to turn off the Windows Security protection too. Just follow the steps below:
- Press the Win+I keys to open Windows Settings.
- Now, click on Update & Security > Click on Windows Security from the left pane.
- Click on the Open Windows Security button.
- Go to Virus & threat protection > Click on Manage Settings.
- Just Turn Off the Real-time protection option.
- If prompted, click on Yes to proceed further.
6. Close the Background Running Tasks
Another thing you can do is simply close unnecessary background tasks on your PC to ensure there is no additional consumption of system resources happening in the background whatsoever. To clear out background tasks:
- Press the Ctrl+Shift+Esc keys to open Task Manager.
- Click on the Processes tab > Select the task that you want to close.
- Once selected, click on End Task.
- Make sure to do the steps for each task individually.
- Once done, restart your PC to change the effects immediately.
7. Use the Fullscreen Display Mode
Multiple reports are claiming that running the Diablo IV game in fullscreen display mode is quite helpful to some players. You should also try that out by following the steps below.
- Launch Diablo 4 via Battle.net.
- Go to the game’s Options menu.
- Search for Display Mode and select Fullscreen.
- Make sure to apply changes and relaunch the game to check for errors.
8. Run Disk Scan and Disk Defragment
Running the disk scan and disk defragment can eventually increase the lifespan of the hard disk and keep the system file management performing well enough. Make sure to close all foreground running applications and then follow the steps below to run disk scanning or defragment.
For Disk Scan:
- Open the Start menu > Go to File Explorer.
- Right-click on the particular hard drive that you want to scan. For instance, C:/ drive.
- Then select Properties > Select the Tools tab.
- Click on Check and wait for it to complete.
For Defragment:
Do not perform disk defragmentation on SSDs (Solid State Drives). If you aren’t sure what type of disk drive you have, check your PC specifications first.
- Open the Start menu > Go to File Explorer.
- Right-click on the hard drive that you want to defrag.
- Select Properties > Click on the Tools tab.
- Click on Optimize > Select the specific drive or volume.
- Click on Optimize and confirm the task.
- Once done, reboot the PC.
That’s it, guys. We assume this guide was helpful to you. For further queries, you can comment below.
