In this guide, we will show you the steps to flash the stock firmware on your device using SP Flash Tool. Nowadays, devices with MediaTek chipset are on the rise. With many Redmi devices also boasting of this chipset, its userbase is constantly upscaling the charts. Along the same lines, these devices are also quite an active player in custom development. Due to Android being open source in nature, you could carry out a plethora of tweaks and customizations onto your device. These include the likes of custom ROMs, custom recovery such as TWRP, and tons of other mods.
Likewise, you could even gain access to the system partition by rooting it via Magisk. This would allow you to flash Magisk Modules, Xposed Frameworks, and other related mods. However, these tweaks might bring in some risks as well. If you flash an incorrect binary or messes up with the instructions, then your device might end up in a boot loop or bricked state. But even if that happens, you could easily bring the device back to normal working condition by flashing the stock firmware using SP Flash Tool. And in this guide, we will show you how to do just that. So without further ado, let’s get started.
Page Contents
What is SP Flash Tool?
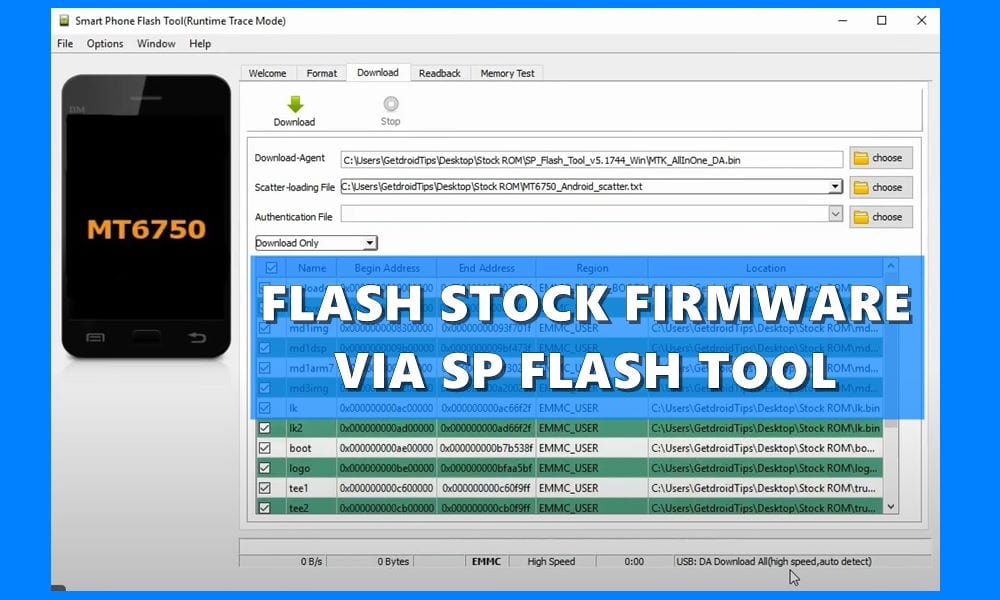
SP Flash Tool is software that has been designed specifically for MediaTek devices. It beholds quite a few useful features, the most important of which involves flashing the stock firmware. So if your device gets bricked or you aren’t getting the OTA updates, then you could manually flash the ROM using this tool. Along the same lines, you could also carry out a Memory Test of your device. This will help you to verify the status of external memory devices.
Likewise, there is also a Parameter Setting that will help you to read or write the OTP parameter. Then there is also an option to perform a factory reset on your device. While you could do the same right from your device, but it requires way too much effort. Whereas this tool has completely streamlined the process and just requires a single mouse click to carry out the desired task. With that said, let’s start off with the guide to flash the stock firmware on your device using SP Flash Tool.
How to Flash Stock Firmware Using SP Flash Tool
The below instructions have been laid down into separate sections for ease of understanding. Follow along in the exact same sequence as mentioned.
STEP 1: Backup your Data | Charge your Device
First and foremost, it is recommended to take a complete device backup. Along the same lines, you should keep the device sufficiently charged, at least 50% is the recommended level so that it doesn’t turn off midway during the process.
STEP 2: Install the Required Drivers
There are a couple of drivers that you need to install as well. The first one is the Android USB Drivers that will help your PC in identifying your device. Next up, is the MediaTek Drivers that will make it possible for the tool to interact with your Mediatek chipset device. So get hold of both the drivers from the below link:
- Download: Android USB Drivers | MediaTek Drivers
STEP 3: Install the SP Flash Tool
It’s now time to install the SP Flash Tool through which you flash the stock firmware on your device. So download the tool from the below link and extract it to any convenient location on your PC.
- Download: SP Flash Tool for Windows and Linux
STEP 4: Download Stock ROM for your Device
Next up, download the stock ROM for your device. You could browse through our comprehensive collection of stock firmware and download the one for your device. Or you could also check with your device’s manufacturer if they have uploaded the official ROM on their website. Anyways, once you have downloaded the ROM, extract it inside the same folder where you have installed the SP Flash Tool.
STEP 5: Flash Stock Firmware Using SP Flash Tool
Now that we are done with all the requirements, we could start off with the steps to flash the stock firmware using the SP Flash Tool. Follow along for the detailed instructions.
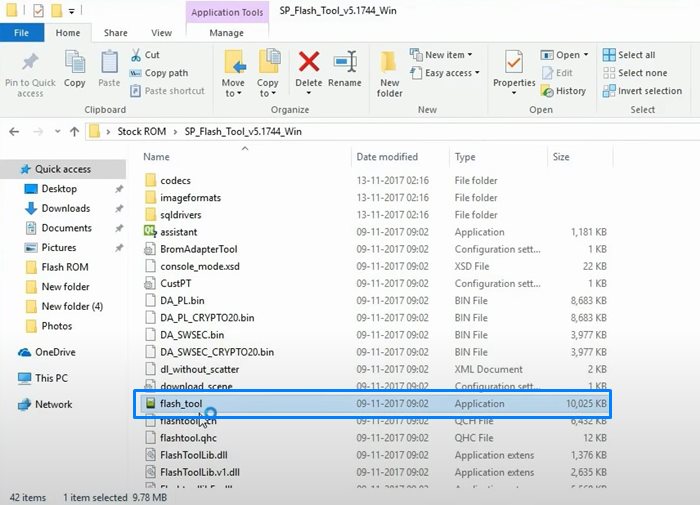
- Head over to the folder where you have extracted the SP Flash Tool and double click on the flash_tool.exe file to launch it.
- Then click on the Choose button next to the Scatter Loading File section.
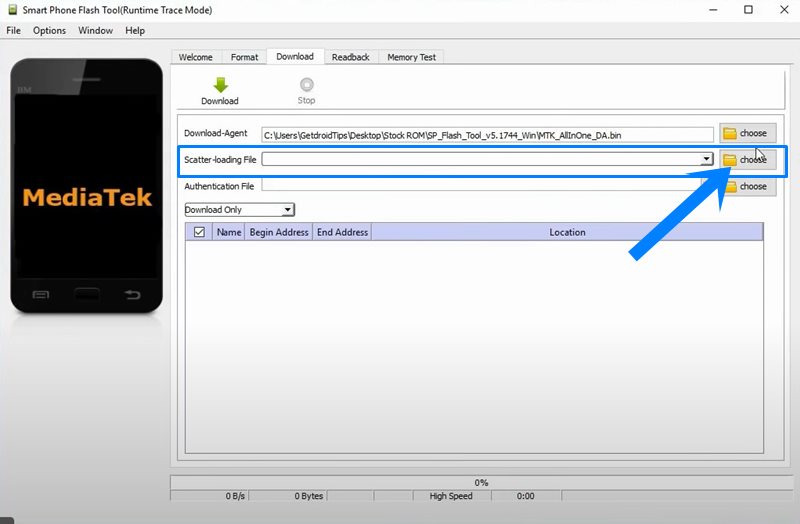
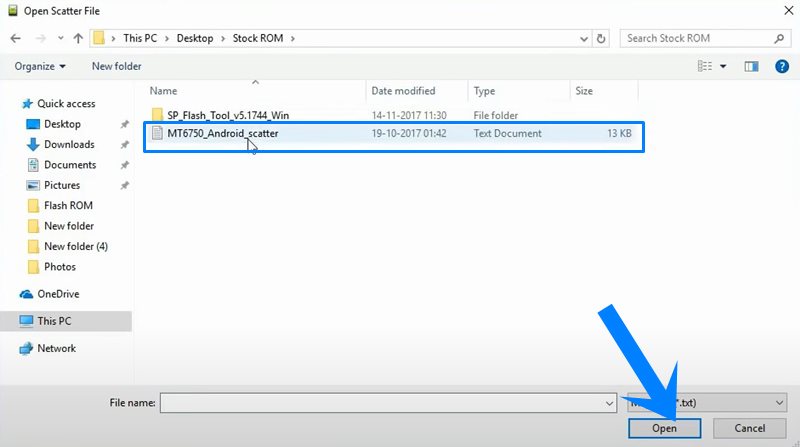
- Browse to the downloaded stock ROM, select the Scatter file, and click Open.
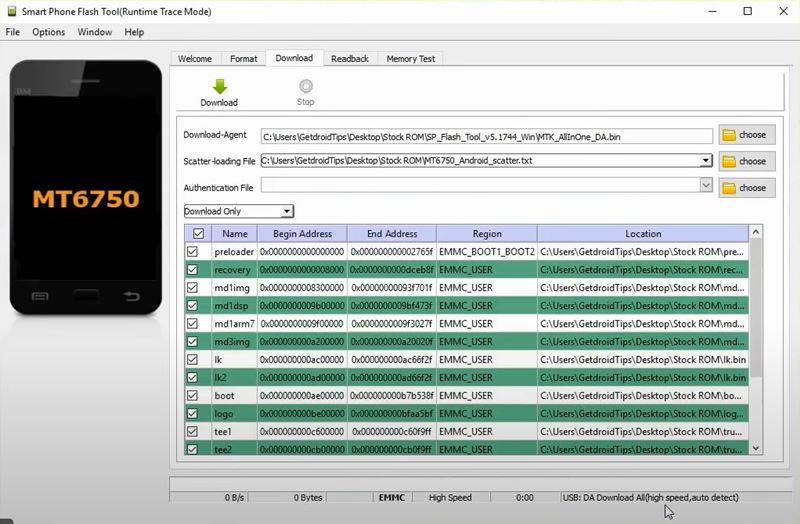
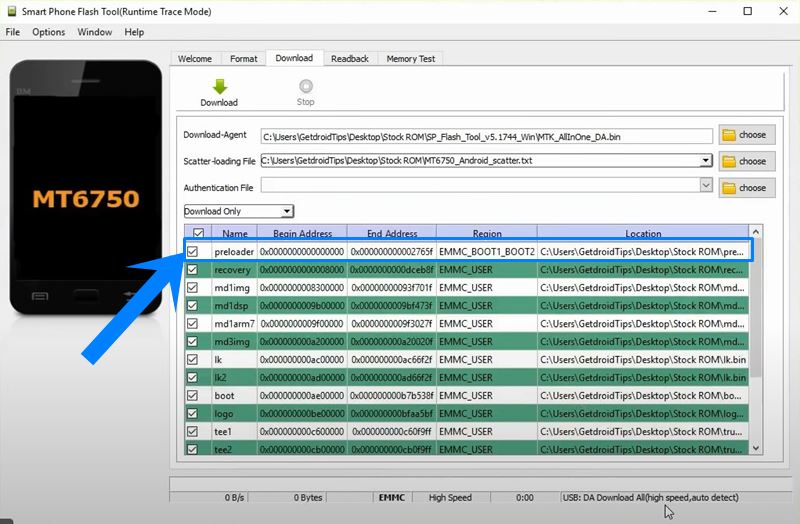
- The tool will now start loading all the stock firmware files. Once that is done, it is recommended to untick the Preloader option. This is because flashing the preloader.bin file might lead to a few issues.
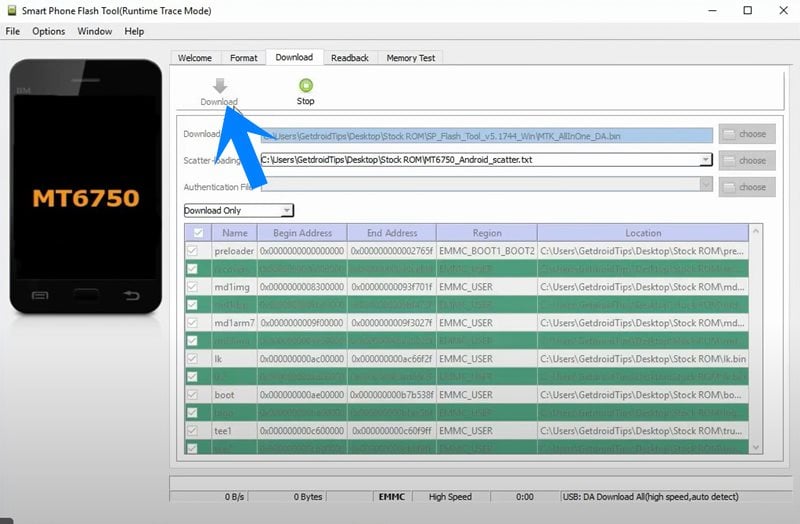
- Once that is done, click on the Download button of the SP Flash Tool. The entire interface should now be greyed out, as shown in the image.
- Now power off your device. Press and hold the Volume Up and Down buttons together and connect it to the PC via USB cable.
- As soon as you connect the device to the PC, the tool will recognize your device and the flashing will begin automatically.
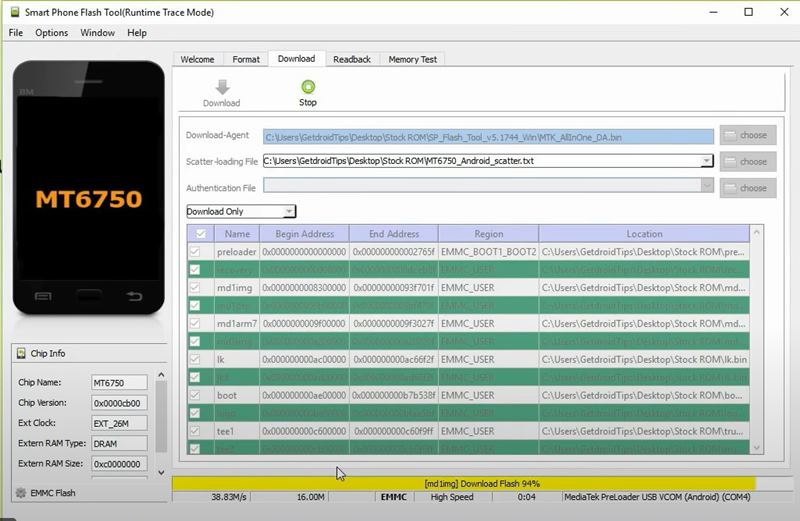
- You could keep a track of the same using the progress bar situated at the bottom.
- Once the process is complete, you will get the Download OK message, signifying that the process has been completed successfully.
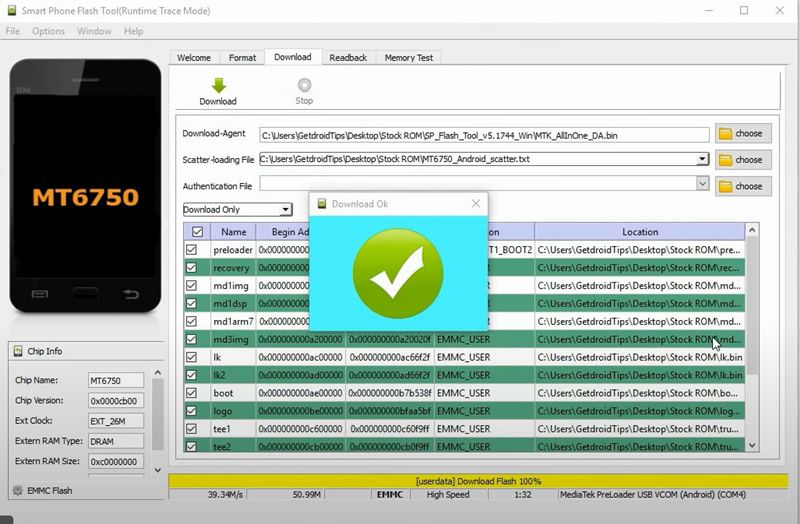
- You may now close the tool and unplug the device from the PC.
- Finally, reboot your device using the Power key and it should boot to the OS.
You can watch the complete video tutorial for the same.
That’s it. These were the steps to flash the stock firmware using the SP Flash Tool. If you have any queries concerning the aforementioned steps, do let us know in the comments section below. Rounding off, here are some iPhone Tips and Tricks, PC tips and tricks, and Android Tips and Tricks that deserve your attention as well.

it doesn’t do anything.
i followed ALL the steps in order here.
loads the files from the txt file.
when you remove and reinstall battery then press both volume up and down simultaneously
the only thing that happens is the phone enters factory test mode.
absolutely does not work.
why? also the instructions could be a bit more clear if this is going to be the case.
Will soon make a video for those who are little worried…..
Hey Seika, this happened to me too. Just seen your post so I hope you’ve sorted it by now. If not, there’s a crucial step missing. Before clicking DOWNLOAD, choose FIRMWARE UPLOAD from the menu on the bottom left of the file screen you see that still says ‘download only’. Otherwise, the phone goes into factory test mode.
Then connect your phone. It remains dark. You’ll see the yellow bar at the bottom of the SP flash tool start to fill up. When the flash is complete, it will give you the Download OK symbol.
It worked beautifully for me. Hope it works for you.
Thanks for sorting out… I’ll add that step.
Dear Razaaq, I tried this on UMI DiGi S2, and I recieved the error saying “Chipset Mismatch” Can you help me out regarding what actually went wrong?
your ROM is incorrect for your mobile phone chipset type, mtk65xx or mtk67xx etc are they the same as your mobile phone chipset type as the one on the ROM
Thanks a lot for the help. You like visitors make these like websites beautified…. Good luck!
nthng happed only phone start in factory mode pls help
No drivers installed
we nmms explica mas bien si kieres hacer un tutorial we
It helped resurrect my bricked oukitel u17 plus smartphone. Thanks a lot
I used the SP_Flash_Tool_v5.1632_Win with the ROM GF20_HT3Pro_V1.0.9_user_20160420-17_38_40. The flash run successefully but when I try to restart the phone it does not work ! The phone stay off. Could you help me to solve the issue ?
Regards
Dude, you forgot a crucial step. Before clicking DOWNLOAD, choose FIRMWARE UPLOAD from the menu on the bottom left of the file screen you see that still says ‘download only’. Otherwise, the phone goes into factory test mode.
Then connect your phone. It remains dark. You’ll see the yellow bar at the bottom of the SP flash tool start to fill up. When the flash is complete, it will give you the Download OK symbol.
It works beautifully.
Hey Guys, for Vernee Apollo:
Hold only volume down for start device in SP Flash tool
Intex aqua 5.5 how to root no PC
please stock firmware …
??
Brow how to repair NAND Flash not detect in lenovo P70. because my Lenovo say like that….I’m confused. HELP me Please
I can’t find the scatter loading file when I try to do it with ULEFONE POWER 3S.
It contain inside the Stock ROM image
Hi, I did FIRMWARE UPLOAD ( download MT6xxx_Android_scatter.txt file) for my K5 note Lenovo .
I did not read first the nvdata and the nvram form the cellular. Now I can not use the cellular for sendingqreceiving calls and messages. only the internet qdata is working. Also get message invalid IMEI.
cAN YOU HELP?
Anyone can guide me thru it please? I am doing as the instructions above , also pressing firmware upgrade before pressing download but nothing is happening , the phone is remaining black / off . would appreciate your help.
Thanks in advance.
Hello I am doing exactly the same as the instructions above, Also pressing Firmware Upgrade before hitting Download button but nothing is happening, the phone remains switched off / black screen. Would really appreciate someone’s help. Thanks in advance.
Which is your phone ? Which version currently running ?
H! I’m having the same problem. Although the only thing I have not done is removing my battery because the cover is screwed, and I’m not sure if I can remove it without deforming the screws. My phone is Vivo V5 Lite. I’ve tried Download Only, Firmware Upgrade and Download+Format All. Nothing happens when I connect my phone, no matter how long I press the up and down button.
Many thanks for the article!
You saved my cell phone.
Worked for me (once I changed the drop-down menu selection from “Download Only” to “Format All + Download”)
Thanks a bunch! =]
Worked for me – once I changed the drop-down menu selection from “Download Only” to “Format All + Download”.
Thanks a bunch! =]
descargué el stock room que recomendaron pero no encuentro el archivo MT6xxx_Android_scatter.txt
El Stock Rom es del modelo VeryKool s4009 Crystal
Hi. I have a verykool s4009 and the file mt65xx_android_scatter.txt does not appear in the stock room. Help
Hi,
I was able to install the stock ROM of my phone. The Flash tool said: Invalid ROM, so I choose “Format all + Download” option.
It went to 100%, I started up the phone, and it was the same as when I bought it 4 years ago. My problem was with the phone that it started to be very laggy, and it seems it lags only with stock ROM. (I don’t know what would it be with a custom ROM because I couldn’t install any of them only one which was for an another phone, so things were buggy).
The stock ROM restored my IMEI numbers as expected.
hi i downloaded the sp tool but ithe file there is no MT6xxx_Android_scatter.txt in the extracted folder my fone is oukitel k3 thanks where can i find the scatter file
In ROM zip the scatter file should be there..
Great job there !
Easy steps .. All went perfectly !
Thank you.
Hey bro realme3 rmx1825 firmware is not downloading please give any other link to download scatter firmware.
followed tutorial everything went fine put my sim card in and it says invalid IMIE I’m from uk will not connect to my virgin mobile provider!!! help?
after that , i can’t make or receive calls , whatever the number i call , it give call ended :( , any help !
Which phone and which link you came for…?
yu yunicron
FRIEND I HAD A PERSONALIZED ROOM AND DID THE FLASH AS DESCRIBED IN THE TUTORIAL AND NOW I CAN NOT GET AND RECEIVE NO CONNECTIONS FROM MY PHONE CAN HELP? MY SMARTPHONE IS A DOOGEE T6 PRO
thank you sir!!!!!! saved my soft bricked phone
how can i update my yu yunocron mobile to andride 7
FRIEND I HAD A PERSONALIZED ROOM AND DID THE FLASH AS DESCRIBED IN THE TUTORIAL AND NOW I CAN NOT GET AND RECEIVE NO CONNECTIONS FROM MY PHONE CAN HELP? MY SMARTPHONE IS A DOOGEE T6 PRO HELP PLEASE
Thank you for this topic.
I finished the flashing by following all the points mentioned until the green OK button.
I restart my phone now and it hangs on “Experience SmartLife Now” (just after the TECNO and Android logo)
What should I do ?
thanks for your advices
thanks it worked but booting is slow
Thanks a Lot man….
It perfectly worked .
Hi. What happens is that the room of the verykool s4009 does not appear anywhere on the file mt65xx scatter.txt. Somebody could help me? Thank you
I cant find the MT6xxx_Android_scatter.txt file !
this is a basic for people
you should up to error in sp flash tool
Thank you very much for the information!
It worked for me.
People, don’t forget to change the drop-down menu selection from “Download Only” to “Format All + Download”
worked on Lenovo phab 2 plus but doesn’t recognize a sim card now and i can not click the sim card slider it is greyed out. Any Help on this?
Thanks
Jon
Works perfectly. Thanks a lot.
Welcome!!!
Thank You nice to see my phone working with new system
hi i have a problem, i did all step by step but now my phone dont work, when i turn on, appear the logo and later a few line of pixel, what can i do?
Thank you man, you just saved my life!!!
From now on you are my hero Abd Razaaq! Thank you very much.
I followed all the steps, but when I click on “Dowload” nothing happens, no reboot program starts. What is the problem? help me please
Thanks for this piece ABD RAZAAQ. I used the firmware upload as suggested. Worked flawlessly.
Hi. I flashed my Oukitel c8 4g, but the problem hasn’t been solved. It freezes and restarts but gets stuck on the screen showing the company name. Plz help.
Please help me, I am using tecno c7, anytime I try to flash this is the feedback i get
(BROM ERROR SFT ENABLE DRAM FAIL (40320
{EMI} Enable Dram Failed
{HINT}
Please check your load matches to your target which is to be downloaded.
Hi,
I have a problem were the “system” image file is not selected in SP Tools so i try to select it manually but wen it finishes procesing it says:”Please check the load image file is correct or not?”
worked for me, hours of research and i finally found something that worked
Hi i just used your method for my BLU Studio X8 HD it formatted and everything just fine but it hasn’t actually downloaded the flash and it’s been 20 minutes
Watch the video for how to flash.
Works perfectly with Firmware upgrade option!! Million stars for you. Thank you!!
U200 does not work just keeps running in the interface
exelente amigo es genial
Thanks,
I bricked my p98-4G A8H9, and struggled for months,trying to find the firmware to flash. :-
The flash tool ,and some others ,would not recognize the scatter file, I moved the scatter file and associated files into the flash-tool folder it then recognized the scatter file and loaded into the flash-tool as it should.
I then tried twice to flash the device ,the second time it worked ,but took longer than usuall
I have flashed TWRP, with flash-tool on other devices , do you know if it will work with this one.
Thank You again , it almost went in the trash.
Brother, our guide works 100%. We already shared the complete video on how to install the firmware. We can help you if you tell your device model name, brand and the firmware link from where you exactly found it. You may have installed the wrong file or inserted wrong scatter text. Let us know clearly!
Hello sir ABD RAZAAQ! Please help me i download stock rom for my oppo f7 i have to extract but it required password. My downloaded files name is CPH1819EX_11_A.14_OTA_0140_all_201805230117. please help me sir. Thankyousomuch!
I follow the whole process as you said and everything go well but my hisense U989 phone is stuck at boot-load. Only the screen is on but no sign of a logo or anything. Phone is just turning on off by it self.
Watch this video…
Excellent! Works perfectly fine!
Thank you.
thanks for the good and easy to follow intructions. i managed to repair my phone with 100% success
Olá, me ajuda por favor, no download do firmware não encontro o arquivo MT6xxx_Android_scatter.txt. Por favor me ajude
PASS PLEASE
This was so helpful. Great work. Thx. Keep it up!
I think most of the people in comments facing the Problem regarding SP Flash Tool not working is because of the Drivers not installed correctly. I am facing the same issue. Please make a Separate video on that as well.
You can comment on your respective ROM article. This article is about the installation using SP Flash tool. I can only guide you if I know your device model, ROM link, etc.
Please I have umidigi A3 that goes on and off always and also shows apps stopped. Please help me out with how to work on it. Thanks
Thank you so much bro. Followed the guide and flashed stock firmware which fixed the problem I was having.
Question, where can I download different firmware versions for Blu Life One X (2016)? Just official firmwares only.
After I flashed to stock firmware, I tried OTA update but I think Blu took down all OTA updates for this phone since it’s old so it tells me I am on newest version (which I know is false because I know Blu released Android 6.0 for this phone while stock firmware is 5.1).
Thanks again
I have the same problem. I did the procedure on my Vernee M5, and now putting the ota update downloaded from the manufacturer’s website at the root of the memory, the phone starts to install but when it restarts before boot it says the file is corrupt, so it restarts normally in stock version. Already if I seek update by mobile phone it also indicates to be the latest even being stock.
Helo thanks for this great tutorial but when i clic dowload i receive the message which asking the valid authentification .Please help me with AUTHENTICATION CERTIFICATE TO FLASH infinix x626
your stock rom file is corrupted for realme 3 stockrom
Thanks, bro. It works, You made my day man
This firmware works for Tecno P701, and it really working
Worked like a charm in my Tecno C7
He knows nothing about computers , what a joke. Nothing works
Had a stock Rom and your guide helped me port back to stock rom.
Thanks
Hi,
thanks for the description.
Unfortunately it works not with my Vernee M8Pro as I get this error:
ERROR: STATUS_BROM_CMD_STARTCMD_FAIL (0xC0060001)
Can you help, please?
Thanks
Been trying and found that the Vol+ and Vol- button needs to be released at the right moment for it to stay alive in Device Manager. Only if the MTK USB port is there can the SP Flash tool work.
Loading 17% at this very moment.
Thank you to the page contributor for the files, the tip and the detailed steps.
Ich dachte, das wäre es gewesen mit meinem neuen Handy. ABER – funktioniert wieder!!!!
Vielen Dank!!!!! Grüße aus Deutschland.
*****
It says status brom cmd fail ..please help
It works for my TWZ U21, but I found that the back camera doesn’t work. Can you help me? Thanks.
i need Android_scatter for realme u1
q mobile m6 flash file password need ?
i need q mobile m6 rar file password
I receive an error message after a timeout:
ERROR: STATUS_DEVICE_CTRL_EXCEPTION (0xC0050001)
It worked after messing about a bit. It’s the scatter text file not the scatter xml file. I found you have to release volume +/- almost instantly after the usb is connected and the Win usb com driver recognizes the connection.
In ROM zip the scatter file should be there..
Good day. I’ve tried this over several times but in stuck at it asking me for authentication file which I have no idea about. Please I need an urgent response asap. Thanks