Backing up the data available on your Mac is one of the important things that you should do if you have important files on your devices. And for that, there is a built-in backing up tool called the Time Machine that allows the Mac users to backup their data and restore it when required. You can automatically backup all your system files and other data including apps, music, photos, email, documents, etc. And to create a Time Machine backup, all you need is an external hard disk. Moreover, if you are looking for ways to set up tie machine backup on your Mac then you are at the right place.
As in this post, we will guide you on how setup Time Machine on your Mac and backup all your data pretty easily via simple steps as well as how to restore the backup from the Time Machine backup. This helps you to restore the data in case your data is erased or you have deleted Mac. So, without any further ado, let us get straight into the article itself:
Also Read
FIX: Crunchyroll Black Screen When Streaming
Fix: macOS Ventura WiFi Not Working Issue
Fix: macOS Monterey Not Connecting to WiFi
Continuity Camera Not Working After macOS update, How to Fix?
Fix: Cannot Change Folder Background Color in Mac (macOS Ventura)
Fix: SanDisk Extreme Pro SSD Not Recognized or Detected on macOS
Page Contents
How To Setup Time Machine Backup and Restore Files From it on Mac
Below are the steps to Enable as well as how to restore your data back to your Mac by using Time Machine.
Instructions
Enable Time Machine
- Go to System Preferences>>Time Machine icon from the Apple Menu.
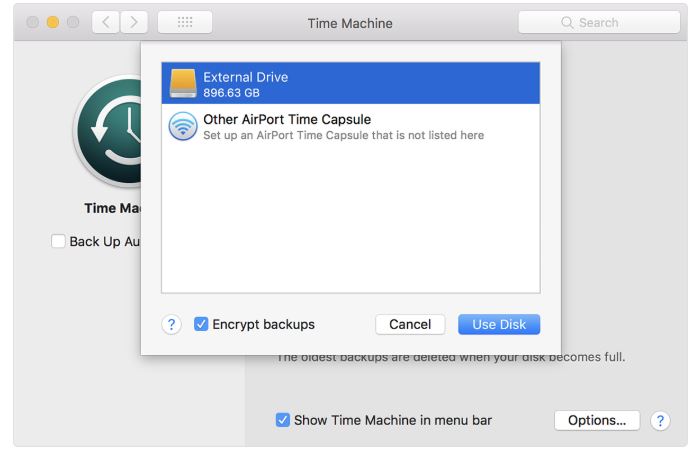
- Tap on Select Backup Disk.

- Now you need to select the disk where you wish to create a Time Machine backup.

- Tap on the Back Up Automatically box.
- That’s it!
Restore Files from Time Machine Backup
- Go to System Preferences>>Time Machine icon from the Apple Menu.
- Tap on the Show Time Machine situated at the Menu bar.
- Click the Time Machine icon and hit Enter Time Machine.
- Tap on the file or folder that you want to restore and click on the Restore button.
- That’s it!
So, there you have it from my side in this post. Hope you guys liked this post and were able to successfully create a backup using the backup utility on your MacOS. Let us know in the comments below if you come across any issues while following the above-mentioned methods. Until the next post…Cheers!

