Thousands have complained that the Crunchyroll screen goes black when streaming content in the browser. Viewers are playing the video content in Firefox, Chrome, Safari, Opera, and other browsers. The subtitles appear in the video player, but the screen remains black. It’s a common problem that affects Linux, Android, macOS, Windows, and iOS devices.
Also Read
Fix: Crunchyroll Buffering Issues
PS5 Crunchyroll Crashing, Freezing, or Not Working, How to Fix?
Fix: Crunchyroll Not Playing Videos on PS4, PS5, and Xbox One, Series S/X
FIX: Crunchyroll Not Working on PS4 PS5 or Xbox Consoles
Fix: Crunchyroll Login Something Went Wrong Error
Fix: Crunchyroll Not Loading Properly
Fix: Crunchyroll Not Working With VPN

Page Contents
Why does the Crunchyroll screen go black when streaming content?
OTT content consumption has increased in the past two years, and the demand has spiked tremendously. Piracy is a serious social issue for music production houses and movie productions. Many independent and smaller artists are fighting against piracy daily, and OTT platforms are taking action to prevent it from happening.
We have to consider multiple aspects when resolving the Crunchyroll black screen in the browser. Let me give you a few valid reasons why Crunchyroll is not viewing the content in the browser video player.
a. The default browser accumulates saved form data over the period, and it causes the problem.
b. The browser algorithm is engineered to take advantage of the CPU, GPU, and RAM resources for an immersive experience. Unfortunately, the browser acceleration algorithm messes up when streaming video/audio content.
c. Websites have internal bugs and glitches that cause the Crunchyroll black screen issue.
d. Poor network connection is another culprit, so connect the machine to a Wi-Fi network, and it shouldn’t have any bandwidth limitations.
e. Almost every user has one add-on installed in the browser, and I’m running two extensions in Firefox. The browser extensions clash with the website algorithm, and they collide in the battle that leads to the video player issue.
We have addressed the problem in the form of solutions. You don’t need additional third-party tools to fix them. Apply the methods in order, and it counters multiple issues in one go.
FIX: Crunchyroll Black Screen When Streaming
The black screen issue mostly happens in desktop-class Chrome and Firefox browsers. Of course, you can try the mentioned solutions in the mobile-class browsers, and it may resolve the issue. I have selected Chrome and Firefox since they are the two most popular browsers in the segment.
Disable Hardware Acceleration
Modern browsers have integrated hardware acceleration in the software, so they can offer an immersive experience. Websites have gotten heavier and they have started offering multiple products, services, and tools online.
It’s a challenge for the browser to run the web-based tools movies, shows, images, audio content, and more. The algorithm utilizes CPU, GPU, and RAM to load the heavy files in the piece of software and give you an immersive experience.
You can disable Hardware Acceleration in the default browser, and let me show you the way.
Chrome:
1. Open Chrome.
2. Copy and paste the (chrome://settings/) command in the clipboard then press the Enter key.
![]()
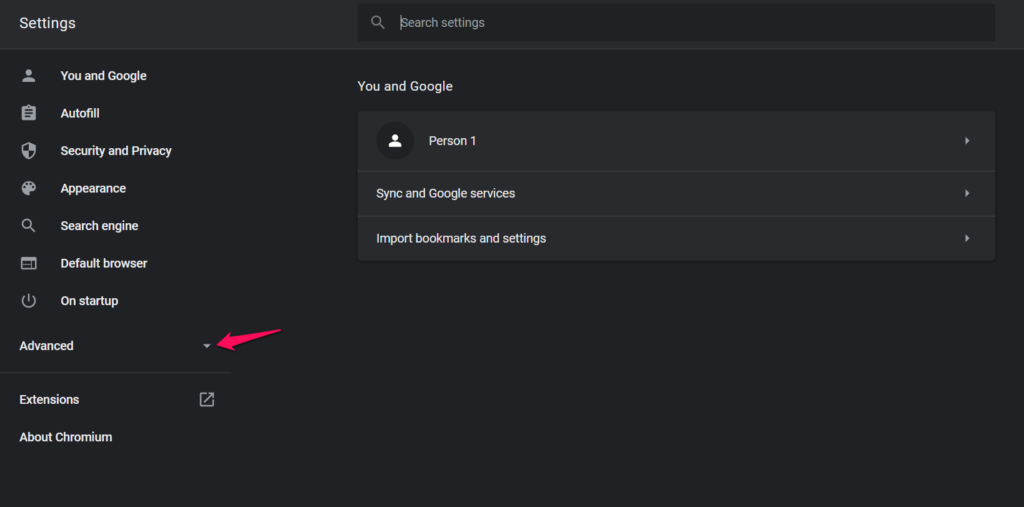
3. Click on the drop-down icon under the “Advanced” option.
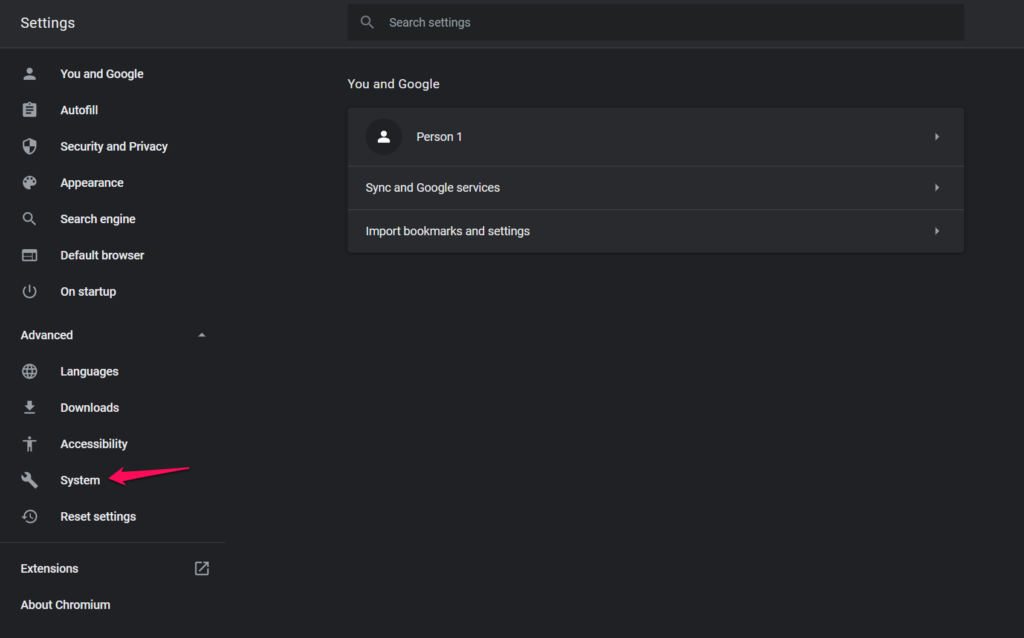
4. Select “System” from the drop-down menu.
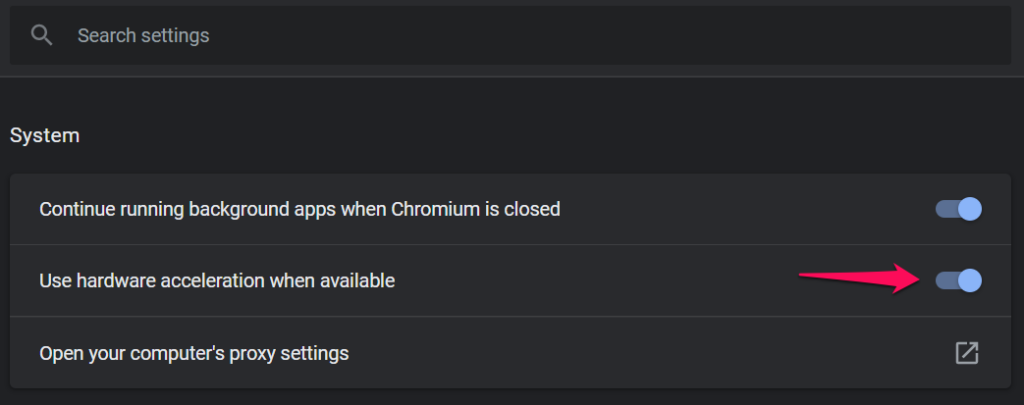
5. Deselect the “Use hardware acceleration when available” option.
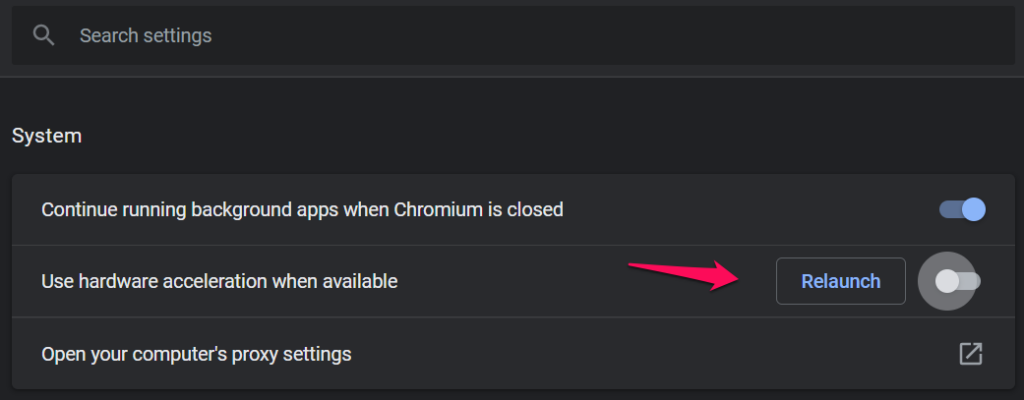
6. Click on the “Relaunch” button to finish the process.
7. Launch the browser and verify the action’s effectiveness.
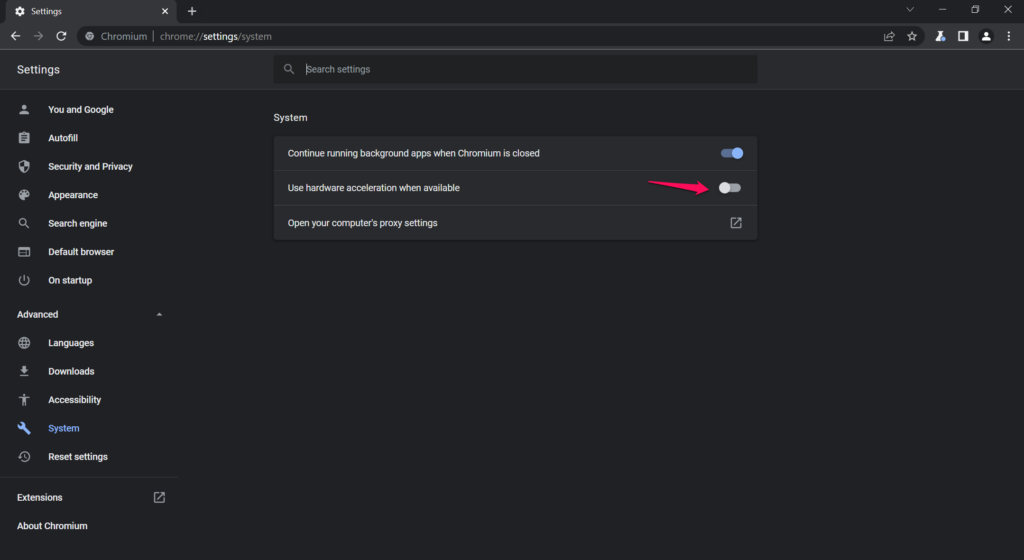
Play the video content on the Crunchyroll website, and the video player won’t have any issues.
Firefox:
1. Open Firefox.
2. Copy and paste the (about: preferences) command in the clipboard then press the Enter key.
![]()
3. Scroll down and deselect “Use recommended performance settings” to reveal more options.
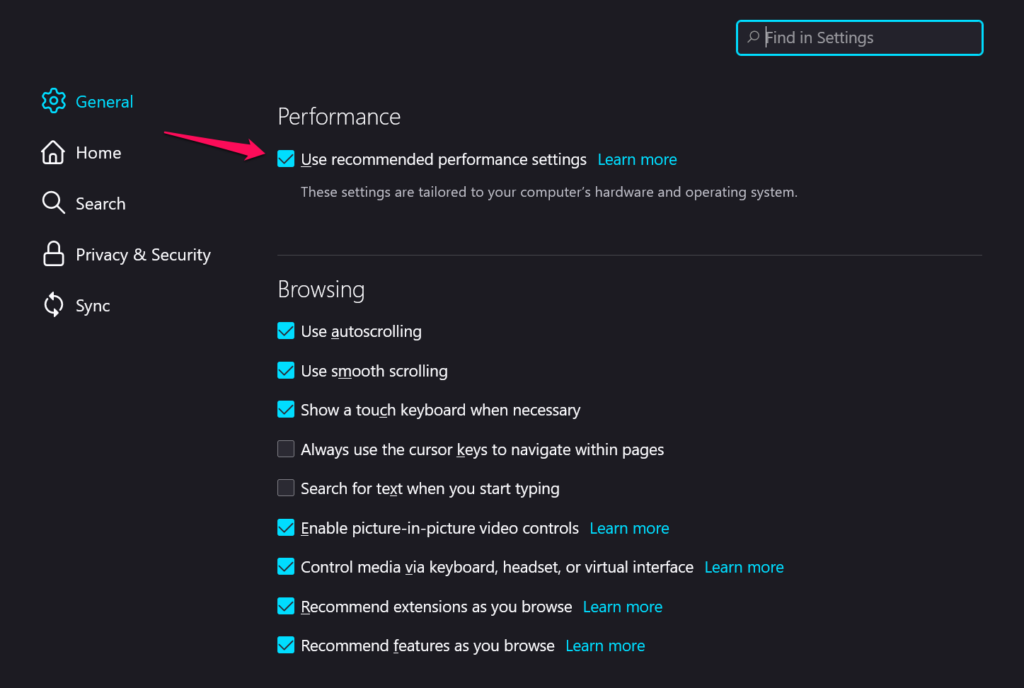
4. Deselect the “Use hardware acceleration when available” option.
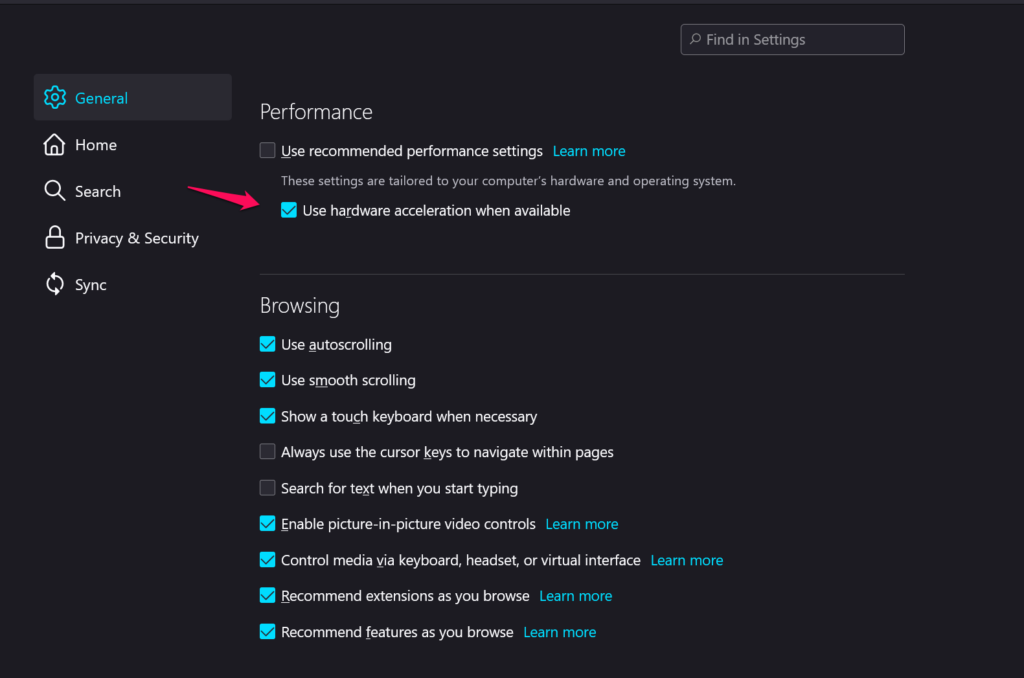
5. Make sure hardware acceleration is disabled in the PC.
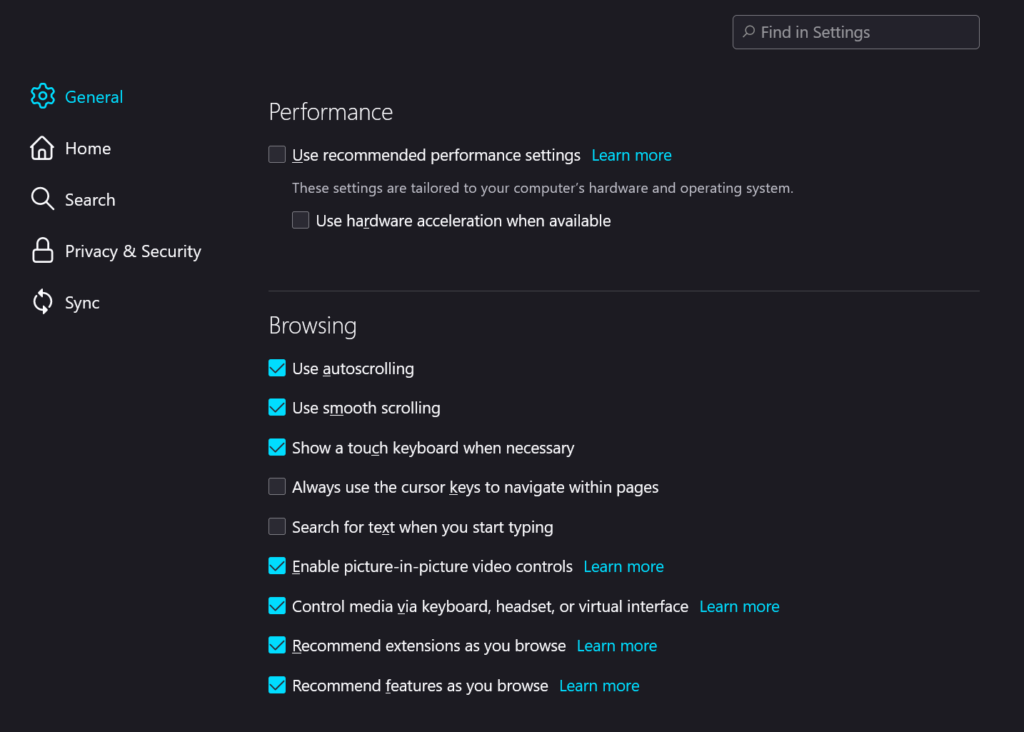
You don’t have to restart the browser to apply the new settings in the machine. Refresh the webpage and it will start loading the video content in the video player without issues.
Edge:
1. Open Edge.
2. Copy and paste the (edge://settings/profiles) command in the clipboard, then press the Enter key.

3. Select “System” from the main menu.
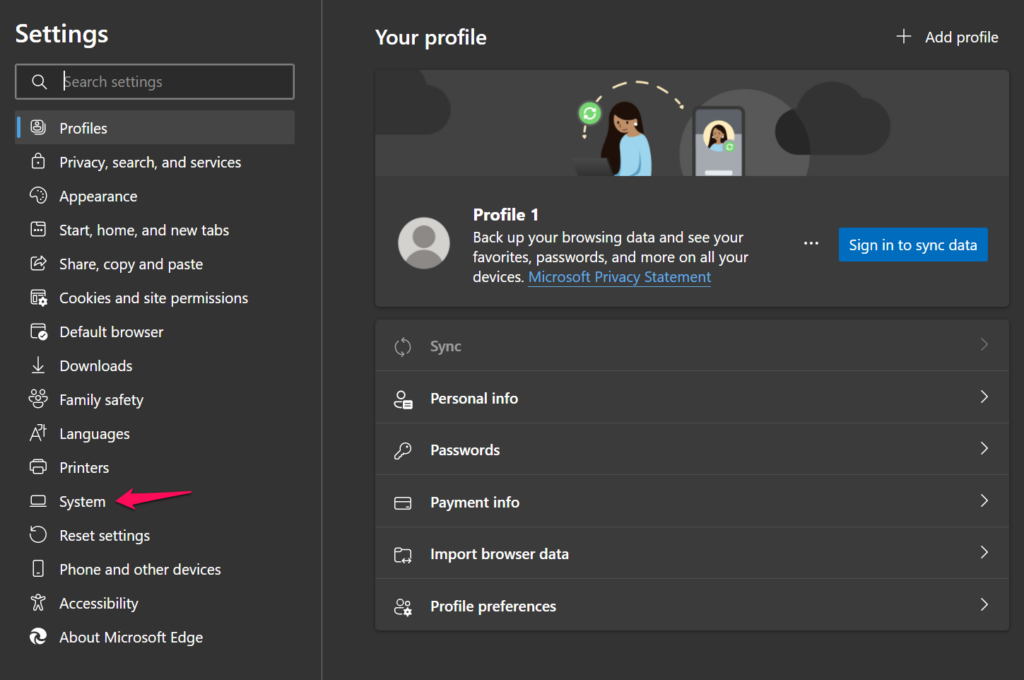
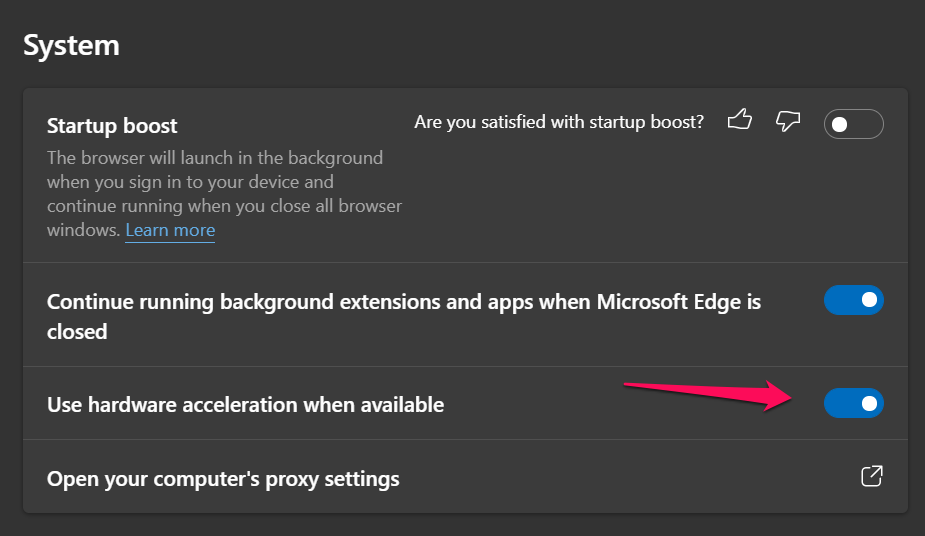
4. Deselect the “Use hardware acceleration when available” option.
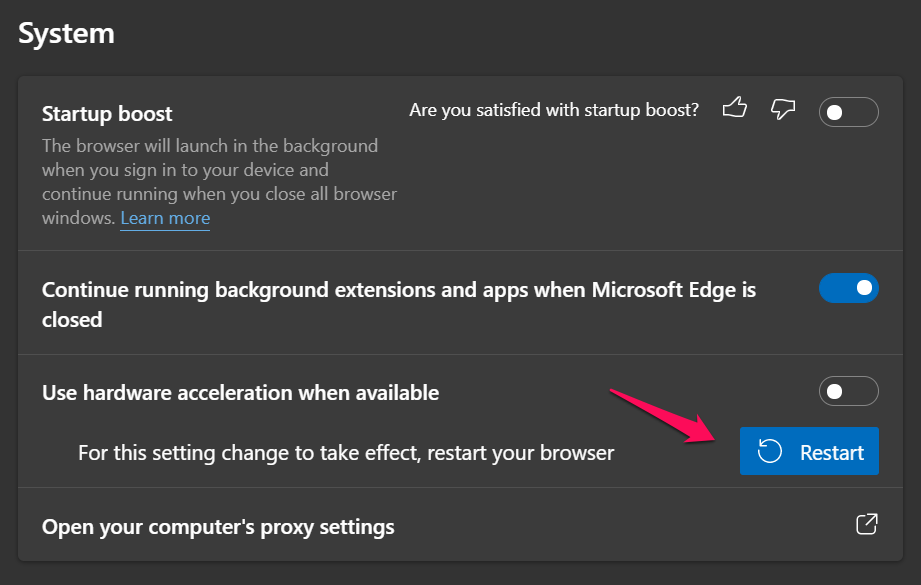
5. Click on the “Restart” button to finish the process.
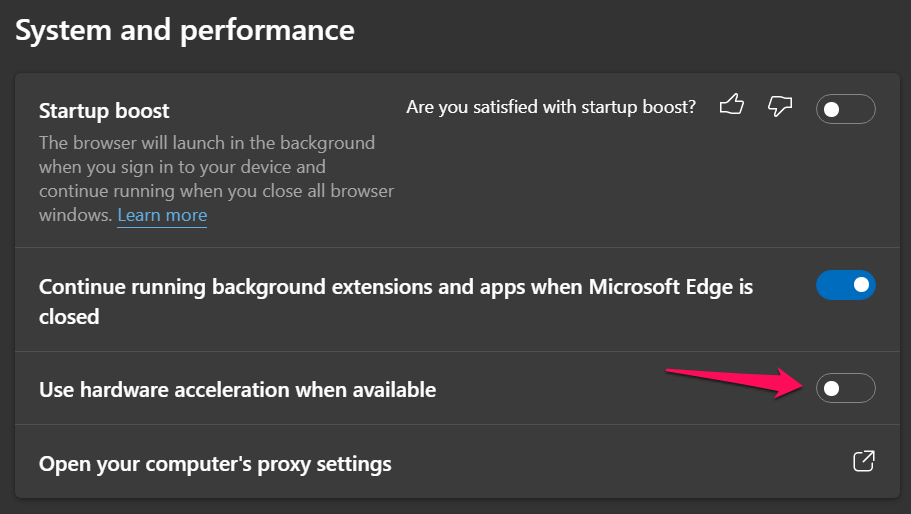
6. Go back and confirm the feature is disabled in the browser.
Reload the webpage, and the Crunchyroll video content will play smoothly in Microsoft Edge.
You have to keep in mind that the browser won’t perform as before.
I recommend the readers enable hardware acceleration after you finish watching the video. Unfortunately, you have to enable/disable the feature manually, and it is the only way to resolve the issue on the Crunchyroll site.
Clear Browser Saved Form Data
I’m always browsing the internet in Private Mode, yet it accumulates 100MB+ worth of data per session. The majority of the users browse in the normal mode, and the program accrues plenty of data over the months.
Clean the browsing data, including cookies, cache, saved formed data, history, passwords, etc. Of course, we won’t touch the bookmarks saved in the browser and follow my lead to remove the junk from the system.
Chrome:
1. Open Chrome.
2. Copy and paste the (chrome://settings/) command in the clipboard, then press the Enter key.
3. Click on “Security and Privacy” from the main menu.
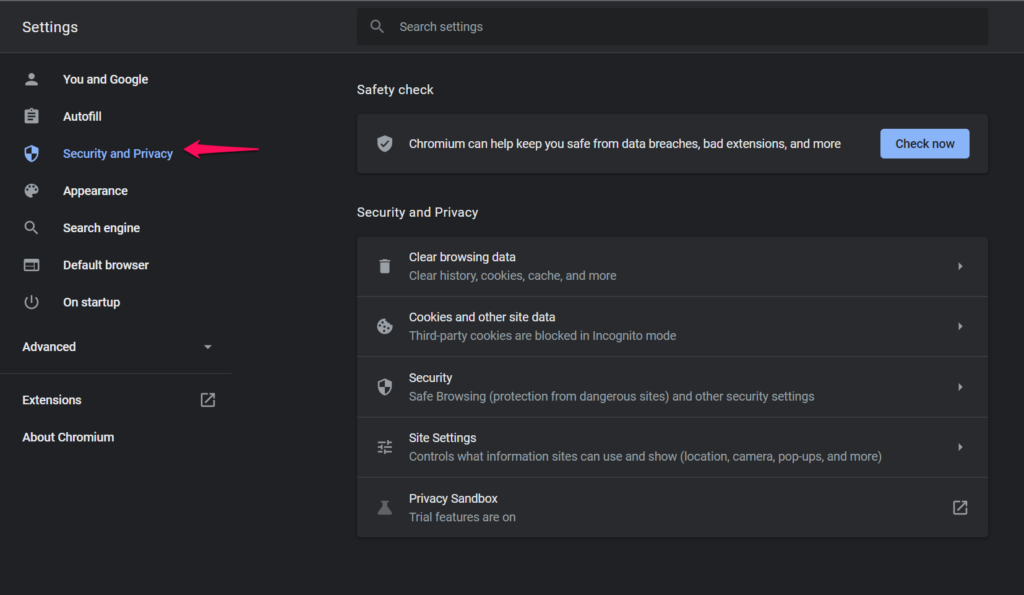
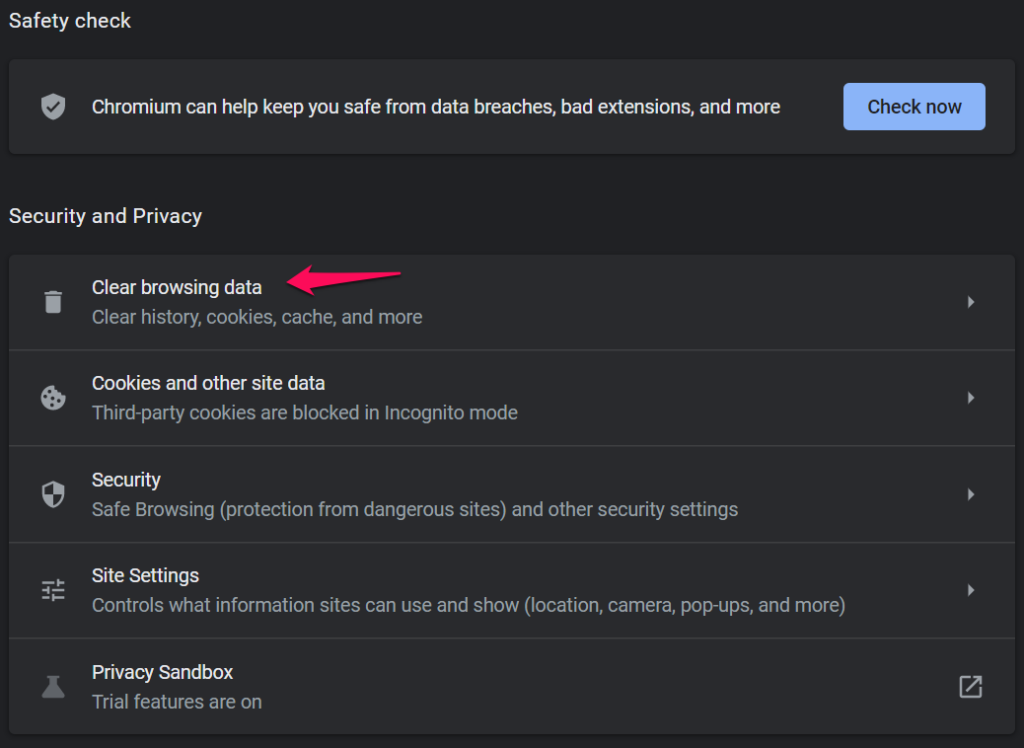
4. Click on the “Clear browsing data” option.
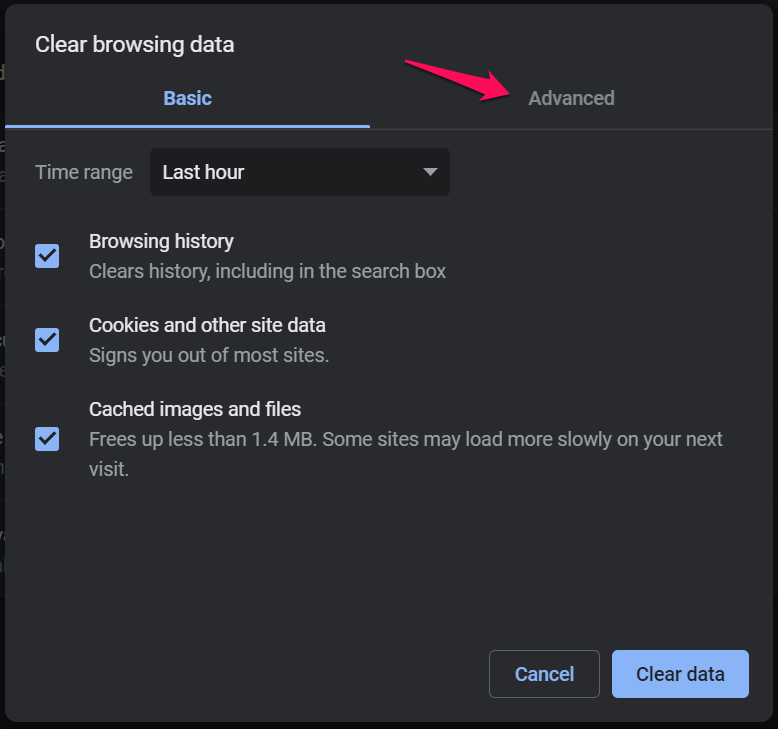
5. A pop-up layout appears and select “Advanced” from the top menu.
6. Choose “All Time” in the range, then select all options.
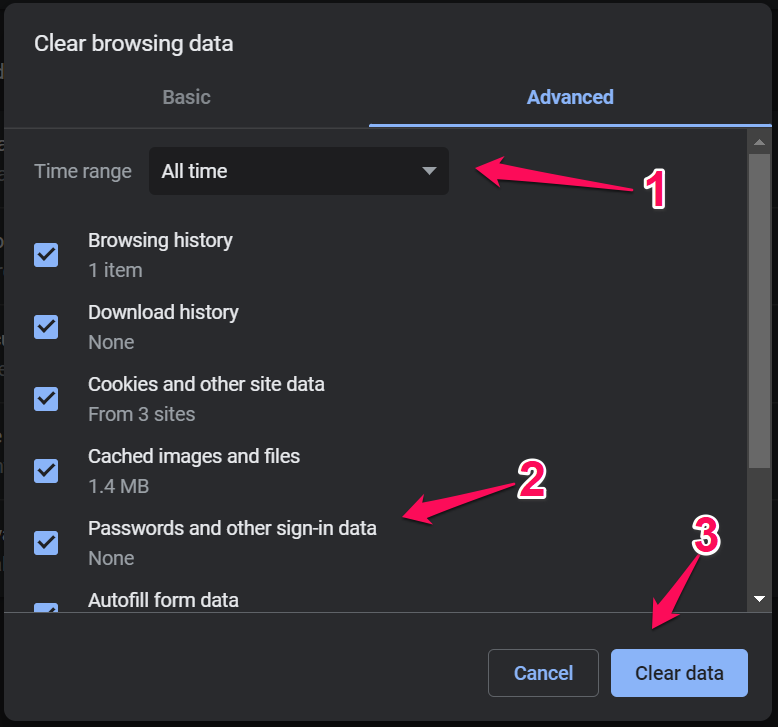
7. Click on “Clear data” to finish the process.
I want you to note down that you will lose your saved password and history in the process.
Firefox:
1. Open Firefox.
2. Copy and paste the (about: preferences) command in the clipboard, then press the Enter key.
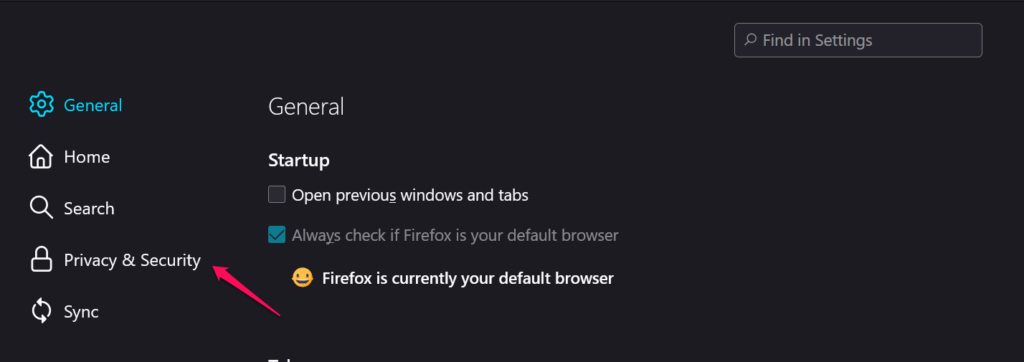
3. Select “Privacy & Security” from the main menu.
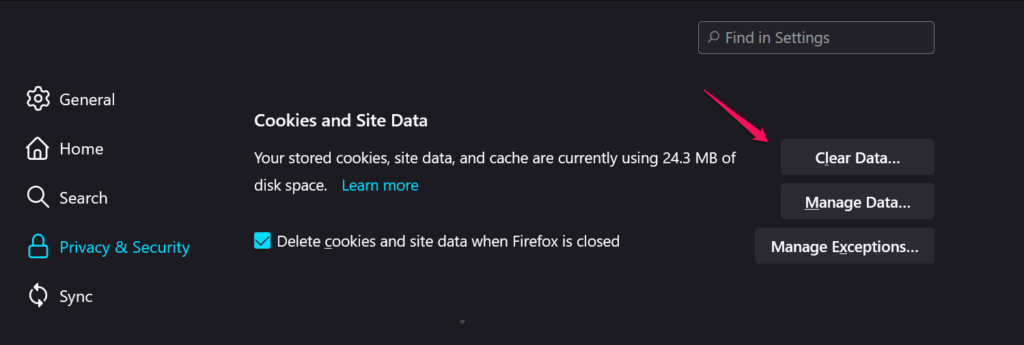
4. Click on the “Clear data” option.
5. Select the two options and click on the “Clear” option.
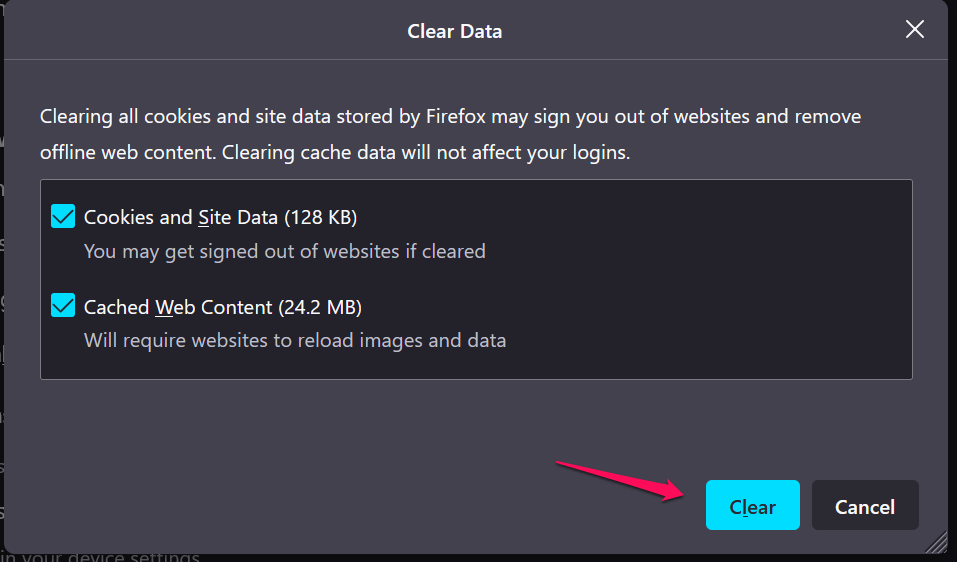
a. Cookies and site data (XMB)
b. Cached Web Content (XMB)
6. Click on the “Clear Now” button.

7. Scroll down and click on the ‘Clear History” button.
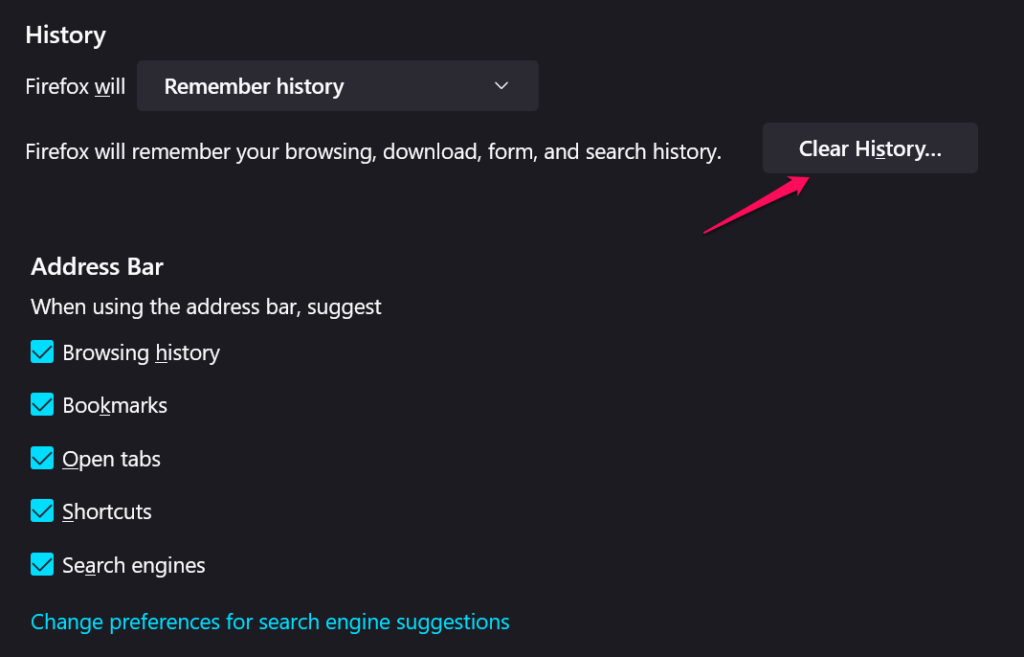
8. A new window pop-up on the screen, and click on the “OK” button.
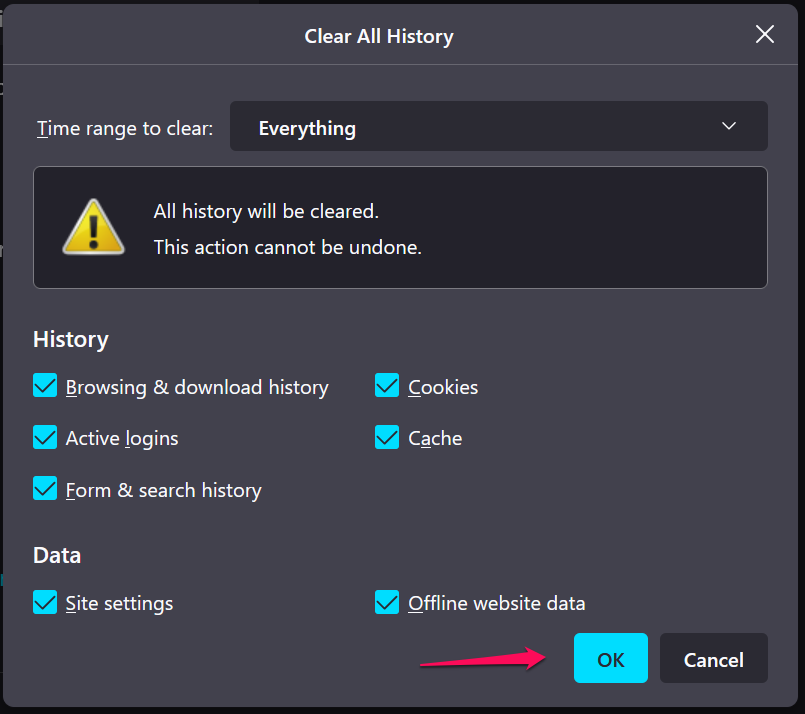
You have successfully cleared saved form data in the Firefox browser.
Edge:
1. Open Edge.
2. Copy and paste the (edge://settings/profiles) command in the clipboard, then press the Enter key.
3. Select “Privacy, search, and services” from the main menu.
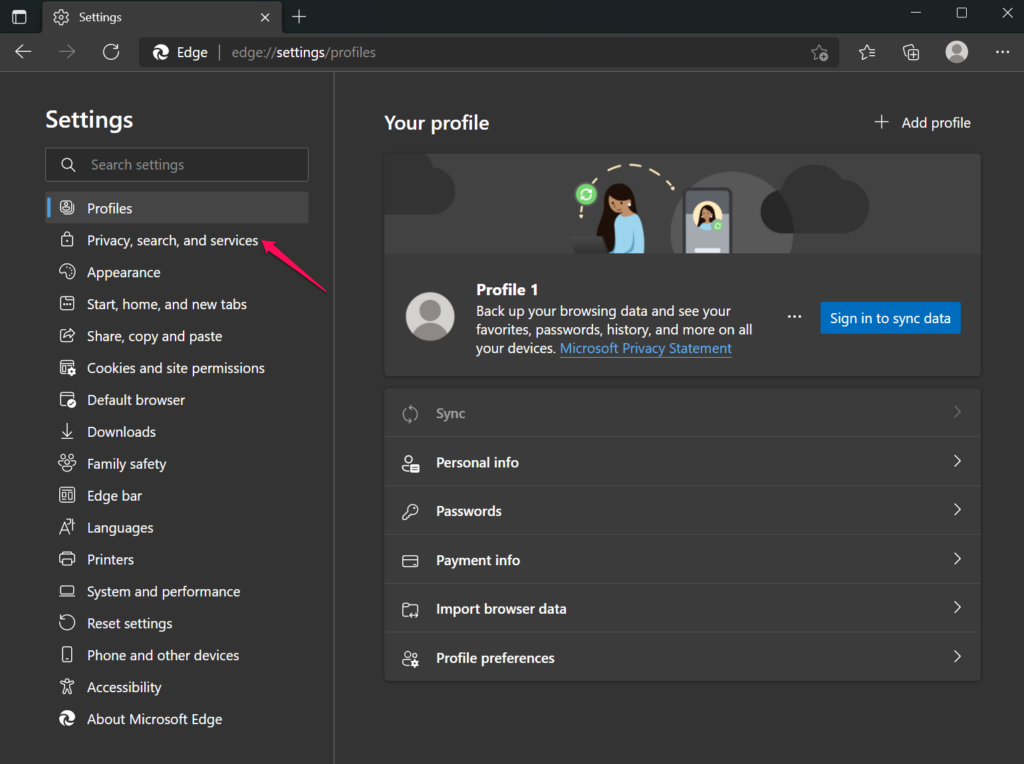
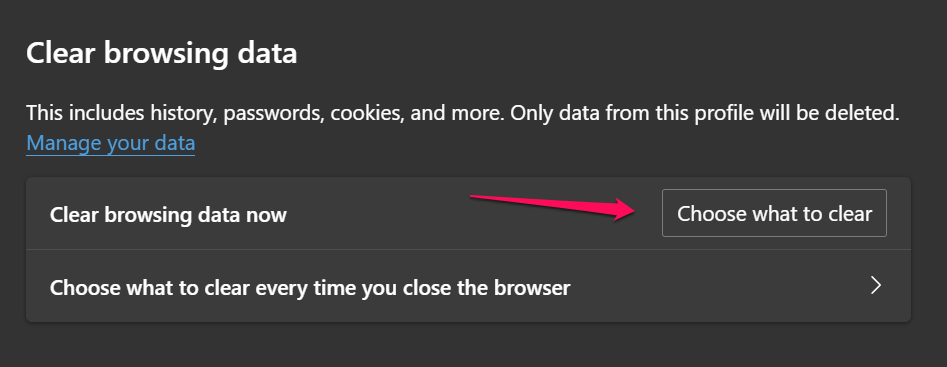
4. Select the “Choose what to clear” option.
5. Select “All Time” in the time range, then select all options.
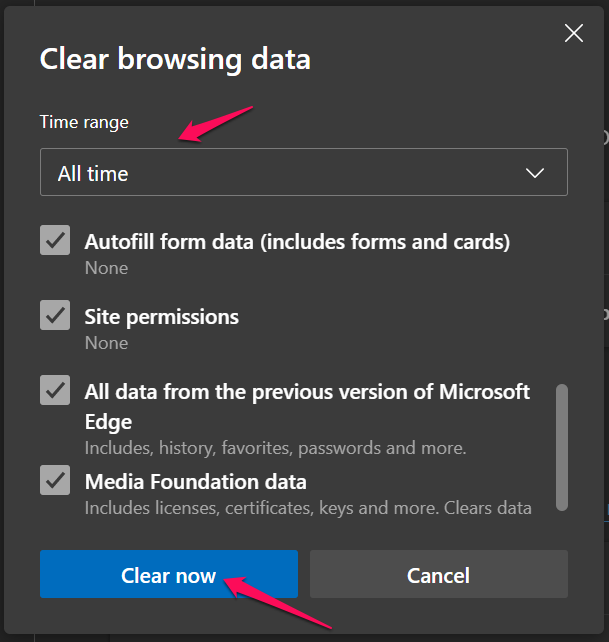
6. Click on “Clear now” to remove junk in the system.
You have cleared saved cookies, cache, history, and other junk in the machine. The tutorial applies the Windows, macOS, and Linux variant browsers.
Remove Bad Extensions
Extensions are part of the browser now and I have two active extensions running in the background. There are many bad extensions listed on the Chrome store and Mozilla add-on store. I understand that Mozilla doesn’t have enough funds to check every add-on listed on the store, and that’s why we have to take the first step to its integrity.
Chrome:
1. Open Chrome.
2. Copy and paste the (chrome://settings/) command in the clipboard, then press the Enter key.
3. Click on “Security and Privacy” from the main menu.
4. Click on the “Check now” button under the Safety Check section.
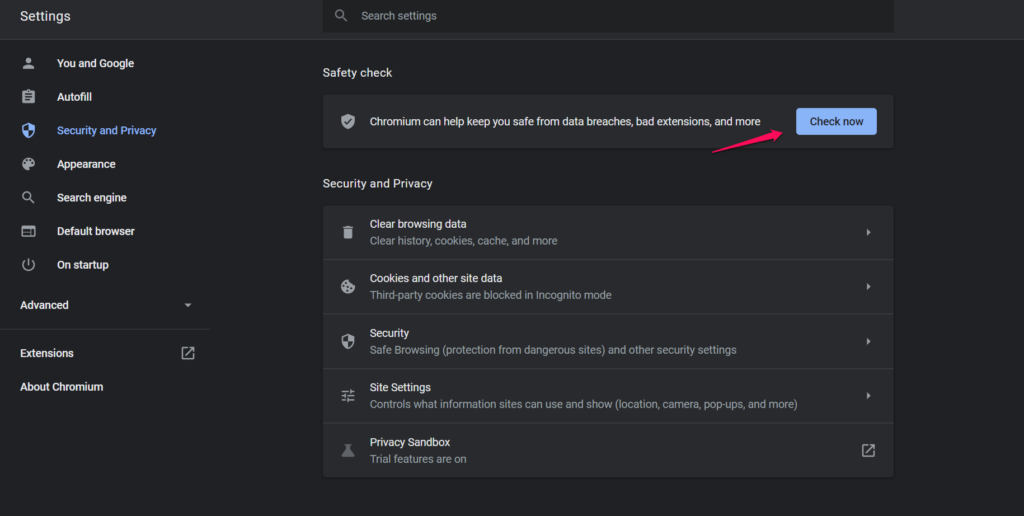
5. Let Chrome a few scans, and it may take a minute.
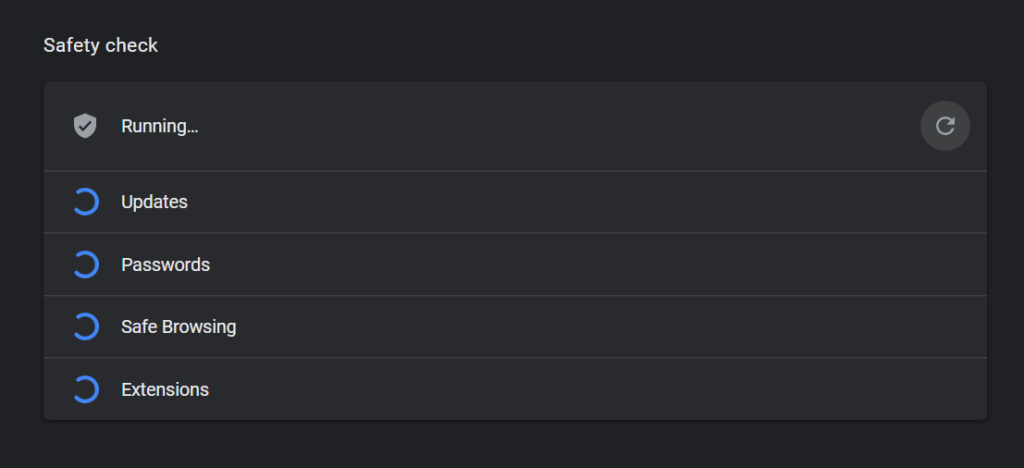
6. There are no dangerous extensions in the browser.
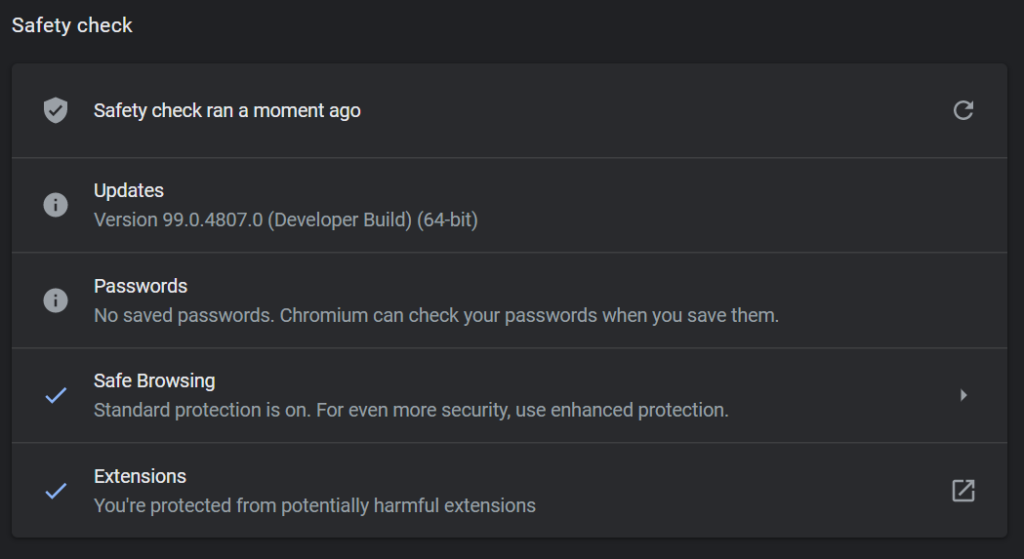
You can disable all extensions manually from the “chrome://extensions/” section. I showed you a new way to scan the installed add-ons in the system, so you can eliminate dangerous extensions.
Firefox:
The open-source browser took a different approach, and I prefer it this way.
1. Open Firefox.
2. Click on the three-dot menu located at the top right corner.
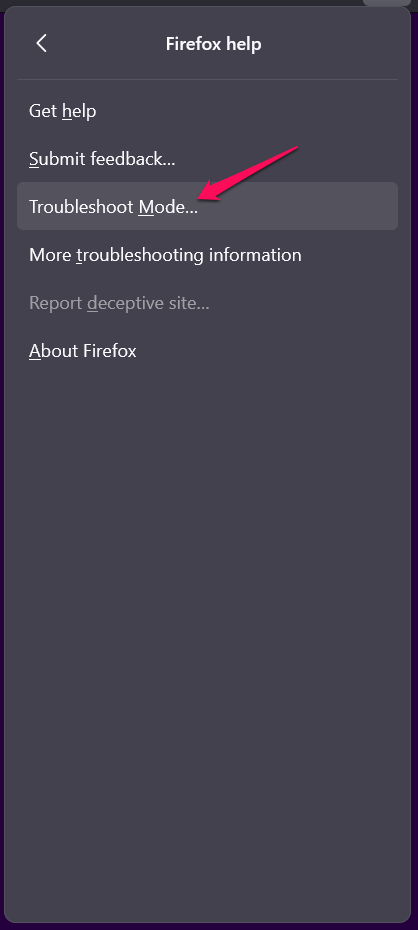
3. Choose “Help” from the drop-down menu.
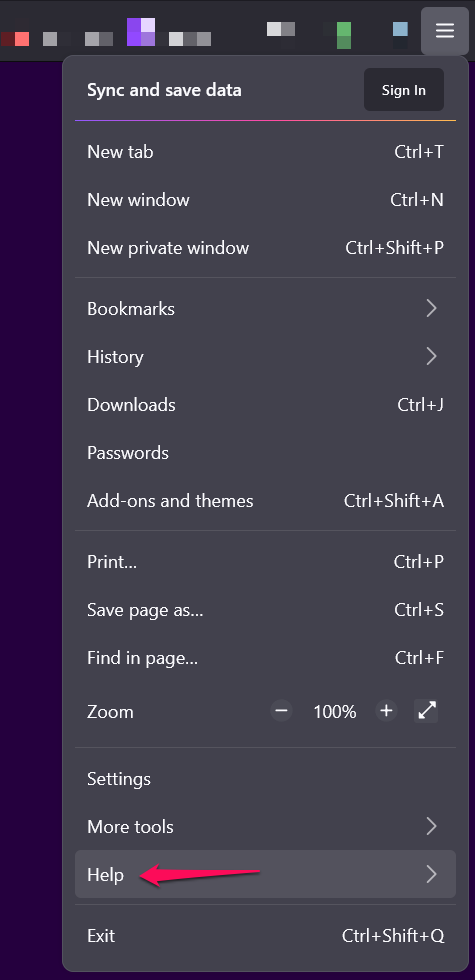
4. Select the “Troubleshoot Mode” option.
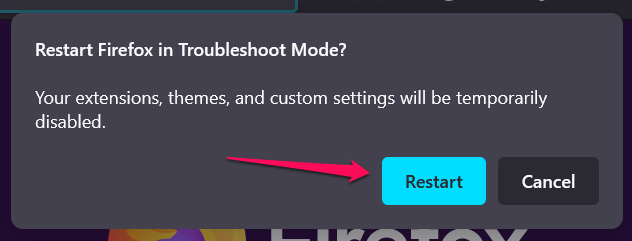
5. Click on the “Restart” pop-up.
6. A notification pop-up appears on the screen, and click on the “Open” option.
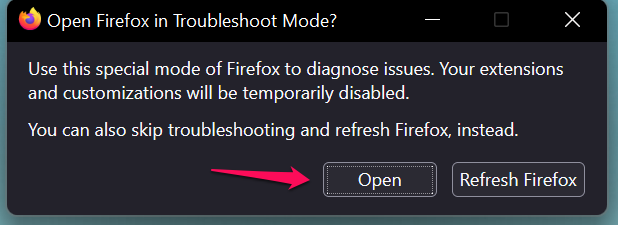
Note: You can choose “Refresh” if you want to reset the browser.
Run Crunchyroll webpage and find out if the video content is playable or not.
7. Follow the same steps and click on the “Turn Troubleshoot Mode Off” option.
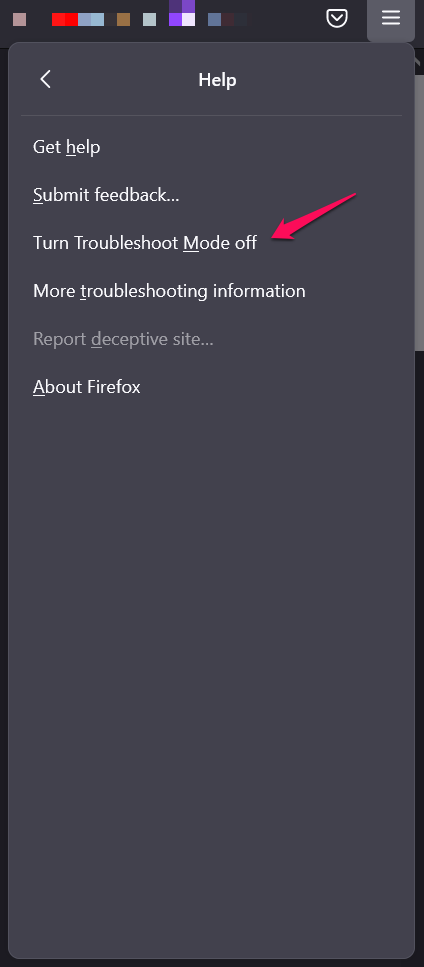
The Troubleshoot Mode allows you to identify the problem and remove the problematic extension.
Edge:
1. Open Edge.
2. Go to (edge://extensions/) page.

3. Disable all extensions.
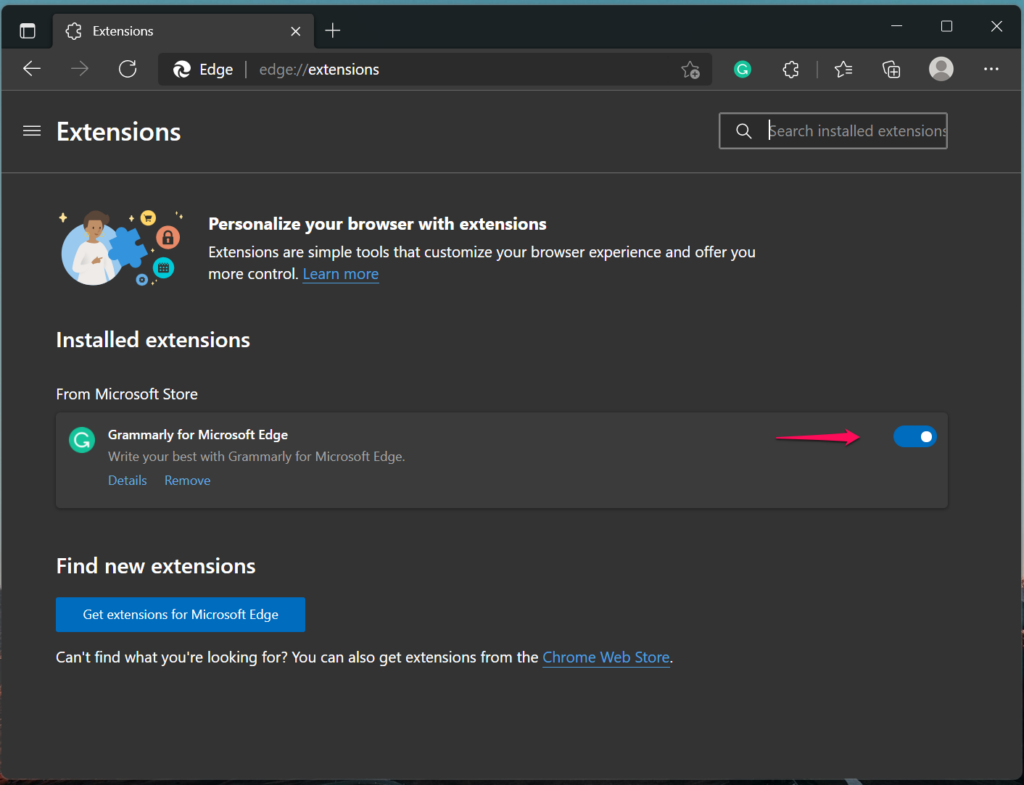
We took a straightforward approach in Edge for a reason and take time to identify the problematic extension.
Windows Virus and Threats
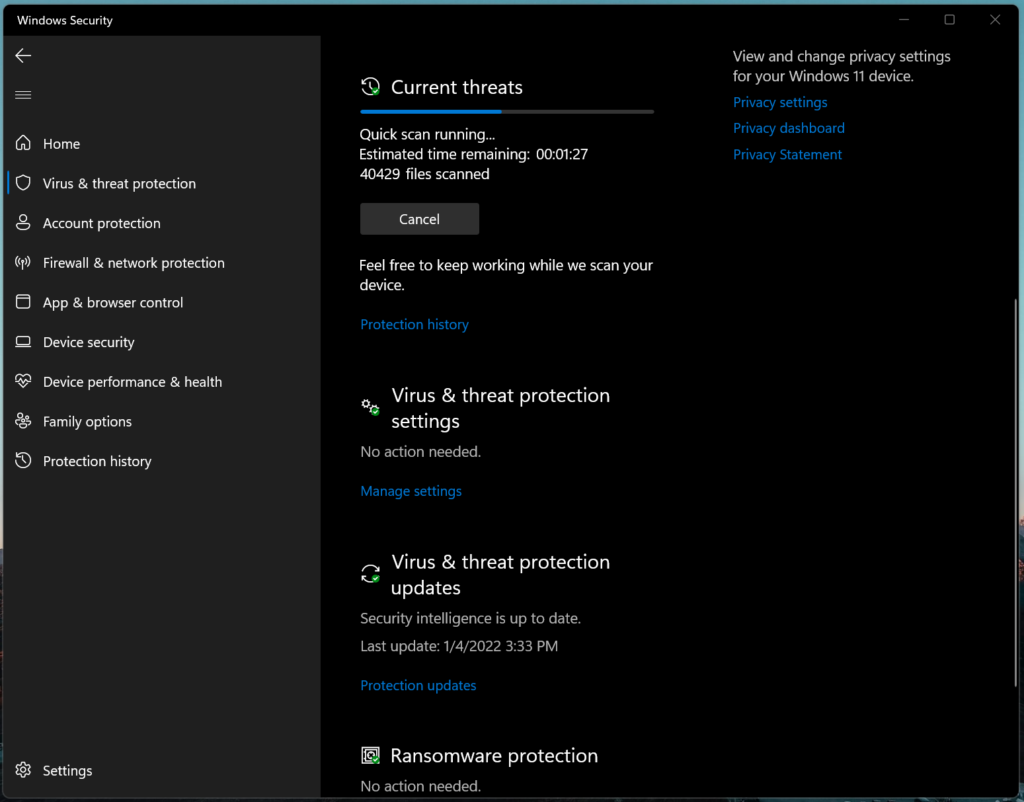
You shouldn’t take the new malware and threats lightly since they are the #1 reason software is failing to perform at an optimal level. Run a full system scan in Windows and macOS machines, and I will leave Linux OS from the equation. Linux environment is secure compared to Windows and macOS.
Windows Security:
Malwarebytes (FREE):
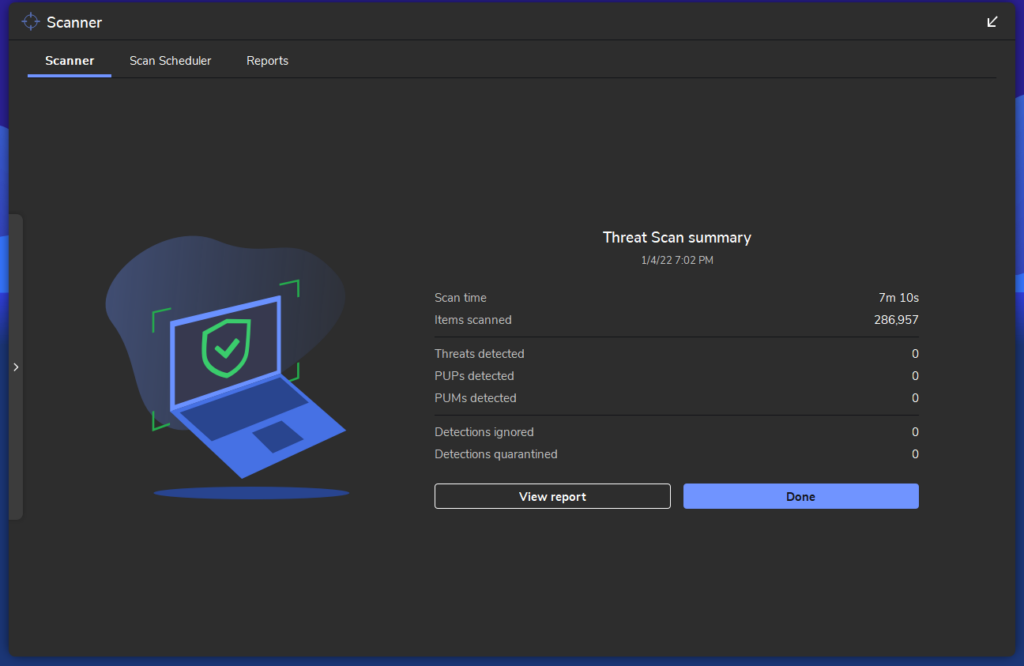
Create a restore point, if necessary because malware begins to destroy the system slowly. We are not sponsored or paid by the Malwarebytes company, and I’m a genuine user. You should opt-in for any premium security solution, and Windows Defender is not consistent and lets threats pass through the security layers from time to time.
Bottom Line
You should be able to counter the Crunchyroll screen going black when streaming content in the Chrome, Firefox, and Edge browser. Fortunately, the market has accepted different browsers, and my primary selection is Firefox. I would choose Microsoft Edge if a website or service is not operational in Firefox. You should choose an alternative that will help you in a pinch, and I suggest you choose Chromium. Let us know which solution resolved the Crunchyroll black screen issue in the comment section below.
