In this tutorial, we will show you how to install the stock firmware on your Sony Xperia device using Xperifirm and Flashtool. Well, why you would need to flash the stock firmware file in the first place when you already receive regular OTA? There are many reasons for the same. To begin with, not every region receives these updates at one go. While some may be quick to get it, others might have to wait for ages for the same. In those cases, the user belonging to the latter half could easily manually flash the latest stock ROM via XperiFirm.
Likewise, suppose you have downloaded the latest OTA package onto your device. But after the installation, you begin to notice a few bugs. If this is concerning a major chunk of users, then the OEM will surely release a patch or two, but that will indeed take considerable time. And using a buggy and unstable device even for two-three days would be very difficult. In those cases, you could flash the stock firmware of a previous build that was quite stable.
Also Read
Furthermore, the custom development scene is brimming with custom ROMs and rooting guides. Although they give you a plethora of customization opportunities, they have their associated risks as well. In some cases, it might lead to a soft-brick or bootloop. The only way out is by flashing the stock firmware to your device. So all these examples make it pretty clear why one needs to flash stock firmware on their device. Today, we will show you how to install the stock firmware on your Sony Xperia device using Xperifirm and Flashtool. Let’s begin.

Page Contents
How to Install Stock Firmware on Sony Xperia using Xperifirm and Flashtool
Installing stock firmware on an Xperia device is somewhat different than what others follow. For Sony devices, you will have to use the XperiFirm Tool and Flashtool as well. The former will be used to download the stock firmware for your Xperia device. Next up, using the Flashtool we will create an FTF file from that firmware. This is because the firmware downloaded from the Xperifirm cannot be directly installed onto your device. FTF is the only compatible file that you could flash when your device is in flash mode. Finally, after the conversion, you will have to install this firmware using the Flashtool itself. So with that said, here are the complete instructions to install the stock firmware on your Sony Xperia device.
Prerequisites
- First of all, make a complete backup of your Sony device.
- Next, download and install the Sony USB Drivers.
- You will also have to enable USB Debugging on your device. To do so, head over to Settings > About Phone > Tap on Build Number 7 times > Go back to Settings > System > Advanced > Developer Options > USB Debugging.
- Download the XperiFirm software. This will help you in downloading the last firmware file.
- For flashing the stock firmware, download the Sony Mobile Flasher tool and install it onto your PC.
- Also make sure that your device is charged at least 60%, to avoid any sudden shutdown during the process.
So these were all the requirements that your device needs to be met. If it’s all well and good, then you may proceed to the installation part.
Instructions to Install
We will be breaking down the installation instructions into three separate sections. The first part involves downloading the stock firmware via XperiFirm. Next, we will convert that firmware file to FTF and finally flashing it onto your device using the Sony Flash Tool. So without further ado, let’s begin with the guide.
STEP 1: Download Stock Firmware
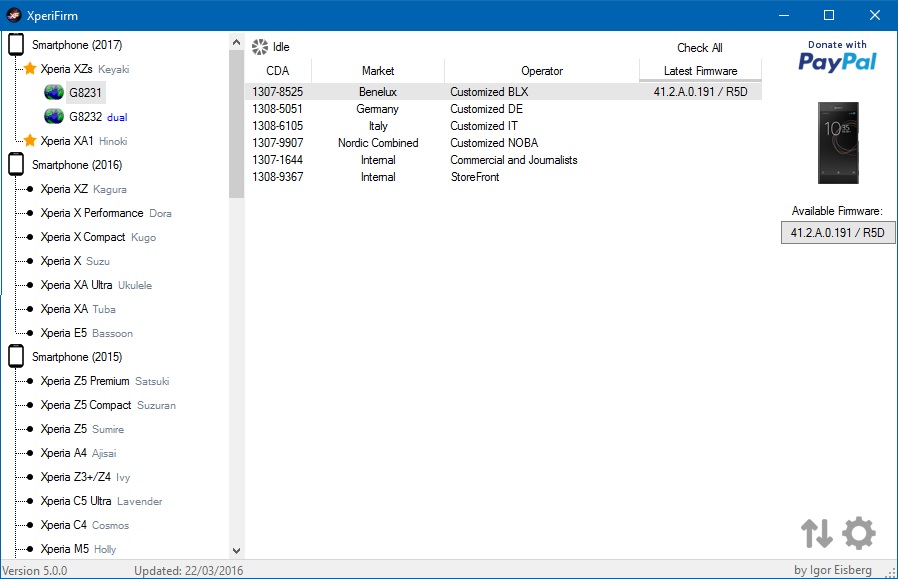
- Download and install the XperiFirm software on your PC.
- Open it and then select your device from the left-hand side. Then click on the latest firmware file that shows up on the extreme right.
- All the details related to the latest firmware file will now be displayed. Go through the complete information and then hit the Download button situated at the bottom.
- As soon as the download is completed, you will be greeted with the Unpacked Successful message. Click on OK.
With that, you have successfully downloaded the stock firmware file. It is now time to convert it and then flash it onto your device.
STEP 2: Create the FTF File
- Download and install the Sony Mobile Flasher Tool onto your PC.
- Open it and then click on the Tools option situated at the top menu bar.
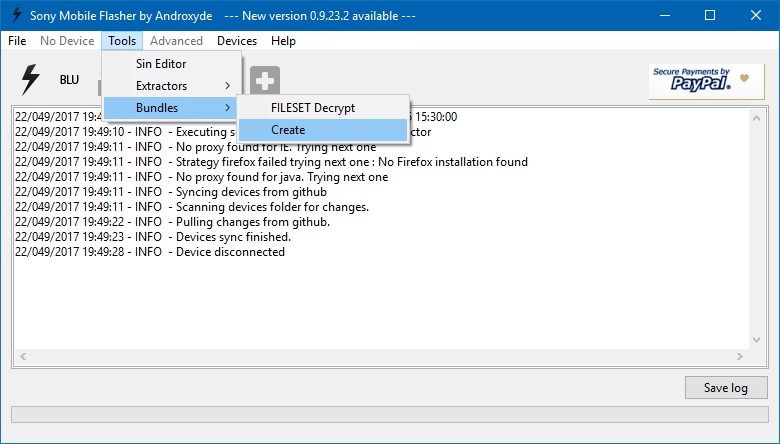
- Then from the menu that appears, click on Bundles followed by Create.
- Now from the Select Source Folder, browse to the created FTF firmware file that you have created.
- Next, double click on the device section and select your Xperia device.
- Under the Branding section, give the firmware a name and under the Version section, enter the firmware version (optional).
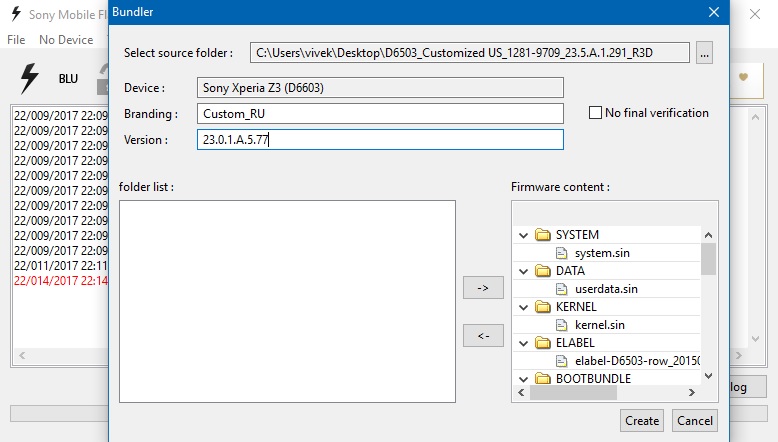
- Finally, select all the files from the Firmware Content section on the right to the Folder list section to the left. You may use the left and right arrow keys for the same. Once that is done, click on Create.
- The process might take some time to complete. Once that is done, it’s time to flash the file onto your device using the Xperia Flash Tool.
STEP 3: Flash FTF File on your Xperia File
-
- Launch the Flashtool on your PC. Then click on the Flash icon situated at the top left.
- This will then launch the Boot mode chooser dialog box, select Flashmode from the menu, and hit OK.
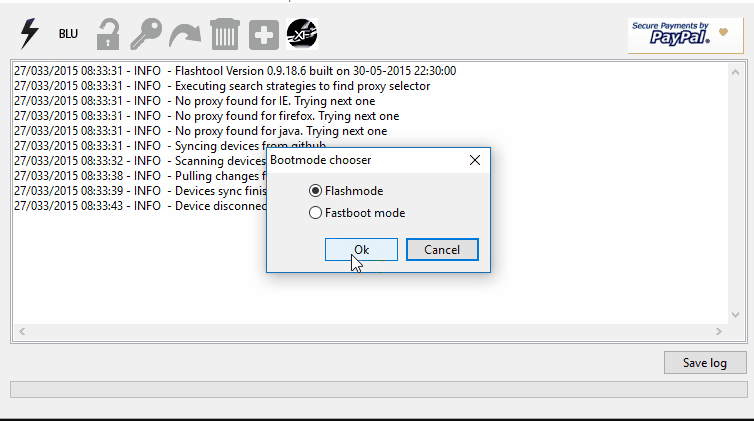
- Now under the Firmware section, select the FTF file that you have just created.
- Likewise, under the Wipe section from the right-hand side menu, select DATA, CACHE, and APPSLOG options.
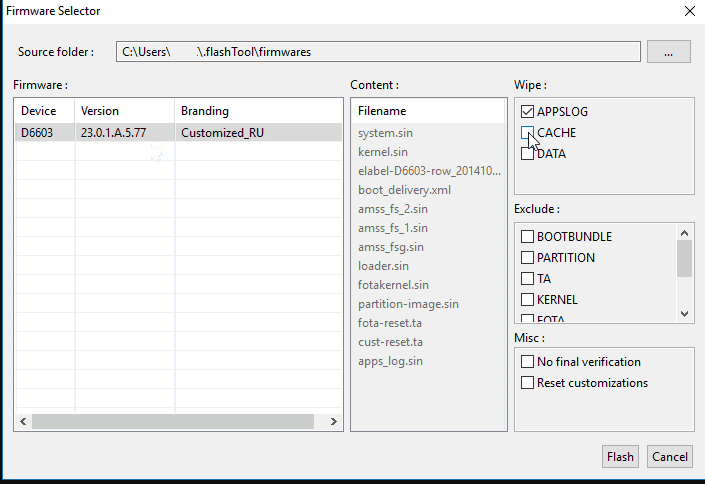
- Once you have made the selection, click on the Flash button. In this instance, you will get notified to boot your device to Flashmode.
- To do so, power off your device and make sure that it is unplugged from your PC. Now press the Volume Down button and at that instance plug in your device to PC via USB cable. As you do so, the LED light on your device should turn green.
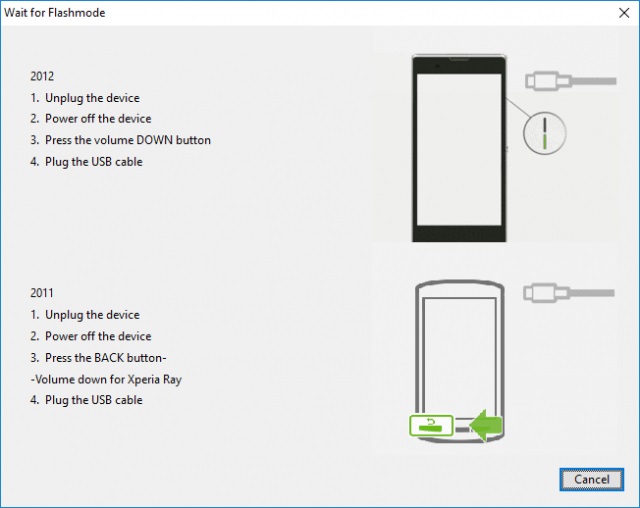
- After this, the flashing process will begin and might take some time. As and when that is done, you should see the flashing complete message. At that point, you could safely remove your device from the PC. That’s it. You have successfully flashed the stock firmware file onto your device.
So with this, we conclude the guide on how to install stock firmware on your Sony Xperia device using XperiFirm and Xperia Flash Tool. Do let us know in the comments if you face any issues while executing the above steps. Likewise, here are some iPhone Tips and Tricks, PC tips and tricks, and Android Tips and Trick that you should check out as well.
