Not only Android smartphones or tablets but also Android TV Box devices are capable to install custom firmware (aftermarket) that runs on Amlogic chipset out of the box. Now, if you’re using a G12 or SM1 device that runs on Amlogic SoC then you can follow this full guide to Download and Install LineageOS 18.1 for Amlogic G12/SM1 TV Box. We’ve shared the installation instructions for your specific device model.
A big thanks to npjohnson (XDA Recognized Developer) for sharing this guide and download links so that you can easily follow the steps one by one. Here we’ve provided a couple of device models such as deadpool – Google ADT-3, dopinder – Walmart Onn UHD Box, sabrina – Chromecast with Google TV, wade – Walmart Dynalink 4K Box. XDA has also included development boards like m5 and odroidc4.

Page Contents
LineageOS 18.1 – Overview
It seems that one and only LineageOS is a top contender when it comes to custom firmware. To recall, it was previously known as CyanogenMod based on Android Open Source Project (AOSP) that offers plenty of on-device customizations that are possible on stock firmware whatsoever. It’s also quite stable so that users can prefer it as a daily driver apart from a few drawbacks or bugs that we can’t deny.
The LineageOS 18.1 is purely based on Android 11 that offers most of the native Android 11 features out of the box and includes some additional customizations or visual tweaks too. You can check out the features of Android 11 here. Well, there are a couple of known bugs or issues present on LineageOS 18.1 (device-specific) that you can check below.
LineageOS 18.1 (Android 11) Known Bugs
- Hardware-backed OMX – Therefore, by proxy, L1 DRM is broken, we’re currently trying to fix it, but it’s proving tough to figure out. Software OMX fallback is in use for now, though, and works fine on almost all non-DRM videos.
- SELinux is permissive, this is only due to a lack of time to put together a decent looking sepolicy for the devices,
- (wade/dopinder only) Side-button doesn’t work – On wade, you can use the IR remote to navigate recovery, on dopinder, you’ll need an OTG adapter, and a keyboard or controller to attach.
Important Notes:
- GApps are baked in – No, I will not be building without GApps included for this device. These builds are built, packaged, and signed by me, and not affiliated with LineageOS whatsoever. OTA is provided the same way officials would have them.
- Firmware is shipped in the ROM package for this device, so you’ll end up on the newest version of compatible firmware after install. Please don’t touch firmware partitions after install.
- If you don’t follow the mentioned instructions properly or try using 3rd party add-ons (like Magisk) then you may not get support from XDA officials.
Disclaimer: GetDroidTips won’t be held responsible for any kind of issue that may happen on your device while/after following this guide. You should know what you’re doing and proceed at your own risk.
Download and Install LineageOS 18.1 for Amlogic G12/SM1 TV Box?
Now, follow all the requirements properly, check out download links, and head over to the installation instructions below.
Pre-Requirements
- You’ll need a computer and a USB cable.
- Download and Install the Android SDK Platform Tool on your PC from the guide mentioned inside the link.
- Enable USB Debugging and OEM Unlocking on your respective Android TV Box. [Important]
- Make sure that your Amlogic G12/SM1 chipset-enabled Android TV Box is running on the latest Android 11 firmware. While if you’re using Walmart Dynalink 4K Box (Wade), make sure that it’s running Android 10.
- Unlock the Android TV Box Bootloader which is really necessary before flashing a custom ROM. You’ll find out the instructions below.
- Try creating a data backup of the device to the PC or into the Google account before performing the firmware flashing method.
Download Links:
- LineageOS 18.1 for Chromecast with Google TV (sabrina)
- LineageOS 18.1 for Walmart Dynalink 4K Box (wade)
- LineageOS 18.1 for Walmart Onn UHD Box (dopinder)
- LineageOS 18.1 for Google ADT-3 (deadpool)
1. Unlock Bootloader on Android TV Box
- Make sure that you’ve already enabled the OEM Unlock from the Developer Options menu on your Android TV Box via Settings. If not, do this first.
- Now, connect the device to your PC via a USB cable.
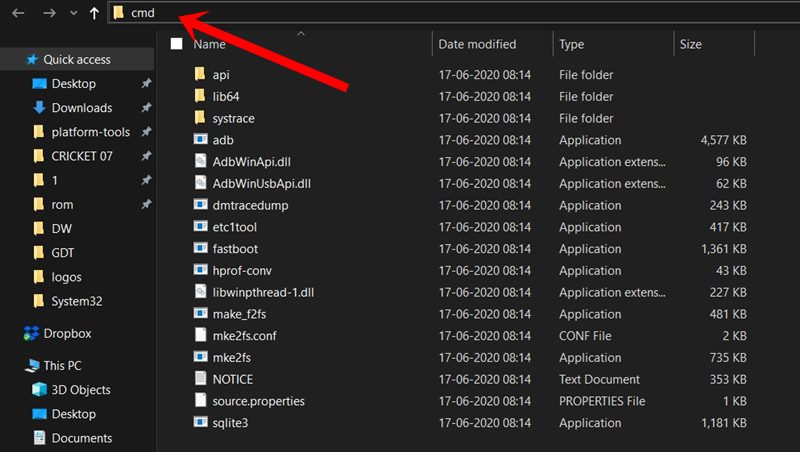
- Head over to the installed ADB & Fastboot (Platform Tools) folder on the PC > Click on the address bar and type cmd then hit Enter to open Command Prompt.

- If a prompt appears, make sure to allow it to run as an administrator.
- From the command prompt window, run the following command to boot your connected device into the fastboot/bootloader mode:
adb reboot bootloader
- Once the device is in fastboot mode, run the following command to check if the computer detected the device in the fastboot mode or not:
fastboot devices
- Now, run the following command to unlock the device bootloader:
fastboot flashing unlock
Note: Unlocking the Bootloader will void the device warranty as well as remove the user data completely into a default factory state.
- If the device doesn’t automatically reboot, make sure to manually reboot it. (The first boot may take some time after bootloader unlocking so have some patience)
- You’re done. You’ve successfully unlocked the device bootloader.
- Since the device resets completely, you’ll need to re-enable the USB debugging option on your Android TV Box from the Developer Options under Settings to continue the next method. So, after booting up the device, go through the initial setup screen, and re-enable USB Debugging for sure.
2. Install a Custom Recovery via Fastboot
- Download a custom recovery like Lineage Recovery. Make sure to get the latest recovery file something like (lineage-18.1-20211016-recovery-deadpool.img or dopinder.img or sabrina.img or wade.img).
- Now, connect your device to the PC via a USB cable.
- Head over to the installed ADB & Fastboot (Platform Tools) folder on the PC > Click on the address bar and type cmd then hit Enter to open Command Prompt.
- If a prompt appears, make sure to allow it to run as an administrator.
- From the command prompt window, run the following command to boot your device into the fastboot mode:
adb reboot fastboot
- Once the device boots up in the fastboot mode, check whether the PC detects it or not by executing the following command line:
fastboot devices
- Now, make sure to flash the recovery file onto your device by running the command below: [Here <recovery_filename>.img should be replaced by the actual recovery filename along with .img extension]
fastboot flash recovery <recovery_filename>.img
Note: If you’re getting stuck into the fastboot screen or any other error then make sure to use a different USB port or USB hub to retry again.
- Once done, just reboot the device into the recovery mode to verify the installation by running the command below:
fastboot reboot fastboot
- Then select ‘Enter Recovery’ to confirm the process. Now, you’ll need to follow the last method to complete the LineageOS firmware flashing process.
3. Steps to Install LineageOS 18.1 via Recovery
- Make sure that you’ve downloaded the LineageOS installation package for your specific device model.
- If your device is not booted in the recovery, then reboot into recovery by following the steps below:
- Connect the device to the PC via a USB cable while holding the Side Button until the Recovery is displayed.
- OR, just run the following command after connecting to the PC and opening the command prompt window from the Platform Tools folder:
adb reboot recovery
- Now, select Factory Reset > Format data / factory reset > Continue with the formatting process. [This will remove encryption and delete all files from the internal storage apart from formatting the cache partition]
- Go back to the main menu of the recovery > Sideload the LineageOS.zip package by following the steps below:
- On the device, select ‘Apply Update’ > Choose to ‘Apply from ADB’ to begin to sideload.
- On the host machine, sideload the package via running the following command on the Platform Tools folder:
adb sideload filename.zip
Note: If the process succeeds the output will stop at 47% and report adb: failed to read command: Success.
- Once done all, click on the back arrow in the top left corner > Select ‘Reboot system now’.
This is how you can properly flash the LineageOS 18.1 (Android 11) custom firmware on your Android TV Box having the Amlogic chipset inside. For further help or flashing add-ons or even if you’ve any questions regarding this method, you can visit the source link below for forum support or FAQs.
That’s it, guys. We assume this guide was helpful to you. For further queries, you can comment below.
Source: XDA
