Do you play League of Legends? If yes, then most probably, you are also getting the PVP.net kernel not working error from the last patch update. The error “PVP.net Patcher Kernel not working” prevents many League of Legends players from opening their game client. Due to a lack of permission, the client cannot run its operations. An error message will appear when you run the client without administrator rights.
A corrupt game patch file can also cause the error. No special conditions exist for this to occur, and it occurs randomly. But, nothing to worry about as we have some fixes to help you fix the PVP.net kernel not working issue while playing the LOL. So, if you are facing this problem with LOL, perform the fixes mentioned below.
Also Read: Fix: League of Legends Reconnect Loop Bug

Page Contents
How To Fix PVP Net Kernel Not Working
Fixing the PVP.net kernel not working issue isn’t a challenging task to do. Yes, you heard it right. You can do this just by performing these fixes:
Fix 1: Restart The Game
Initially, as to just checking, you must try restarting your game as your game may have some random bugs or glitches due to which you are getting this PVP.net kernel not working issue while playing the League of Legends game.
Also, there are many users who recently confirmed that after rebooting, this type of issue gets vanishes. Therefore, you must try this fix and check if it really helps. Meanwhile, if it doesn’t help, then don’t get sad as we have more options for you that you can use in order to resolve this problem.
Fix 2: Run The Game Using Admin Privileges
Most of the time, it is seen that due to improper permissions to use the system resources, this kind of error occurs. Also, as we have already mentioned earlier in this article that an error message will appear when you run the client without administrator rights. So, it is very crucial to Run the LOL using admin privileges in order to resolve this annoying error. However, to do so,
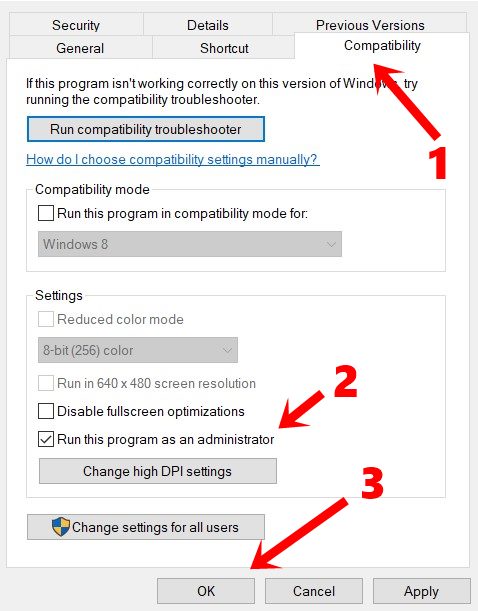
- Initially, locate and right-click on the .exe file of your game and select the Properties option.
- Now, tap on the Compatibility tab.
- Thereafter, checkmark the Run This Program as Administrator and hit the apply button followed by ok.

Fix 3: Delete Recent Game Patch Files
If you have tried running the game using admin privileges but still getting the same error, then there are possibilities that the game may have some issue with the recent patch update that you have updated. So, it is highly recommended to delete the recent patch files located inside your game files in C Drive. So, in case you are not familiar on how to delete the recent game patch files, follow these steps:
- You will need to navigate to your computer’s League of Legends directory. Open the RADS folder when you are there.
- Follow the following path once you are in RADS:
- projects > lol_air_client > releases> Select the latest folder present
- The files S_OK and releasemanifest should be deleted
- You can now delete the file’s properties, META-INF, logs, and LoLClient.exe from the Deploy folder.
- Once done, simply reboot your PC and run the LOL game again to check if the PVP.net kernel, not working issue, gets resolved or not.
Fix 4: Force End The Program
Using the task manager and then restarting the program worked for many users as a quick workaround. As soon as you close down a program, all its data is discarded, along with any data stored in memory. The problem may be fixed by restarting the program with administrator privileges after you have ended the program.
- Open task manager by pressing Windows + R and typing taskmgr into the dialogue box.
- Look for the League of Legends processes in the task manager. Right-click the process and select End task once all processing has been completed.
- Now, again run the game using admin privileges and check if the issue gets resolved or not.
Fix 5: Check For GPU Driver Update
Did you check if your device’s GPU driver is updated or not? Well, the possibilities are high that you may face this problem just because your GPU driver is not updated. So, to update your GPU driver, you must have to perform these steps:
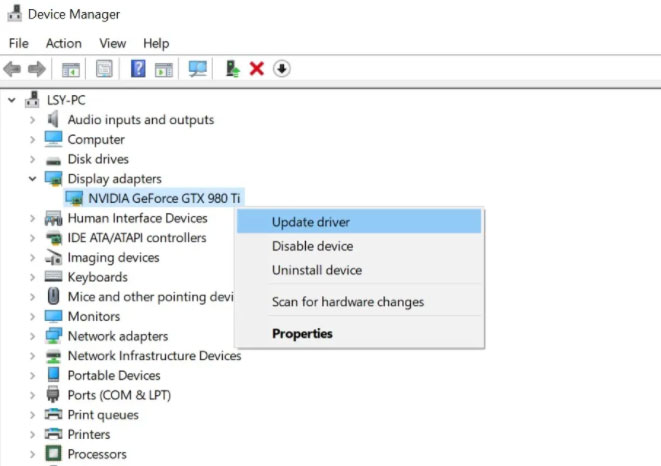
- Firstly, open the Device Manager using the Windows Search bar.
- After that, locate the Display Adapter tab and click on it.
- Then, right-click on the GPU manufacturer name and select the Update Driver option.

- Now, follow the on-screen instruction and select the Search Automatically For Drivers.
Fix 6: Check Your Antivirus
Your antivirus also sometimes comes up as the main culprit behind why you are getting this kind of issue. Therefore, we advise you to disable your antivirus for a temporary period just to check if it is the reason for this issue or not. However, in case you don’t know how to do it, here are some steps that will help you:
- Press Win+I and tap on the Privacy & Security.
- Then, Windows Security and select Virus & Threat Protection.
- Now, go to Manage Settings and turn off the Real-Time protection.
Fix 7: Set It To High Priority
If you are still getting the same PVP.net kernel not working issue while playing the League of Legends game, then you should try to set the high priority for the game on your device in Task Manager. However, to do so,
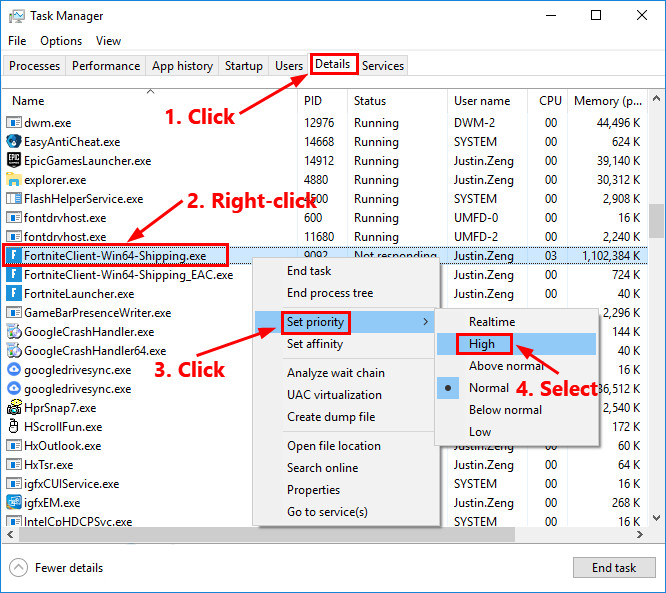
- First of all, run the Task Manager and switch to the Details tab.
- Then, locate and right-click on your game and highlight the Set Priority option. For Example:

- Now, simply set it to High and restart the game to check whether the issue gets resolved or not.
Fix 8: Reinstall The Game
If the issue is still there, then, unfortunately, you must have to reinstall your game as this is the last option that you have to fix the PVP.net kernel not working issue. However, there is a number of users who reported that after reinstalling the same, this issue gets vanished. So, you must also try this out and check if it helps.
So, that’s how you fix the PVP.net kernel not working issue while playing the League of Legends game. We hope that this guide has helped you. Meanwhile, for any further details or queries, comment below and let us know.
Also Read
