In this tutorial, we will guide you on how to backup and restore the QCN file on your Xiaomi Redmi Note 10 Pro (codenamed cannong). With this guide, you can always take one step further to fix the lost IMEI, unable to recognize sim card, unknown baseband version, or more.
Disclaimer!
Flashing IMEI manually is not legal in some of the regions. You should check with the law of your region about it. GetDroidTips only provides guides. You will be solely responsible if you proceed.
We in the era of smartphone technology always want to install the root, mods, or install custom ROM or modify the stock ROM. By doing this, we may sometimes mess up with the device and lose the IMEI or baseband version. This guide is to backup and restore the QCN, and to edit other’s QCN in case you lost your IMEI and you don’t have a backup of your QCN.
Now, talking about the IMEI (International Mobile Equipment Identity) number, it’s a unique 15-digit code that precisely identifies the device model whether you’ve used a SIM card or not. It’s worth mentioning that each and every IMEI number is unique and individually assigned to each and every mobile phone worldwide. You can also check the IMEI number on Redmi Note 10 Pro by typing the *#06# on the dialer or Phone app.
Also Read
We all know that a SIM card can be changed easily from a mobile phone. Therefore, the IMEI number comes in handy to track any particular device across the globe. Now, if you want to use a mobile device to use a SIM then it’s necessary to work the IMEI number properly. Meanwhile, the IMEI number can get corrupted or invalid, or null while flashing any third-party firmware or any custom file on your device. Therefore, you should fix that issue for your Redmi Note 10 Pro model.

Page Contents
Steps to Repair and Fix IMEI number on Redmi Note 10 Pro (cannong)
Here you will get an easy guide to repair and restore the IMEI number on your Xiaomi Redmi Note 10 Pro device by using the QCN Rebuilder Tool. This tool is free of cost and easy to use even if you’re new to this process. Now, before heading over to the guide, let’s follow all the requirements and download the links below.
Now, let’s check out the download links and requirements below.
Download Files:
- Download Flash tool: QFIL Tool
- Download Redmi Note 10 Pro QCN File: Not available, you can download genericIMEI.qcn
- Download Qualcomm QCN Rebuilder Tool
Backup QCN
By using this method, you can backup the QCN file for future resolution or you can help your friend who need the file to fix their IMEI or baseband version issue.
Pre-Requisites:
- QPST installed (which includes QFIL). You can download it here.
- Xiaomi and Qualcomm drivers installed. Download them here
Enable Diagnostics mode on your Redmi Note 10 Pro.
Using ADB mode: Connect your Redmi Note 10 Pro to the PC using the USB cable and enter the given command (make sure you’ve installed all required drivers).
adb shell
su
setprop sys.usb.config diag,adb
For the second method, enter the service code *#*#13491#*#* and select the required connection
Note: If you’re using a custom ROM you can try the dialer method but most likely you will get nothing after dialing the code. If this is the case you still can enable the Diagnostics mode but you need root privileges. Open a Terminal Emulator app and type this:
su
setprop sys.usb.config diag,adb
Done. You’ve Enabled Or Disabled Diag Mode on the Redmi Note 10 Pro device.
Open QPST Tool to Backup QCN
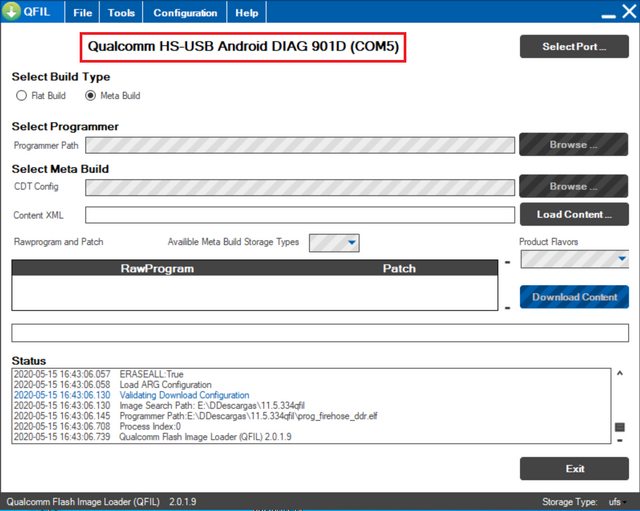
- Now open the QFIL and connect your device to the PC with the USB cable. Redmi Note 10 Pro should show as connected in Diagnostics Mode.

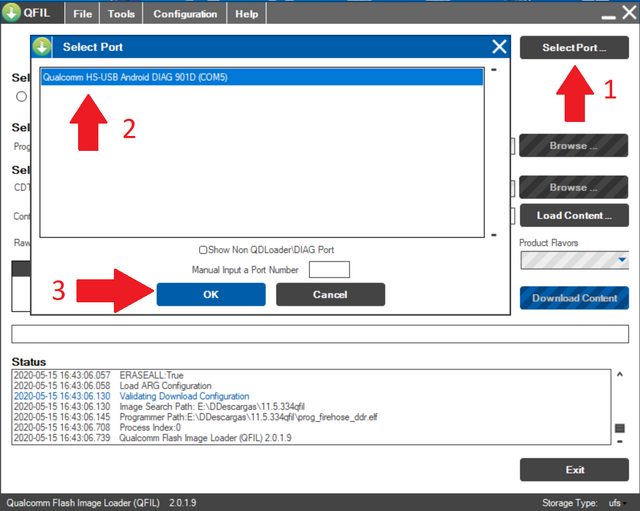
- Now tap on the Select port and select your device and press OK.

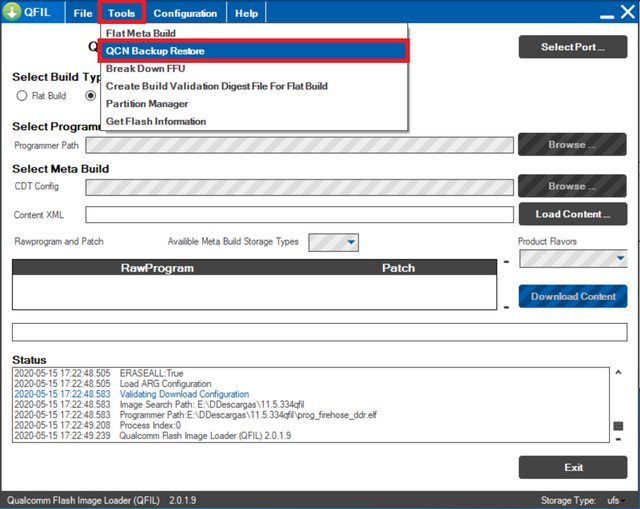
- Tap on the Tools tab and select QCN Backup Restore from the drop-down menu.

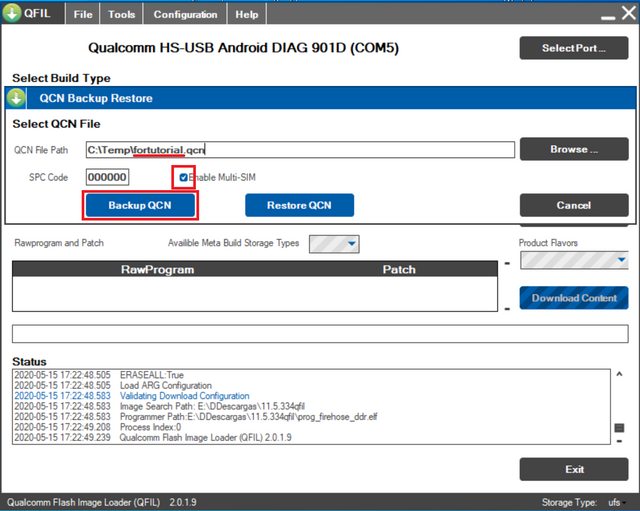
- In the next window, add any name to the QCN file with the .qcn extension. Make sure to Select the “multisim” option and press Backup.

- Once the backup is done, check the generated file size. A normal backup is around 310Kb, if your file is significantly lighter you can suspect a damaged file. In this case, I suggest installing stock rom and use the dialer method.
IMEI Rebuilding and Restore Guide
- After downloading, install, and run the QCN Rebuilder tool on your PC.
- Click on Open file and select the Redmi Note 10 Pro QCN file.
- Now, replace the IMEI with the original IMEI number.
- Click on Rebuild.
- Next, connect your phone to a PC using a USB cable.
- Open the dial pad on your device and type this code *#*#717717#*#* or use any method to enable diagnostic mode.
- If the above code doesn’t work, use CMD on your PC by following the commands below.
adb shell
su
setprop sys.usb.config rndis,diag,adb
- Then run the QPST tool on your computer.
- Click on the Restore tab > select the rebuilt QCN file > click on Restore.
- You’re done.
That’s it, guys. We hope you’ve found this guide useful for your Redmi Note 10 Pro. If you’re facing any issues, feel free to ask in the comments below.
