Remnant 2 is the newly launched sequel to Remnant: From The Ashes, a popular title in 2019. As the sequel is almost closer to the first part with some improvements and graphical delights, fans are quite active to get into it. However, no game is bug-free and Remnant 2 is no exception here. The title has some issues or errors that you can find while launching it on the PC. Meanwhile, Remnant 2 Error DirectX 12 Is Not Supported On Your System is one of the trending topics.
It appears that your current system build is not compatible with the DirectX 12 version of your Windows operating system. The game requires DirectX 12 to run on Windows, and if your system does not support it, you may encounter the “DirectX 12 is not supported on your system. Try running without the -dx12 or -d3d12 command line argument” error. This error can occur if your computer is low on specs or outdated. You may also encounter a LowLevelFatalError during startup.
Also Read

Fix: Remnant 2 Error DirectX 12 Is Not Supported On Your System
Well, there can be multiple reasons why the DX12 error is bothering you with Remnant 2 on the PC. Something like an outdated Windows OS or build, an outdated GPU driver, an outdated game patch version, corrupted or missing game files, incompatible graphics settings on the game, an outdated DirectX version, not running the client in DirectX 12 with Remnant 2, and more. Luckily, we’ve shared with you possible workarounds to resolve this error easily.
1. Restart the PC
First, you’ll need to reboot the PC after closing the game and the client to ensure no conflict with the system resources or a temporary glitch. As a system reboot doesn’t take that long, it’s better to do so.
2. Update Remnant 2
Always try manually checking for the game update to the latest version so that you don’t have to fall for any startup crashes or unexpected bugs. With every patch update, game developers try to push bug fixes & improvements.
For Steam:
- Open Steam and go to the Library.
- Click on Remnant 2 from the left pane.
- Steam will automatically search for the available update.
- If there is an update available, click on Update.
- Make sure to wait for some time until the update is completed.
- Once done, ensure to reboot the PC to apply changes.
For Epic Games Launcher:
- Open the Epic Games Launcher > Head over to Library.
- Now, click on the three dots icon next to Remnant 2.
- Make sure the Auto Update option is turned on.
- It should automatically install the available update.
3. Repair the Game Files
Sometimes, corrupted or missing game files installed on the PC can trigger several issues with the performance and launching errors. If the game continuously crashes, then try repairing the game files on the client by following the steps below.
For Steam:
- Launch the Steam client > Click on Library.
- Right-click on Remnant 2 from the list.
- Click on Properties > Go to Local Files.

- Click on Verify Integrity of Game Files.
- This process may take some time to complete. So, have some patience.
- Once done, make sure to reboot the PC to apply changes.
For Epic Games Launcher:
- Open the Epic Games Launcher > Click on Library.
- Click on the three-dots icon next to Remnant 2.
- Click on Verify and wait for the process to complete, and restart the launcher.
4. Update the Graphics Driver
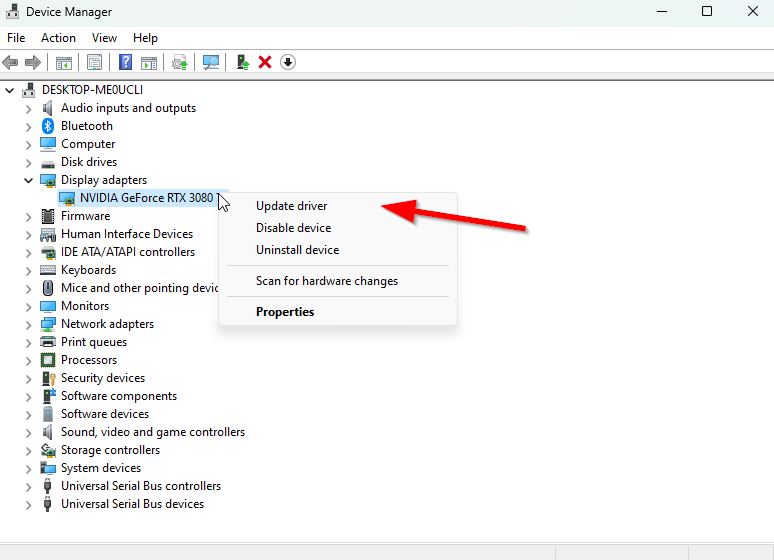
To ensure that graphics-intensive programs run smoothly on your Windows PC, it’s important to regularly check for and install graphics driver updates. An outdated or missing graphics driver can cause issues with these programs. Follow the steps below to check for updates:
- Right-click on the Start Menu to open up the Quick Link Menu.
- Click on Device Manager from the list.
- Double-click on Display Adapters to expand it.

- Right-click on the dedicated graphics card name that’s active.
- Now, click on Update driver.
- Choose Search automatically for drivers.
- The system will automatically check for the available updates.
- An update will automatically download and install the latest version if available.
- Once done, you should restart your PC to apply the changes.
If you can’t find any pending updates, then just head over to the official website of the Nvidia website below and search manually for the latest update. If a new version is available for the graphics card, just download the driver and install it on your PC. You can jump to the link below to do so:
5. Run the Game in the Compatibility Mode
Well, if you’re not running the game in the compatibility mode on your low-spec computer or an outdated machine, then you’re doing it wrong. Making the compatibility factor can give you more freedom to run the latest game smoothly than earlier.
- Right-click on the Remnant 2 application on your PC.
- Now, select Properties > Click on the Compatibility tab.
- Ensure to click on the Run this program in compatibility mode for: checkbox to enable it.
- You can select Windows 7/8 from the drop-down menu.
- Click on Apply > Click on OK to save changes.
6. Force Run DirectX 12
Sometimes you may have to set launch options on the game launcher for the specific game to make it compatible or force run with the required DirectX version. Running Remnant 2 in DX12 is recommended to avoid multiple errors while launching.
- Open Steam > Click on Library.
- Right-click on Remnant 2 from the left pane.
- Click on Properties > Go to the General section.
- Go to Launch Options > Type -d3d12 and then try launching the game again.
7. Update DirectX and Visual C++ Redistributables
The chances are high that your system doesn’t have the updated DirectX version and Microsoft Visual C++ Redistributables. An outdated version might trouble you a lot. Otherwise, if your system doesn’t have these programs installed, then you can do so. Just follow the steps below to update or install both programs.
- Visit the official Microsoft website and download the latest DirectX installer version.
- Run the installer and install DirectX completely.
- Once done, visit the official Microsoft for the latest Visual C++ Redistributable.
- Install the program and reboot the PC to apply changes.
8. Adjust In-Game Graphics Settings
Finally, you should try adjusting the in-game graphics settings according to your system configuration to ensure no issue with the game launching or DX12 not supported error. Head to the in-game graphics settings menu and lower the options to medium or low to cross-check the issue. Try combining multiple options and check which settings are suitable for your computer.
That’s it, guys. We hope you’ve found this troubleshooting guide useful. If you’ve any queries, you can comment below.
