Developed by Google, Chromebook is a laptop that runs on Chrome OS. It is a perfect device for those who use Google applications on a daily basis, and it supports both Android and Linux Applications. However, bugs in Chromebook are no exception. Recently users have reported that they are facing the DHCP Lookup issue. The issue prevents you from connecting to a network, and it displays the error “Failed to connect to network DHCP lookup failed.” Such DHCP lookup issue in Chromebook can hinder the workflow of any user.
DHCP is a protocol used to configure the device on IP networks. This protocol enables the device to use various network services based on UDP and TCP, such as DNS and NTP. Issues like an outdated OS, damaged router firmware, invalid frequency, and a hidden SSID can influence the DHCP error.
If you are using a VPN, it is also possible that it’s because of the VPN. It is also possible that the router is from some other region, which is incompatible with your Chromebook. Try to connect to other networks before you follow the solutions brow to fix the DHCP lookup failed error.
Also Read

Page Contents
How to Resolve DHCP Lookup issue in Chromebook?
Method 1: Restarting Chromebook and Router
If you have tried to connect to other networks and you still go, the DHCP lookup failed error. Then you should try to restart your network first. You will have to Shut Down Chromebook. Therefore click on the Power button from the notification menu and select ShutDown. To shut down your Chromebook completely, you can also press the power button for more than 3 seconds until the led goes off. After Shut Down, close the lid, now turn off your network router and plug out all the power cables.
Wait at least for 30 seconds, plug the router power cables and turn the router power on. Let the router stabilize, then Switch on your Chromebook and try to connect to the network check if the DHCP lookup issue has been fixed on your Chromebook.
Method 2: Update ChromeOS
It is possible that the version of ChromeOS you are using is outdated or damaged, thus causing the error. You can fix it simply by updating your firmware. If you are facing the error while trying to connect to a wi-fi network, then connect an ethernet cable to your device or do the vice-versa. The Internet is required to update the Chrome OS. After you have connected to the internet, you can follow the simple steps mentioned below.
Step 1) Click on the bottom-right corner on the Time icon to pen up the notification menu. Now, click on the Gear icon to open up the Chromebook Settings.
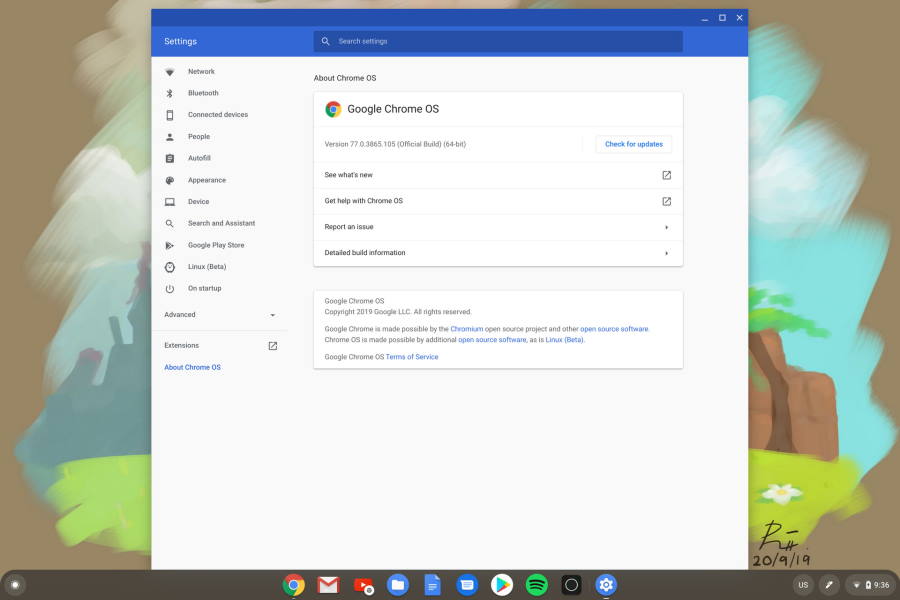
Step 2) On the left-pane look below, click on the option About Chrome OS.

Step 3) Now, just click on the Check for updates button on the right pane of the Window. If there is an update, it will be automatically downloaded and installed. Restart your PC and check if the DHCP lookup error still exists.
Method 3: Using Google Name Servers
If your device is unable to communicate between the server and IP address, then it is mostly because of the DNS server. The device will fail to query a DNS server and will show the DHCP lookup error. Therefore using Google Name servers is the best thing to do.
Step 1) Click at the bottom right corner on the taskbar on the time icon to open up the notification menu. Now, open up the Chrome settings by clicking on the gear icon.
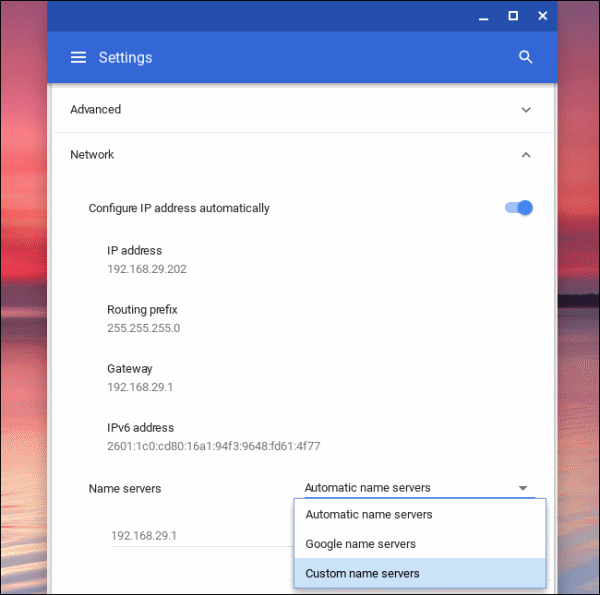
Step 2) Select the Wi-Fi option under the Network section. Click on the Right-arrow of the network, which you are facing an error while connecting.
Step 3) On the next age, scroll-down, and beside the Name servers option, click on the drop-down menu and select Google name servers.

Step 4) Now, connect to the Wi-Fi network and check if the DHCP error has been resolved or not. If not, then Restart your device and go to the network settings page of the network that is showing the error. Scroll down and click on the drop-down menu beside the Name Servers label and select Automatic name servers.
Step 5) Connect again and check if the DHCP error is clear, if not then go to the Network Settings of the network and toggle off the Configure IP address automatically option. Set the manual IP address of your Chromebook and restart. Connect to the network and see if the error is gone or still persists.
Method 4: Extending DHCP Addresses Range and Changing the Frequency Band of Wi-Fi
It is possible that your device doesn’t support the Wi-Fi frequency that is used by your router. So you should manually change your device frequency to match the router Wi-Fi frequency.
Step 1) Open up your Chrome Browser and visit the Web portal of your router, log-in to your account.
Step 2) Head over to the Wireless Settings tab and click on change the band option. Select 5GHz if it was 2.4GHz by default or vice-versa.
Step 3) Now, Save your settings and exit. Restart your device and connect to the network, check if the DHCP has been resolved.
Method 5: Changing Wifi Band Frequency
Sometimes changing the band frequency of your Wi-Fi network can resolve your DHCP lookup failed issue. However, if this doesn’t solve that, then you must try to extend the range of addresses for the DHCP.
Step 1) Open up the Web portal of your router in the Chrome browser and go to the DHCP tab settings.
Step 2) Now, to increase the DHCP IP Range, just type the value in the second box of the DHCP IP Range option. For example, increase the range to 192.168.1.253, if the initial range was 192.168.1.200.
Step 3) Save your settings and exit your browser, now try to connect to the network again and check if the error has been resolved.
