In the past couple of years, Motorola has done a tremendous job with its foldable devices that come under the Razr family. Just like Samsung’s Flip models, Moto Razr models are also flip (foldable) devices that deliver a proper smartphone experience and the feel of a folding display too. Last year in June 2023, the Motorola Razr 40 Ultra (Razr+ Unlocked) variant was released with a big bang due to specs & colour options. Now, if you’ve been using it for a while or recently purchased then you can try to Root Motorola Razr 40 Ultra / Razr+ (XT2321-3) with Magisk on Android 13.
To be precise, Motorola Razr 40 Ultra is also known as Moto Razr+ in North America where the brand offers an unlocked carrier variant for the fans at an exciting price range with additional Moto trade-in discounts on most models as well as previous generation Moto Razrs. The handset features a 6.9-inch foldable LTPO AMOLED display with 165Hz refresh rate & HDR10+ compatibility. While the secondary (external) display is a 3.6-inch. It runs on Android 13 out of the box, driven by Snapdragon 8+ Gen 1 SoC, up to 12GB RAM, dual 12+13MP rear camera setup, front 32MP camera, and more.
We all know that Motorola offers a vanilla Android OS experience to its device users without any bloatware or ads which is a nice thing. Even though the Android 13 OS brings a lot of customization options to the themes and colour palettes, plenty of avid Android users prefer to have over-the-top features or customization accessibility. So, Android fans may end up searching with root access or bootloader unlocking so that they can install custom firmware along with custom modules. Now, if you’re also interested in enabling the root access on your Moto Razr+ (XT2321-3) model then check this guide.

Page Contents
Why Rooting Your Android Device?
Well, Rooting an Android device can give you full control of your handset such as system apps, Android sub-system files, tweaks, customizations, bypassing limitations to the device manufacturer or SIM carrier, and more. If we take a brief look at the features or benefits of having root access, you can check the following things that you can achieve on your rooted Android device.
- Ability to Install Custom ROMs
- Uninstall Bloatware (pre-installed apps)
- Block ads pushed by applications
- Ability to Install Some Incompatible Apps
- Tweak System Performances
- Allow display options and internal storage
- Increases battery life
- Allow to create full data backups
- Access to system root files
- Ability to customize themes, colour palettes, appearances, etc
- Modify hidden settings
- Your device might not receive OTA updates
- And so on…
However, there are some disadvantages or risks that can also be associated with rooting your Android device. Such as voiding the manufacturer’s warranty, being stuck in the bootloop issue, damage to your system files (bricking), being prone to malware attacks, issues with the system performances, conflicts with the online payments or banking apps, and more.
But if you’ve been using Android devices for quite some time and already know about rooting then you can proceed with enabling root access. But this will require your device bootloader to be unlocked to be able to install root via Magisk.
Why Magisk is Good for Android Rooting?
Magisk is a systemless rooting application for Android devices that usually allows to enable root access on Android handsets without modifying the system partition. It’ll help in checking system integrity and SafetyNet bypasses by Google. Magisk root will also allow users to freely use online payment or banking applications without any security concerns. Here we’ve mentioned some reasons why you should use Magisk for Android rooting:
- Magisk is safe and easy to use because of its seamless accessibility
- It brings plenty of options and Magisk modules
- It’s good for customizations too
- Hides root easily
Root Motorola Razr 40 Ultra / Razr+ (XT2321-3) with Magisk on Android 13
So, without wasting any more time, let’s jump into the all requirements and installation steps below to root your Moto Razr+ (XT2321-3) or Moto Razr 40 Ultra using Magisk. Do not skip any warnings or requirements to avoid any kind of issues with the system.
WARNING: We at GetDroidTips won’t be held responsible for any reason behind the bricking issues or damaging the data while/after following this guide. You should know what you’re doing. So, do it at your own risk, and always take a full data backup before getting into this process.
Pre-Requirements:
- Keep your device battery charged sufficiently. (at least 50%)
- Take a full data backup of your Android device.
- This method is only applicable to Moto Razr+ (XT2321-3) / Moto Razr 40 Ultra.
- You will require a Windows 10/11 computer and a USB Data Cable.
- Enable the USB Debugging and allow OEM Unlocking on your handset.
- The device bootloader should be unlocked first.
- Requires SDK Platform Tools on the PC.
- A Stock Firmware file is required with the same version.
- Requires Motorola USB Drivers on the PC.
Download Links:
- Download and Extract the ADB and Fastboot tool for Windows.
- Grab and Install the Motorola USB Drivers on your PC.
- Stock ROM: Download the Moto_Razr_40_Ultra_ZEEKR_G_T1TZ33.3-62-9_RSD.zip file.
- Get the Magisk & Magisk Manager App.
Enable USB Debugging and Allow OEM Unlocking
To be able to connect your handset to the PC using fastboot or adb mode, you’ll need to turn on the USB Debugging mode and OEM Unlock option manually. You can check the steps below to do so:
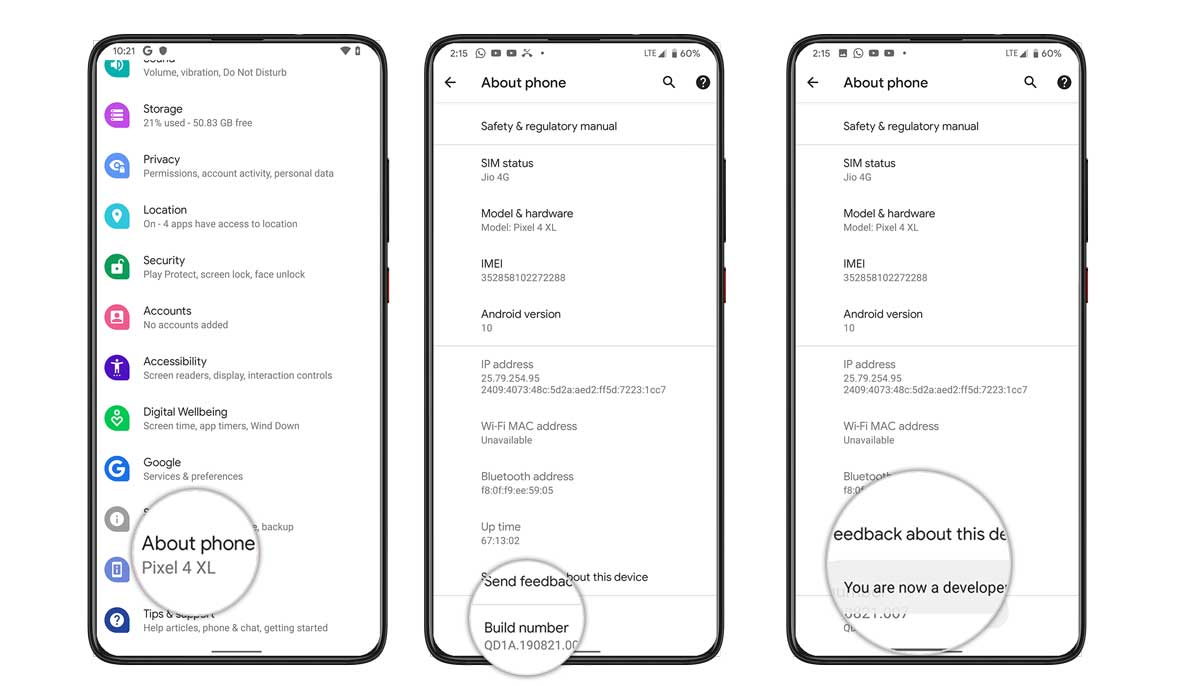
- Open the Settings menu on your handset.
- Tap on About Phone > Tap on Build Number.
- Now, tap 7 times on the Build number quickly.
- The Developer Options menu will be activated.
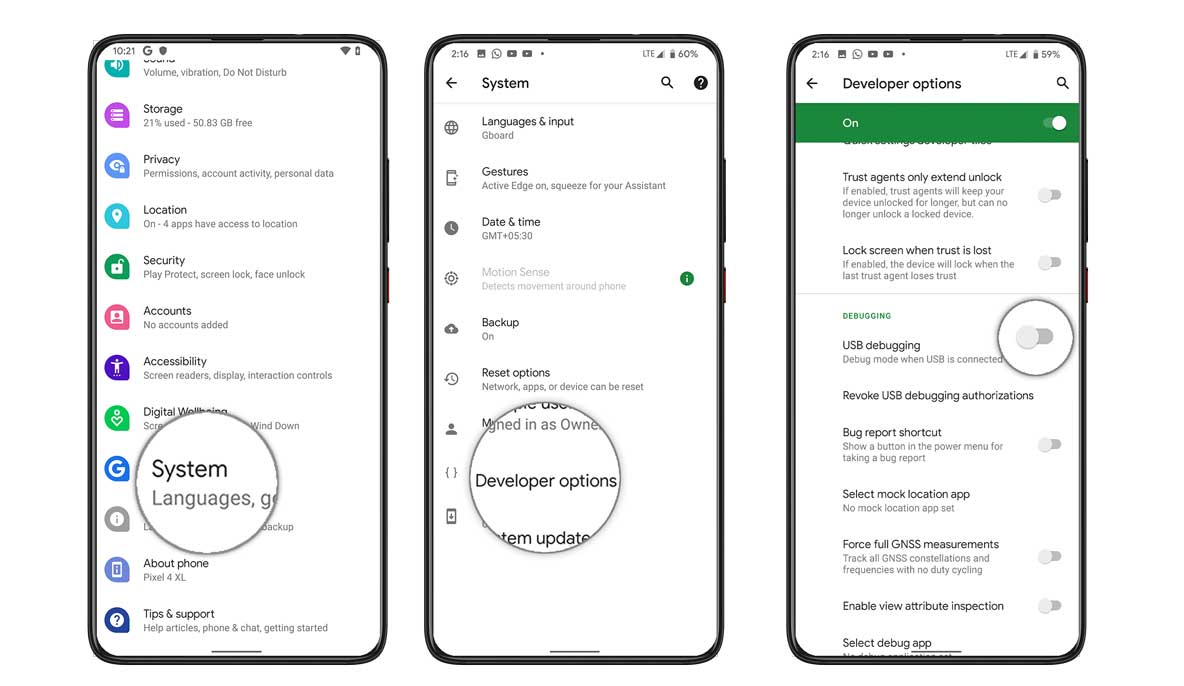
- Go back to the Settings menu > Search for Developer Options and open it.
- From the Developer Options menu, Turn On the USB Debugging toggle.
- If prompted by Allow USB Debugging? then tap on OK to confirm it.

- Once done, scroll a bit, and Enable OEM Unlocking too.
- If prompted, confirm to turn it on.
Please Note: The OEM Unlock option may be greyed out on some devices and you won’t be able to turn it on. In this scenario, you’ll have to connect the Razr+ device to the internet connection and browse the internet for at least 7 days (a week) to make the OEM Unlock available. Once available, turn it on manually.
Unlock Bootloader on Motorola Razr+ (XT2321-3)
- Make sure to enable the USB Debugging and OEM Unlock on your Motorola Razr+ (XT2321-3) device.
- We assume that you’ve already taken a data backup on your handset.
- As you’ve downloaded the ADB Fastboot Tool on your PC, extract it on the desktop.
- Now, install the Motorola USB Driver on your computer after downloading it from the link above.
- Connect your Motorola Razr+ smartphone via a USB cable to the PC.
- If your smartphone prompts to allow USB debugging by your computer, confirm it.
- Next, go to the extracted ADB & Fastboot Tool folder on the desktop.
- Click on the address bar inside the folder > Type cmd and hit Enter to open Command Prompt.
- If prompted by UAC, click on Yes to allow the admin access.
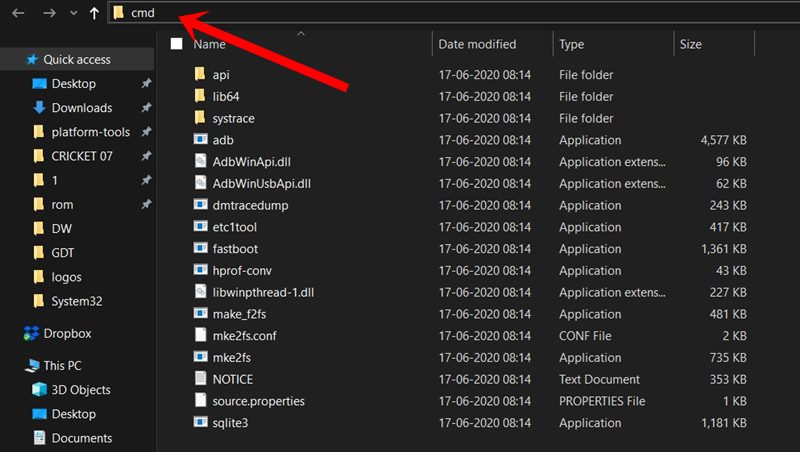
- Now, type the following command in the cmd window and press Enter to check the adb mode:
adb devices
- If the device is connected successfully to the PC in adb mode, you’ll see a random device ID.
- In case, the device ID isn’t showing, disconnect the USB cable > Reinstall the USB Driver and retry the steps again.
- Run the following command in cmd to restart your connected Motorola Razr+ device into bootloader:
adb reboot bootloader
- Run the following command to enable/check the fastboot mode with your device:
fastboot devices
- Then you should run the following command to get the Unlock Data:
fastboot oem get_unlock_data
- Now, you’ll get a string (just combine the string into one line by removing the spaces).
- Then visit the official Motorola Unlock Bootloader website and register or sign in.
- Follow the on-screen steps and use the Unlock Data to get the Unlock Key using your registered email account.
- Go back to your CMD > Run the following command to confirm bootloader unlocking: (UNLOCK_KEY is the key you’ve received via email)
fastboot oem unlock UNLOCK_KEY
- Once you confirm the process, your Motorola Razr+ bootloader will be unlocked.
- Once done, you can run the following command to restart your handset:
fastboot reboot
- You’re now good to go to enable root access in the next method. In case, you’re facing any issues with the bootloader stuck, you should visit the XDA Forums to get further help.
Steps to Root Your Motorola Razr+ (XT2321-3) Using Magisk
Here we’ve shared with you the steps to enable root access on your Motorola Razr+ handset via Magisk that you can check below.
- Connect your Motorola Razr+ to the PC via a USB Data Cable.
- Now, copy the Magisk.APK file to your phone’s internal storage.
- Then extract the firmware (zip) file on the PC and search for the ‘boot.img’ file.
- Make sure to copy the ‘boot.img’ file to your phone.
- Install the Magisk APK file on your Motorola Razr+ device manually.
- Then run the Magisk app > Tap on ‘Select and Patch a File’.
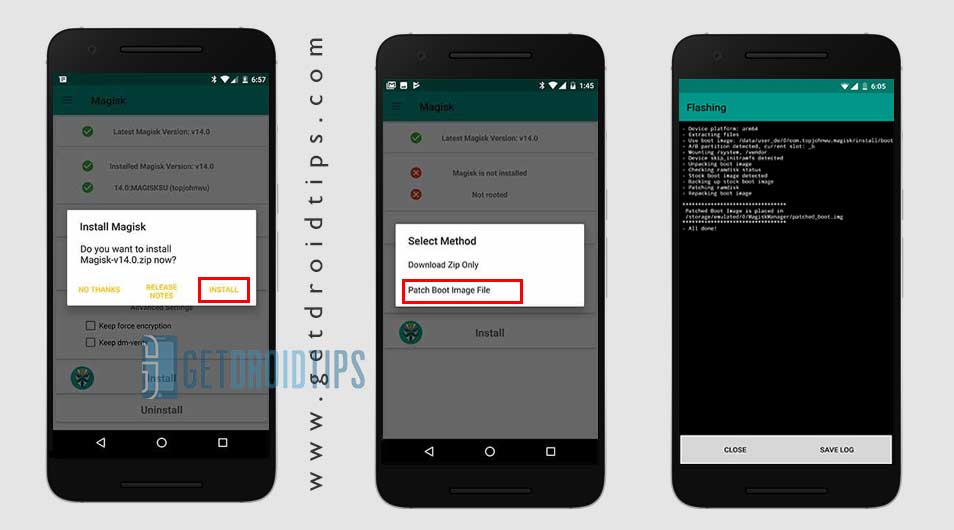
- Next, select the copied ‘boot.img’ file to get the Magisk patched img file.
- Copy the Magisk patched img file to the compressed ADB & Fastboot Tools (Android SDK) folder on your PC.
- Click on the address bar inside the folder > Type cmd and hit Enter to open Command Prompt.
- If prompted by UAC, click on Yes to allow the admin access.
- Now, you’ll need to run the following command in Command Prompt to check the connected device:
adb devices
- If it’s successful, you’ll get to see your Razr+ serial number.
- Then run the following command to restart your Razr+ into the bootloader:
adb reboot bootloader
- Run the following command to enable/check the Fastboot mode:
fastboot devices
- Then run the following command to install ‘magisk-patched-img’ file into your Moto Razr+:
fastboot flash boot magisk-patched-img
Please Note: The ‘magisk-patched-img’ file name should be the exact one that you copied from your phone.
- Once done, you can now execute the following command to reboot to handset to the rooted system:
fastboot reboot
- Finally, your Moto Razr 40 Ultra device is Magisk rooted successfully.
How to Verify the Systemless Root?
You can check out the following steps to easily verify whether your handset is enabled for systemless root or not.
- Launch the Magisk Manager app on your handset.
- Check the Status to verify if your device gets a systemless root with all Green tick options.
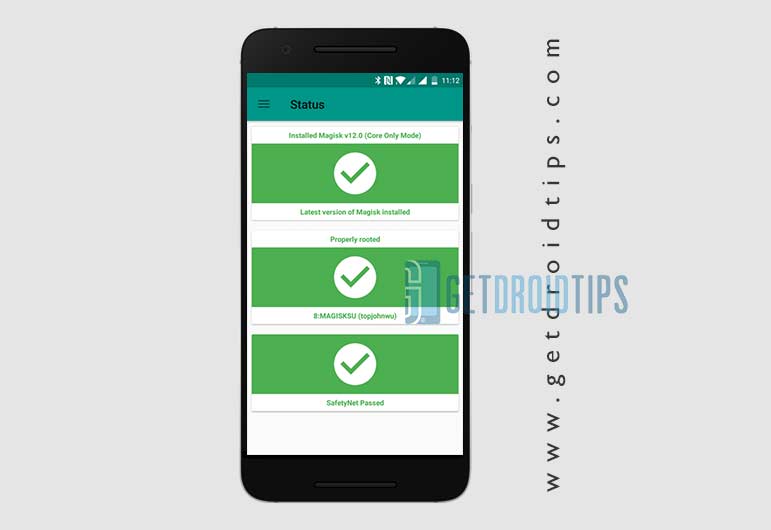
- It means ‘you have successfully rooted and bypassed SafetyNet’.
- You’re good to go. Enjoy!
That’s it, guys. We assume this guide was helpful to you. For further queries, you can comment below.
Credit: XDA Forum
