Here in this guide, we will share with you the easy method to root Vivo Z5 using Magisk without TWRP Recovery. The handset comes with Qualcomm Snapdragon 712 SoC, runs on Android 9.0 Pie and more. Now, if you’re using Vivo Z5 and want to enable the root access, this guide is for you.
By rooting your Vivo Z5, you will get superuser access over the system and subsystem. Therefore, you can easily remove, change, or edit system files and apps on your Vivo Z5 device. Rooting a smartphone can also be useful to increase battery life, remove bloatware, use some of the rooted apps, and more. If you’re a customization freak and tweaks a lot on your device, this will be very useful. However, there are some of the disadvantages as well which are mentioned below.
Page Contents
Rooting and its Advantages
Android is known for customizations, tweaks, and development as well due to its open-source nature. Most of the developers and advanced users are always trying to tweak their Android devices. In that case, if you have to unlock the device bootloader and then install Magisk or TWRP. Then you can be able to install root on your handset. Here we have provided the Magisk method for the systemless root access without any issue.

Rooting a smartphone or a tablet device lets you change themes, removing bloatware, improve battery life, tweaking system root files, visual changes, hibernate system apps, etc. Additionally, you can block app ads, system ads, install Xposed modules, increase device performance, and more. While the smartphone OEMs don’t provide the unlocked bootloader or root access by default. Let’s take a look at the rooting advantages.
Advantages
- You will get access to the device root directory.
- Increase the Vivo Z5 performance by overclocking it.
- Increase battery life by the underclocking device.
- Uninstall Bloatware on the Vivo Z5 device.
- Block Ads on any application.
- You can View, Edit, or Delete any system files inside the root directory.
- Support to install the Xposed Framework and Xposed module.
Please Note:
- You won’t be able to get official OTA updates after installing Root.
- Next, your Vivo Z5 may get bricked easily due to improper rooting steps. Follow the steps properly.
- Your device warranty may void as well after rooting. Before doing anything, check with your device manufacturer for the warranty terms and conditions.
- Make sure to take a complete backup of your Vivo Z5 before doing anything.
Steps to Root Vivo Z5 using Magisk
Now, let’s take a look at the rooting steps along with requirements and download links. Check out the full requirements and download all the necessary files before flashing.
Pre-Requirements:
- Plugin your device with the charger and fully charge it.
- Make sure to take a full backup without the root of your device data before doing anything.
- A Windows PC/Laptop and a USB cable is required.
- Download and Install all the required files, tools, and drivers from the below links.
Download Links:
- You have to download and install the ADB and Fastboot tool for Windows/MAC.
- Download and Install Vivo USB Drivers | MediaTek USB Drivers | MTK VCOM Drivers.
- Download the latest Vivo Z5 Stock ROM.
- Download and Install the QFil Flash tool on your PC.
Disclaimer:
After downloading the stock firmware file for your device model from the download section, you have to extract the boot.img file to patch it via the Magisk Manager app.
Steps to Extract and Patch Boot Image using Magisk
- First of all, download and extract the Vivo Z5 Stock ROM on your computer.
- Next, connect your smartphone via USB cable to the PC and copy the boot.img file only from the extracted folder to your device.
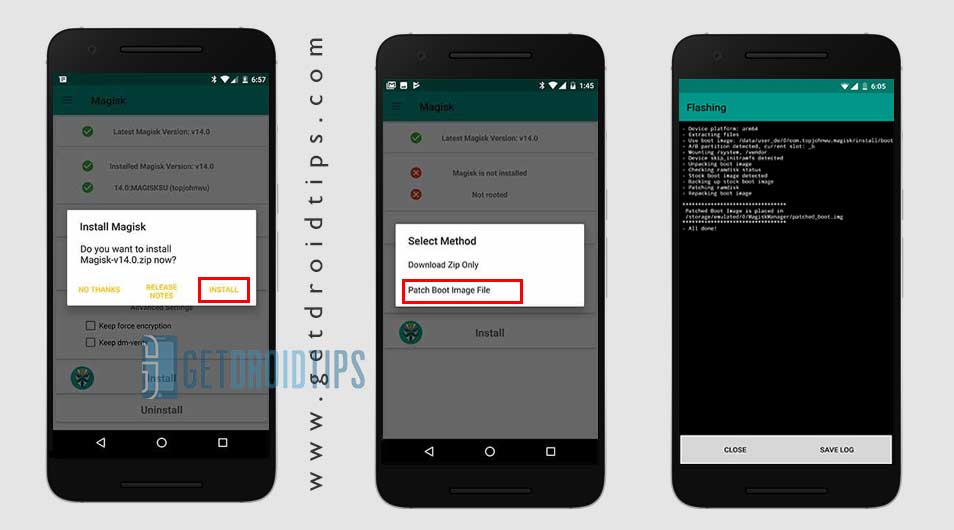
- Now, open Magisk Manager and select the INSTALL option and choose to install it again.
- Then tap on the “Patch Boot Image File”.

- Navigate to the internal storage and select your device boot image which you’ve moved earlier.
- Wait for a few seconds and Magisk will start patching the boot image file.
- After patching the boot image file, copy the “patched_boot.img” from the internal storage and replace it in the ADB fastboot folder on your PC.
Next, you have to follow the second step to flash the patched boot image file.
Steps to Install the Patched Boot Image on Vivo Z5
- Install the QPST package on your PC and run QFIL. Select Flat build, then navigate the programmer path to your ROM folder. Select the prog_emmc_ufs_firehose_Sdm660_ddr.elf as your programmer path. Next, load XMLs RawProgram0.xml and patch0.xml.
- Let’s begin by booting our phone into emergency download mode.
- To boot into emergency download mode, you need to press and hold Shift Key and Right Click button on the mouse in the empty space. You will see the below dialog box popping up.

- Click on Open Powershell Window or Command window here. Basically, the command prompt opens up upon clicking.
- Type the adb command to boot your phone into emergency download mode
adb reboot edl - QFIL should go from ‘No Port’ to ‘Qualcomm HS-USB QDLoader 9008’.
- Immediately after you see this pop-up, select ‘Download’. This will completely reset your device.
- If flashing was successful, wait a bit then boot your device. You should see a little warning complaining that the software has been altered. Wait a little bit more. You can install magisk manager at this point if it didn’t show up after the flash. Reboot the device again.
- That’s it! You should have a rooted device now.
In some cases, if the above method doesn’t work on your Vivo Z5 (PD1921), then try via ADB fastboot method.
- After extracting ADB fastboot tool, you must move the patched boot image to the same folder. Hold the SHIFT key and click on the right mouse button to open the command window/PowerShell.
- Run the following command in the open command prompt.
- Flash the “patched_boot.img” to install Magisk and root your Android device:
fastboot flash boot patched_boot.img
- For devices with A/B partition system, use the following commands:
fastboot flash boot_a patched_boot.img

fastboot flash boot_b patched_boot.img
Please replace [patched_boot.img] with the name of the boot image file you downloaded followed by the .img extension.
- Flash the “patched_boot.img” to install Magisk and root your Android device:
- The flashing process will begin. Once done, run
fastboot reboot
Steps to Verify the Systemless Root Access on Vivo Z5
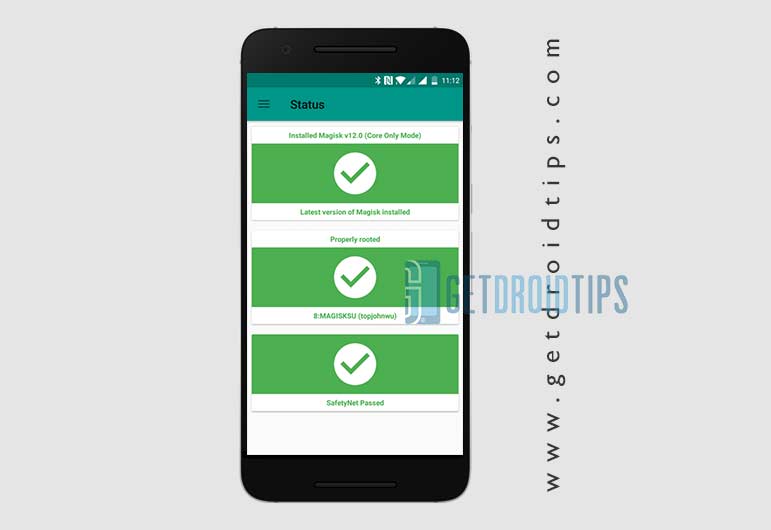
- First, you have to download and install the Magisk Manager app on your device and open it.
- Now, you will see a list of options with the Green Tick mark which means you’ve successfully rooted your device and bypassed the SafetyNet feature. (systemless root access)

We hope that this guide is useful to you and you’ve successfully enabled root access on your Vivo Z5 device via Magisk. For any queries, ask in the comments below.

I need to unlock bootloader to Root my Vivo z5?
How update it After rooting?
Thank you very match