Here in this guide, we will help you to flash the magisk to root Wiko View Go. Read our step by step guide properly!
Who doesn’t want to get the most of his Android device..?! Getting the superuser access through root and to be able to control various aspects like clock, access to cache etc. are few of the various possibilities that we can explore. When we mention root access, this means we need to perform a certain modification that will root our phone and we will have access to the root directory of our device. In this post, we will show you how to root Wiko View Go.
![Easy Method To Root Wiko View Go Using Magisk [No TWRP needed]](https://www.getdroidtips.com/wp-content/uploads/2019/05/Wiko-View-Go.jpg)
We will use the Magisk by patching the stock boot image and flash that to your boot partition. All you need to do is download the patched image file from Magisk Manager and flash it.
Mostly uninitiated people compare rooting with hacking which is not correct. The purpose in both contexts is quite different. Hacking is more like breaking into someone’s else system illegally, whereas rooting is mostly done by the owner of an Android device to gain superuser advantages of the device.
Page Contents
Rooting and it’s Advantages
As we already mentioned above that Rooting for Android means quite similar to the jailbreaking the device to get access to the root directory of your Android system. It will give you the superuser access as an administrator to use your device over an Android subsystem and system apps freely.
Though sometimes improper rooting may brick your Wiko View Go or void your device warranty as well (if applicable). But it will give you extra access to change or edit the system settings, themes, icons, install other mod files, etc.
Let’s take a look at the rooting advantages.
Advantages of Rooting
- You can get access to all files on your Wiko View Go root directory.
- Increase the performance of your device by overclocking.
- By rooting you can increase battery life by underclocking device.
- Uninstall Bloatware on Wiko View Go.
- You can block Ads on any applications.
- By Rooting Wiko View Go device, you can View, Edit, or Delete any system file inside the root directory.
- Install the Xposed Framework and Xposed module.
The smartphone OEMs don’t provide root access with the Stock ROM by default due to some limitations and security reasons. The Magisk root process doesn’t require a Custom Recovery in order to flash anything. But if in case, your device gets bricked or you’re facing any software bug, you can unroot your Wiko View Go as well.
Please Note:
- You won’t be able to get official OTA updates automatically after installing Root.
- Additionally, your device may get bricked easily due to improper rooting steps.
- Your device warranty may void as well after rooting. Before doing anything, check with your device manufacturer for the warranty terms and conditions.
- Make sure to take a complete backup of your device before doing anything.
Steps To Root Wiko View Go Using Magisk
Before moving on to the flashing steps, you need to follow a few,
Pre-Requisites
- Make sure to have enough battery charge on your phone to avoid interruption during the patch installation.
- Before performing any modification take backup of your device data.
- This image file is strictly for Wiko View Go only. Do not use it on any other Android device.
- You need a PC/Laptop with a micro USB cable to connect.
- Make sure that you download all the required files on your PC/Laptop
Required Downloads:
- Download ADB and Fastboot files. (Windows/MAC)
- Download and Install Wiko USB Drivers.
- Download Latest Wiko View Go Stock ROM
- Download And Install SP Flash tool on your PC
Disclaimer
We are at GetDroidTips will not be responsible for any bricking/damage to your phone while/after installing this ROM.
1. How to Extract and Patch Boot.image using Magisk?
- First of all, download and extract the ROM to your PC.
- Attach your device via USB cable and copy only the boot.img file from the extracted folder to your device storage
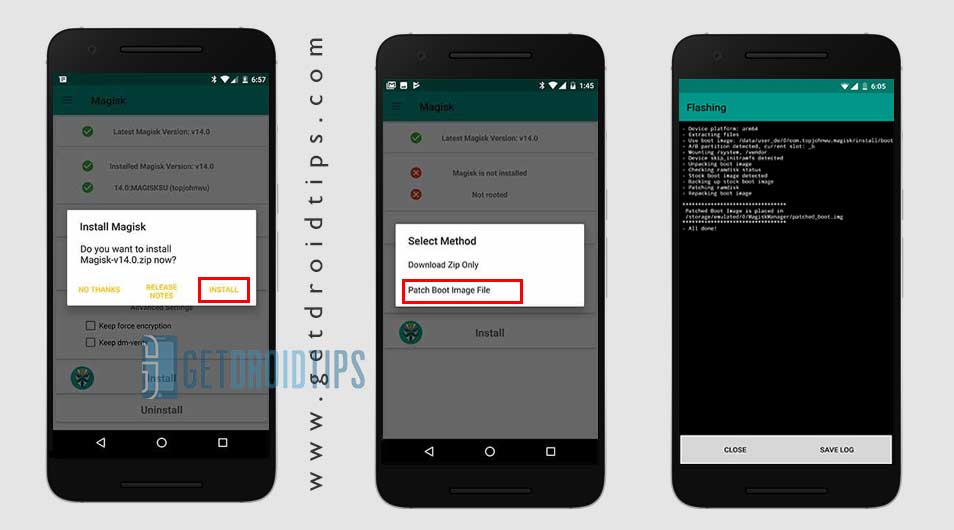
- Launch Magisk Manager. When a popup appears asking to install Magisk, select INSTALL and choose install again.
- Tap on “Patch Boot Image File”.

- Navigate to internal storage and select your phone’s boot image that you transferred earlier.
- Wait for a couple of seconds. Magisk will start patching the boot image.
- Once the boot image has been patched, copy the “patched_boot.img” from the internal storage and replace it in the same extracted ROM folder on your PC.
Now you can follow the second step to flash the patched boot image file.
2. How To Install the Patched Boot Image on Wiko View Go
Follow the given link to install Patched Boot Image on Wiko View Go:
How To Install the Patched Boot Image on MediaTek deviceIn some cases, if the above method doesn’t work on your Wiko View Go, then try via ADB fastboot method.
- We assume that you have already downloaded the ADB & Fastboot tool from the link given above.
- Now, extract the ADB fastboot tool, then move the patched boot image to the same folder.
- Hold the Shift key and right-click on the mouse to open the command window/PowerShell.
- Next, enter the following command:
- Flash the “patched_boot.img” to install Magisk and root your Android device:
fastboot flash boot patched_boot.img
- For devices with A/B partition system, use the following commands:
fastboot flash boot_a patched_boot.img

fastboot flash boot_b patched_boot.img
Please replace [patched_boot.img] with the name of the boot image file you downloaded followed by the .img extension.
- Flash the “patched_boot.img” to install Magisk and root your Android device:
- The flashing process will begin. Once done, run
fastboot reboot
How to Verify if your phone has a systemless root?
- Download and install the Magisk Manager app APK, and launch it.
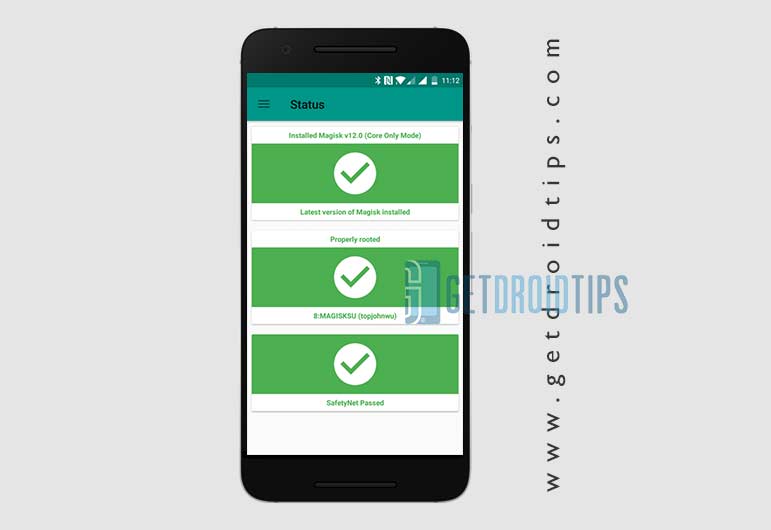
- To verify that you have systemless root, check the top of the screen and if you see all option with Green Tick which means you have successfully rooted and bypassed SafteyNet.

So, that’s it. Now that you have rooted your Wiko View Go. If you have any queries regarding this, do let us know.

Emoji
Emoji
Non mi fa mettere le emoji dell’iPhone ho wiko