SteelSeries is created one of the most amazing headsets for gamers that has a lossless 2.4 GHz wireless and a ClearCast bidirectional microphone. Yes, we are talking about the new SteelSeries Arctis 7P! In addition, this headset comes with 24-hour prolonged battery life, giving you more time to enjoy your favorite content.
But, the most notable feature due to which gamers are crazy for this headset is its built quality and wide range of compatibility, a next-gen true wireless audio output, long battery life, comfort, and versatility. However, in my opinion, Arctis 7P has a much larger battery life in this price segment.
However, it’s the most impressive feature that the ClearCast bidirectional Microphone seems to be not that great. This is because, for some users, the Arctis 7P microphone is not working while they are playing the game using these headgears. But don’t worry, as fixing the mic error is not a very tough task. So, let’s take a look at how you can fix this issue permanently for your Arctis 7P.
Also Read

How To Fix SteelSeries Arctis 7P Mic Not Working Issue
You’re not the only one who is facing the microphone issue with your Arctis 7P. Many people encountered the same Arctis 7p mic not working problem, but they were able to resolve it using the following solutions. So, let’s get started with them:
Fix 1: Power On/Off Your HeadSet
The first way that we ask you to try is to power on/off your headset. This will remove all the temporary glitches that will fix all the issues that occur due to these bugs. So, go and restart your headset using the power on/off button without getting late. Then, check if the mic starts working or not.
Fix 2: Restart Your Device
The system to which you have connected your Acrtis 7P may have some issue due to which you are getting this issue. There are chances that your device may contain some temporary corrupted files due to which it isn’t able to make a connection between your device and your headset’s Microphone.
Therefore, when you reboot your device, these files automatically get removed. So, try this out and again connect your headset to check if the Microphone starts working or not. Most probably, your Arctis 7P microphone starts working as many users previously reported that this helps them to resolve this kind of issue.
Fix 3: Check The Charging Level
Did you check if your Arctis 7P is fully charged or not? So, you can simply check the battery level of your 7P headset, and if you find that the battery is low, then charge it for some time and try using the Microphone again to check if it starts working or not. It sounds weird, but sometimes low battery maybe also come up as the main culprit of this type of issue.
Fix 4: Update or Reinstall The SteelSeries Engine Software

We have noticed many reports that the SteelSeries Engine software older version comes up as the main culprit behind why your mic is not working. Therefore, now what to do? Well, simple, you just have to update your SteelSeries Engine software on your PC. Therefore, let’s look at the needy steps to do so:
- Firstly, press the Win+I key altogether to open the Run box. Then, search for appwiz.cpl.
- After that, locate the SteelSeries Engine and right-click on it. Then, hit the Uninstall button.
- Now, hover over to the SteelSeries website to download the driver.
- Then, install it as you normally do and again connect your headset to your PC, then check if the mic not working issue gets resolved or not.
Fix 5: Perform A Hardware Reset
Now, if the issue won’t get fixed, you must try a hardware reset because this can resolve this kind of error. Therefore, if you are still worried due to this error, then perform the steps we have mentioned below:
- Firstly, turn off your headset and remove the cushion of your left earcup, then locate the pinhole inside it.
- Then, use a pin to press the button for about 2-3 seconds.
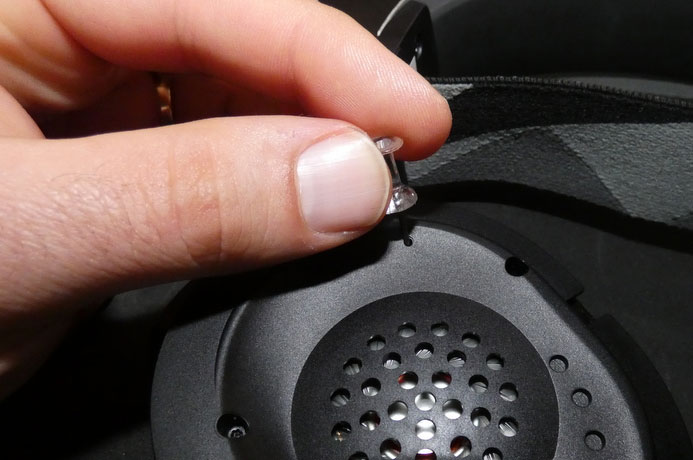
- That’s it. Now, wait for some time and turn on your Arctis 7P headphone to check if the issue gets fixed or not.
Fix 6: Enable The Microphone
Did you check if the microphone is enabled on your PC or not? Well, there are chances by accident you may have disabled it previously. So, here are some steps that will help you enable the Microphone on your Windows PC:
- Initially, launch the Control Panel. Then, click on the View By drop-down button and select the Small icons.
- After that, select the Sound option. Then, switch to the Recording tab.
- Thereafter, simply right-click on the empty space and hit the Show Disabled Devices.
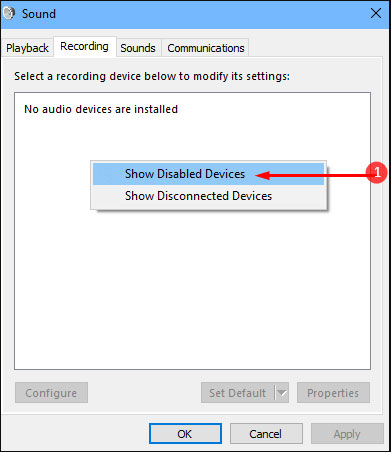
- Now, simply check if the Arctis 7P microphone is enabled or not. For that, right-click on it and select the Enable button.
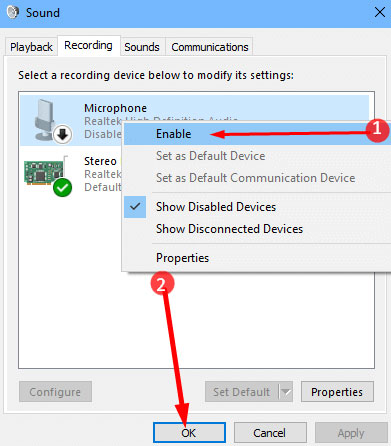
- After that, make sure to microphone is set to default. To do so, click on it and select the Set Default option.
- Then, you just have to right-click on the Microphone and hit the Properties option.
- That’s it. Now, switch to the Levels tab and unmute the Microphone by clicking on the speaker button. Then, drag the slider to full in order to increase the intensity.
Fix 7: Update Driver
Outdated drivers can negatively influence overall computer performance; therefore, keeping them up to current is vital for regular computer maintenance. Unfortunately, most computer users don’t think about updating or managing their drivers until something goes wrong.
At the same time, this works for some types of drivers, such as audio drivers. Therefore, it is possible that your system is running on an older audio driver, due to which you are getting this issue. So, we suggest you check if there’s any update available for your audio driver. However, to do so, you can perform these steps:
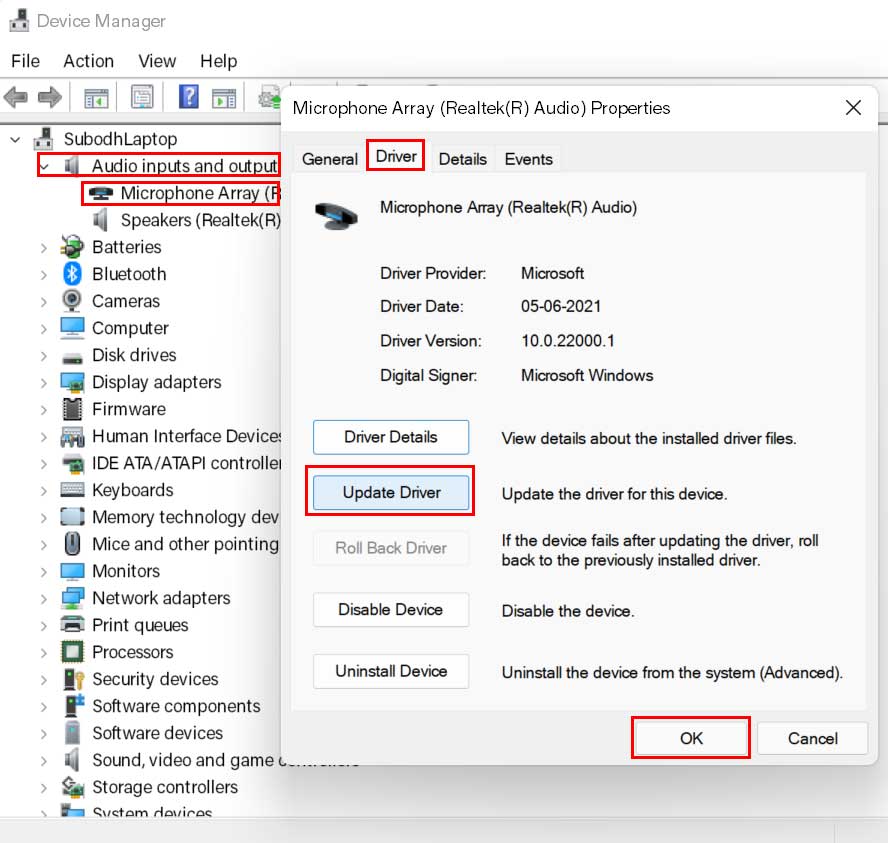
- Firstly, launch the Device Manager and expand the Audio inputs and outputs tab.
- Then, right-click on the Microphone and select the Driver tab, then hit the Update Driver button.
- Now, wait until it searches and updates your driver. Once done, reboot your system to apply the changes. Then, check if the issue gets resolved or not.
Fix 8: Allow Access Arctis 7P Microphone
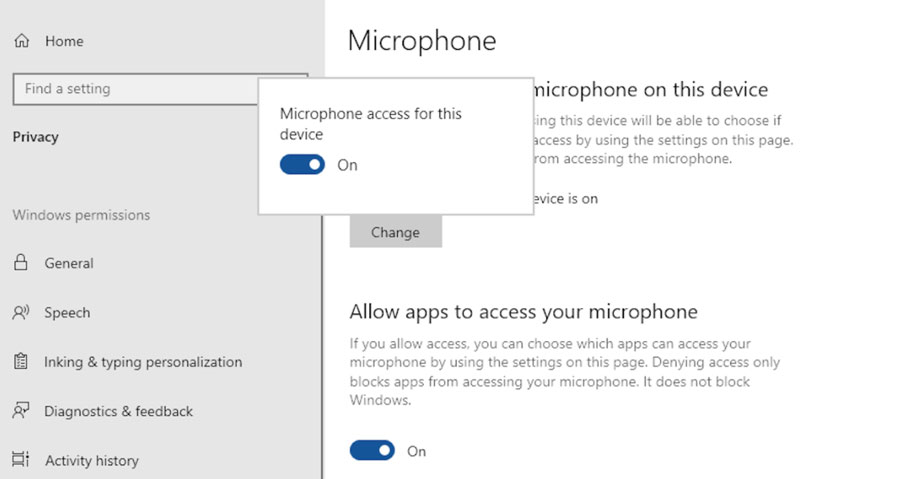
There are chances that you didn’t allow the microphone access to your Arctis 7P headset on your PC. So, you need to allow access to the Microphone by following the steps mentioned below:
- Firstly, open the Windows settings and tap on the Privacy tab.
- After that, shift to the Microphone tab and hit the Change button. Then, make sure Microphone access for this device is On.
- Now, toggle the button located in front of the Allow apps to access your Microphone.
Fix 9: Contact To Support Team
Suppose you have tried everything that we have mentioned here in this guide and are still bothered due to the same error. Then, we advise you to contact the SteelSeries official support team and explain everything about the error. Then, if possible, they will surely come up with some fixes. Otherwise, they call you to their nearest repair center to get a repair.
So, that’s all on how to fix if the SteelSeries Arctis 7P Mic is not working. We hope that the above methods have helped you. But, in case you still have any doubt on your mind, comment below without any hesitation.
