The majority of the population is the kind that needs constant reminders that will keep them from forgetting things. Especially if you’re a person at work, you’ll have those small notes stuck on the corners of your computer or maybe on the refrigerator or walls if you’re at home. These pieces of papers are reminders for a lot of people and they’re at times a lifesaver.
Page Contents
Sticky Notes on Desktop: How to Use and Best Tips
Sticky Notes on Desktop is a really handy tool that eliminates the need for a pen and paper. With this tool, all your reminders and notes will go inside your computer screen and not on the corners of it. Using this tool is really easy, however, there are a lot of things that you will find if you dig deeper. So in the below guide, we’ll get you through everything about Sticky Notes on Desktop: How to use and best tips.

1. How to launch Sticky Notes
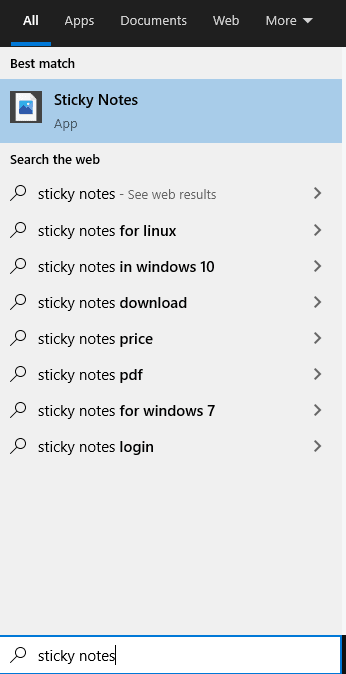
In order to launch Sticky Notes, press the Windows key and then type in Sticky Notes. From the results, you’ll find Sticky Notes as an application. Click on it and Sticky Notes will be launched. For quick access, you can right-click on the Sticky Notes icon on the taskbar after launching it and then choose the Pin to taskbar option.
2. Creating notes using Sticky Notes
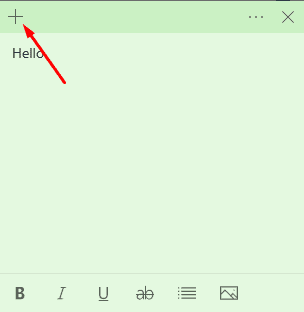
In order to create notes using Sticky Notes, simply launch the tool and it will automatically open a new note. If you wish to add further notes, then simply click on the + icon on the top-left side of a note that’s open. Alternatively, you can also press ctrl+N with the Sticky Notes tool in focus to create a new note with the keyboard. If you have the tool pinned to your taskbar, then right-clicking on its icon from the taskbar and choosing the New note option is another way of creating new notes.
3. Sticky Notes and Virtual Desktop – keep your desktop clean
As of now, each new note that you create opens up in new windows. This means that if you create 10 notes using Sticky Notes, then you’ll have 10 different windows for each note. This is pretty frustrating and creating notes in big numbers will clutter up your screen. In order to prevent this, we suggest that you make use of Virtual Desktop in Windows 10. Having all your Sticky Notes on a separate virtual desktop won’t interfere you and your work.
In order to do this, press Win+Tab. This will open the Windows 10 Task View. At the top of this Task View, you’ll find a New desktop option. Click on this and your computer will create a separate virtual desktop for you. After clicking on the New desktop option, you’ll find two desktops at the top, labelled Desktop 1 and Desktop 2. Desktop 1 is the desktop that you were working on and Desktop 2 is the separate virtual desktop we created for using Sticky Notes. Cicking on Desktop 2 will take you there and you can follow the above steps and have your Sticky Notes there. In order to easily switch between these dektops, you can use the Ctrl + Win + Left/Right keyboard shortcut.

4. How to use Sticky Notes
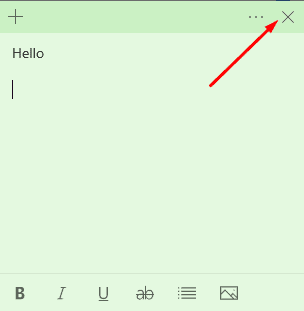
Using Sticky Notes is fairly easy. The interface is pretty easy to understand and it contains no complications at all. By clicking on an open note, you’ll set it in focus. When this happens, you’ll see more options on that particular note. When you have a note in focus, you can click on the X button/close icon to close that note. Keep in mind that this only closes the note and does not erase it. A closed note can always be opened later whenever you want.
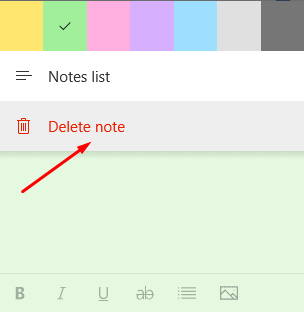
Next, you’ll see three dots right next to the close icon. This is the Menu button. By clicking on this button, you can choose from a variety of colors for your note. Under the same menu, you’ll find a Delete note option. If you no longer need the note and want to erase it, you can click on this option and the note will be gone forever. Next to this, you’ll find another option called Notes list. We’ll save this for another chat later down this guide.
Moving on, at the bottom of every note, you’ll find a set of formatting options. These options help you make texts bold, write in italics, underline words, write strikethrough words, add bullet points, and finally, add images. Depending on your choice, you can choose these formatting options. There are some keyboard shortcuts for these as well but we’ll get to in later in this guide.
![]()
5. Sticky Notes keyboard shortcuts
- Bold: Ctrl + B
- Underline: Ctrl + U
- Italics: Ctrl + I
- Strikethrough: Ctrl + T
- Bullet: Ctrl + Shift + L
- Close the current note in focus: Ctrl + W
- Delete the current note in focus: Ctrl + D
- Open the Notes list: Ctrl + H
6. What is the Sticky Notes List and how to use it
The sticky notes list is another feature of the Sticky Notes. You can either access it from the menu of an open note or by pressing Ctrl + H with a note in focus. The Sticky Notes list is basically the hub for all your current Sticky Notes. The notes that are closed and open will appear in the Sticky Notes list except for any deleted/erased notes.
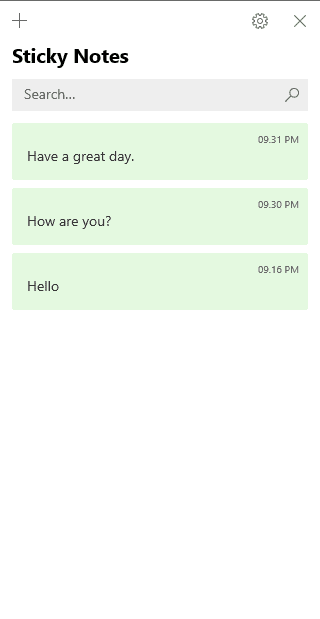
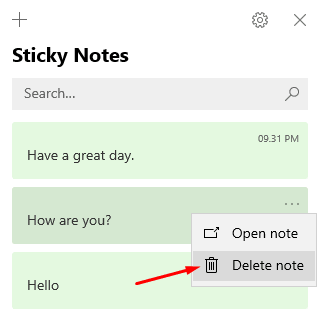
Although we do have multiple ways to creat new notes, you can also click on the + icon at the top-left side of the Sticky Notes list to create new notes. In order to open a note from the list of the Sticky Notes list, you simply have to double click on the note that you wish to open. If you right-click on any note from the list, you’ll also get the option to delete a note.
The Sticky Notes list also have a search box at the top of the list of notes. You can use this search box to search for a note that you can’t find by entering in a word or two that the particular note contains. Furthermore, you can click on the Settings icon at the top to access its settings. Under settings, you’ll find a few options that you can choose to enable or disable. Enable insights is one of these options and enabling it will turn on the useful content recognition feature in Sticky Notes.
7. What are Insights in Sticky Notes
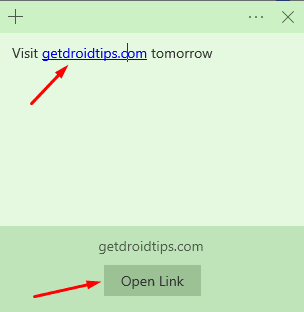
Finally, what we have is the Insights in Sticky Notes. When you enable Insights in Sticky Notes, the tool will automatically recognise some commands, dates, and reminders. However, we did test this but the tool did fail to recognise reminders sometimes. An example when this feature works is if you type in a website domain and click enter. When you do this, the domain name will be underlined and shown as a link/URL. By clicking on it, the tool will give you an option to visit the site. The same happens when you type in a future date or words like tonight or tomorrow, although this didn’t work for us.
- Microsoft Sticky Notes vs Google Keep: Which One Is The Best Note Taking Tool?
- All Sticky Notes Keyboard Shortcuts on Windows 10
- How to enable System sound on Windows 10?
- How to Enable Windows Tamper Protection in Windows 10
- What are PY files? How to Open PY Files on a Windows 10 PC?
- Lock Your Windows 10 PC Using Command Prompt
- How to Change Your Login Name on Windows 10
- How to Add Control Panel to File Explorer in Windows 10
With that, we’re winding up today’s guide. Covering 7 steps for using Sticky Notes, we’re through with everything regarding using Sticky Notes as well as the useful hints that’ll help you be no stranger to the tool. That said, we hope reading the article above has equipped you with some bit of information. Please let us know by commenting down below if you have any further queries regarding the same.
Also, check out our iPhone Tips and Tricks, PC tips and tricks, and Android Tips and Tricks if you’ve got queries for it or want help. Thank you!
