Well, starting off, the ‘System Service Exception Stop Code’ in Windows 10 is one of the (Blue Screen of Death) BSOD errors. Plenty of Windows 10 users are experiencing this particular error on several occasions which is frustrating a lot. If you’re also one of the victims then make sure to follow this troubleshooting guide to resolve it completely.
To be very precise, this particular issue may happen due to drivers or software-related conflicts. Sometimes corrupted or missing Windows system files can also occur such kinds of issues. Additionally, issues with the hard drive like bad sectors, etc can also fix multiple issues with BSOD errors in most scenarios.
Also Read
Page Contents
- How to Fix the System Service Exception Stop Code in Windows 10
- 1. Update Windows OS Build
- 2. Update Graphics Drivers
- 3. Run Windows Update Troubleshooter
- 4. Disable Antivirus Software
- 5. Run Windows Memory Diagnostic Tool
- 6. Run SFC (System File Checker) Scan
- 7. Run CHKDSK (Check Disk)
- 8. Reconnect Hard Drive (HDD/SSD)
- 9. Update BIOS (Basic Input Output System)
- 10. Uninstall Recently Installed Programs
- 11. Disable Webcam Device
- 12. Reset This PC
How to Fix the System Service Exception Stop Code in Windows 10
As we’re aware of what can cause the system service exception error on Windows 10, let’s jump into the possible workarounds below without wasting any more time.

1. Update Windows OS Build
Well, it’s highly recommended to update your Windows OS build on the computer to get the latest features, improved performance, stability improvements, and additional privacy or security functions whatsoever. If you haven’t updated your Windows OS build for a while then make sure to install the latest version right now. To do that:
- Press Windows + I keys to open Windows Settings.
- Click on Update & Security > Select Check for updates from the Windows Update section.
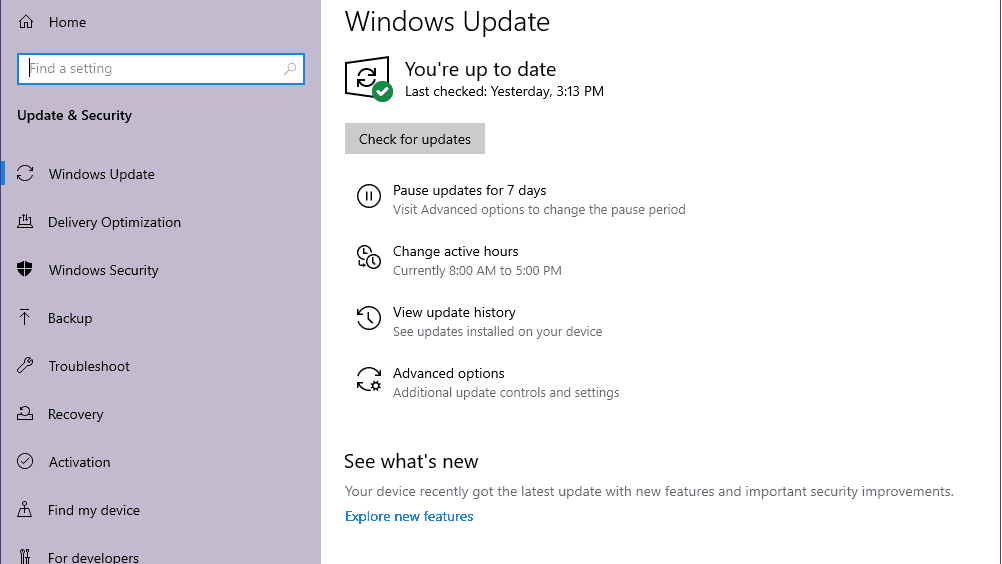
- If there is an update available, just click on Download and install.
- It may take some time to complete the update installation on your PC depending on the internet connection as well as hardware specs.
- Once done, your computer will automatically reboot to the system. If not, you can also manually restart the PC to apply changes.
2. Update Graphics Drivers
There is nothing new to say because an outdated graphics card driver on your Windows PC can always cause several issues with the system performance, gaming, hardcore graphical tasks, BSOD-related errors, and more. To do so:
- Press Windows + X keys to open the Quick Start Menu.
- Now, click on Device Manager from the list > Double-click on Display adapters.
- Right-click on the dedicated graphics card that you’re using.
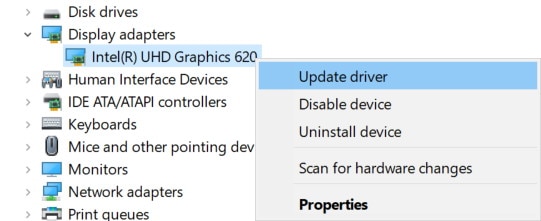
- Next, select Update driver > Choose to Search automatically for drivers.
- If there is an update available, it’ll automatically download & install the latest version.
- Once done, restart the system to apply changes immediately.
3. Run Windows Update Troubleshooter
If in case, you’re still having issues with the Windows 10 System Service Exception Stop Code error then make sure to run Windows Update Troubleshooter by following the steps below:
- Press Windows + I keys to open Windows Settings.
- Go to System from the left pane > Click on Troubleshoot from the right pane.
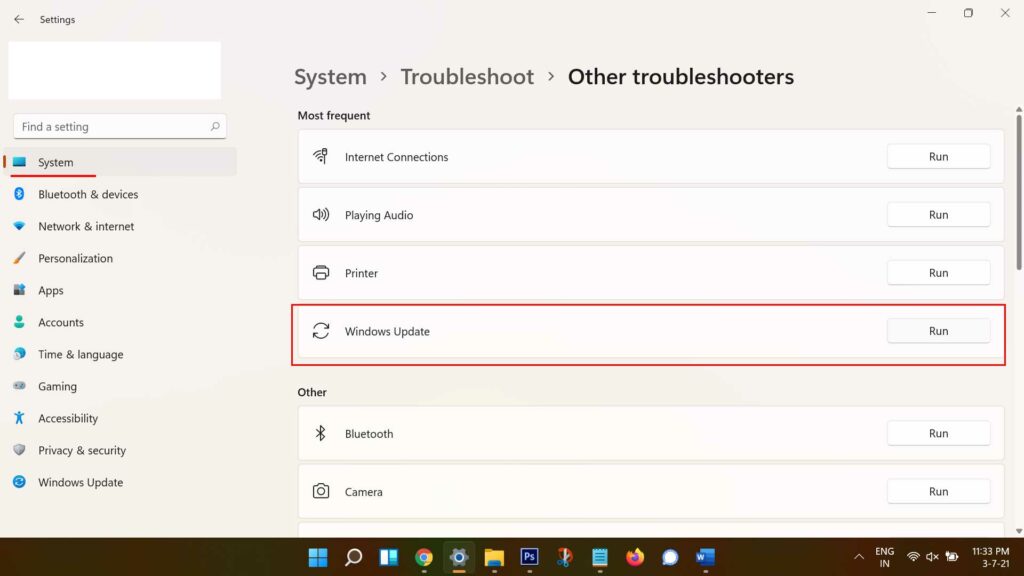
- Click on Other troubleshooters > Click on Run next to Windows Update.
- Let the system automatically initiate diagnostics and check several items on the computer.
If there is an issue detected on your computer then make sure to search for a specific troubleshooting guide online and fix it.
4. Disable Antivirus Software
The chances are also high that the antivirus programs on your Windows computer are somehow preventing the boot files to run the system properly. It’s always a better idea to temporarily disable any of your third-party installed antivirus programs to check for the issue.
If you’re not using any third-party antivirus program then skip this method.
5. Run Windows Memory Diagnostic Tool
Well, Windows Memory Diagnostic Tool is an inbuilt utility tool that scans and repairs any kind of possible Windows memory-related issues automatically on the computer. If in case, you’re experiencing the BSOD error on your Windows 10 PC then follow the steps below:
- Click on the Start Menu > Type Windows Memory Diagnostic.
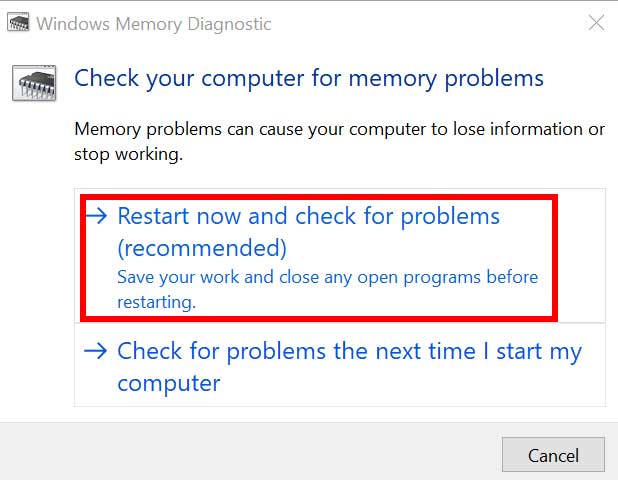
- Now, click on it to open from the search result > Click on Restart now and check for problems.
- Your Windows system will restart automatically and try scanning then repairing the memory issues by itself.
- This process may take some time. So, have some patience until the system starts up and completes the diagnosis.
6. Run SFC (System File Checker) Scan
System File Checker (SFC) is a utility tool in Microsoft Windows that allows users to scan for corrupted Windows system files and restore them automatically. To perform this task:
- Click on the Start Menu and type cmd.
- Now, right-click on Command Prompt from the search result.
- Select Run as administrator > If prompted, click on Yes to give admin privileges.
- Once the command prompt window opens, type the following command and hit Enter to execute it:
SFC /scannow

- Have some patience until the process gets completed.
- Once done, close the command prompt window, and restart your computer to check for the error again.
7. Run CHKDSK (Check Disk)
Check Disk is a system command tool that verifies system files as well as the whole hard drives using the command to check whether there is any corrupted or missing file available or not. You can follow the full in-depth guide here to perform the task according to your need.
8. Reconnect Hard Drive (HDD/SSD)
Try disconnecting and reconnecting the hard drive from the computer (if possible) by yourself and try checking the issue again. Sometimes this particular trick can also come in handy.
9. Update BIOS (Basic Input Output System)
If you’re still having issues with the SYSTEM SERVICE EXCEPTION STOP code error, then we’ll highly recommend you trying updating your BIOS on the PC. Although this is something that we don’t gonna recommend to everyone, advanced Windows users can definitely try out this process.
Keep in mind that updating the BIOS can be risky enough to brick your system if you’re not aware of the steps. However, most of the motherboard manufacturer’s are offering an automatic BIOS update notification to the users these days so that they can easily install the update. But that’s fully up to you and we won’t gonna entertain such acts at all.
Now, if you still want to update BIOS then head over to the respective manufacturer’s website and go through the detailed guide to do so for your specific model.
10. Uninstall Recently Installed Programs
The chances are also high that you’ve recently installed any of the apps or games or a bunch of programs on your computer and somehow the program(s) is causing several issues with the system files whatsoever. If so, make sure to simply uninstall all of those recently installed programs from your PC to resolve such an issue. To do that:
- Press Windows + I keys to open Windows Settings.
- Click on Apps > From the Apps & Features section, scroll down the list of installed programs.
- Search for the specific programs that you’ve recently installed on the PC.
- Click on the particular program and select Uninstall to delete it from the computer.
- You’ll need to perform the same steps for each program that you assume causing the BSOD error on your computer.
11. Disable Webcam Device
You should also try following this method if in case you’re using the default or external webcam on the computer.
- Press Windows + X keys to open the Quick Access Menu.
- Next, click on Device Manager from the list of menus.
- Once the Device Manager window opens, you’ll have to find your connected webcam device from the Other devices section.
- Now, make sure to right-click on it > Click on Disable device.
- Finally, restart your computer to apply changes, and check for the issue again.
However, if the method didn’t work for you, make sure to enable the webcam device again.
12. Reset This PC
If nothing works for you then you should try resetting your PC to refresh the system files on it. To do so:
- Go to Windows Settings by pressing Win+I keys.
- Click on Update and Security > Select Recovery.
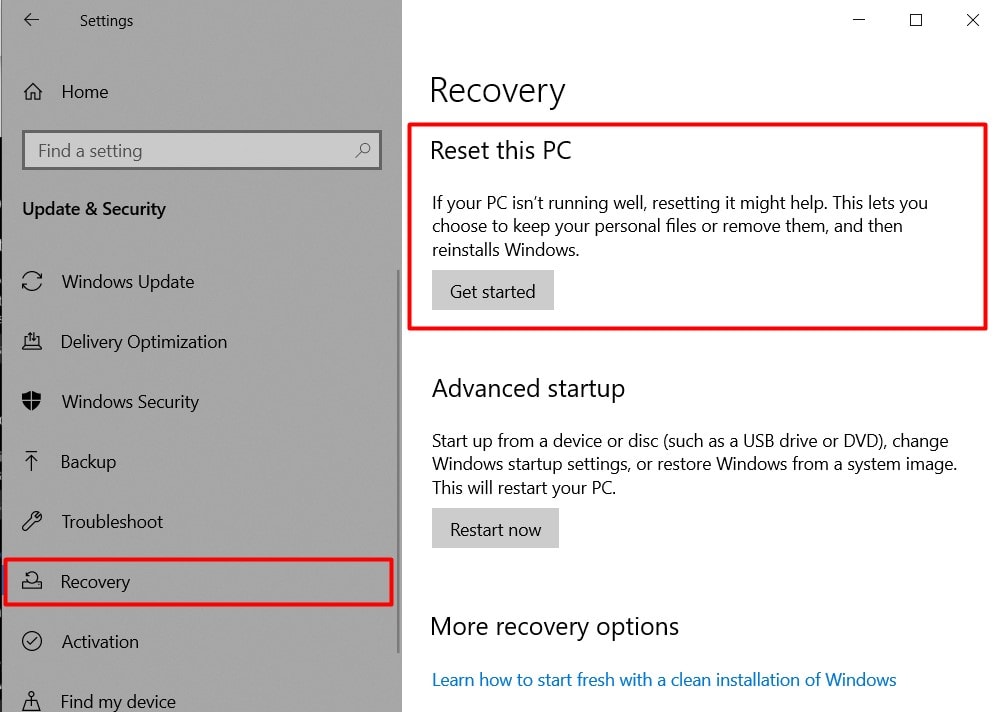
- Under the ‘Reset this PC’ section, click on Reset PC or (Get started).
Note: Make sure to take a backup of the important data before performing this method.
- Next, your system will restart and start resetting the system and its files.
- Once your system will restart, it’ll ask you to choose from Keep my files or Remove everything.
- Select the option according to your preference and wait for the process to complete.
This trick should gonna help you out of the ‘System Service Exception Stop Code’ error on Windows 10.
That’s it, guys. We hope this guide was useful to you. If you’ve any queries, you can comment below.
