Windows 10 includes the Camera Roll and Saved Pictures folders by Default. They are not of much use unless you actually utilize them. However, it is not possible to delete them by conventional means. Sometimes, this can result in them becoming obstructive.
Still, it is not impossible. So here, we will demonstrate how to hide, move, or delete these folders. We will also demonstrate how to hide the libraries associated with them.
Also Read
Page Contents
- What exactly is the purpose of the Camera Roll and Saved Pictures folders?
- Moving the Camera Roll and Saved Pictures folders
- How to find the Camera Roll and Saved Pictures folders quickly
- How to conceal the Camera Roll and Saved Pictures folders
- How to make the Camera Roll and Saved Pictures folders, Super Hidden
- Hiding the Camera Roll and Saved Pictures Libraries
- Deleting the Camera Roll and Saved Pictures folders
What exactly is the purpose of the Camera Roll and Saved Pictures folders?
You will find the Camera Roll and Saved Pictures folders in your Pictures folder. They are created by Default if you are using Windows 10. The Camera Roll folder stores the photos and videos clicked or recorded by the Camera app, while the Saved Pictures folder is required by the Photos app. Thus, you can see that these two apps – the Camera app and the Photos app – are the main reason behind the existence of these two irritating folders.
In case you do not use the Camera or Photos apps much, both the Cameral Roll and Saved Pictures folders are likely to lie idly in your Pictures library. If you try to delete them by conventional means, they will get resurrected a while later – even if you do not use the apps, they are associated with. Thus, you will need to remove these folders by some special means. You can also try moving or hiding them as a temporary fix.
Moving the Camera Roll and Saved Pictures folders
You will find the Camera Roll and Saved Pictures folders in the Pictures folder, by Default. You will be able to move them to any other folder of your choice individually. You can do this by simply following the steps given below:
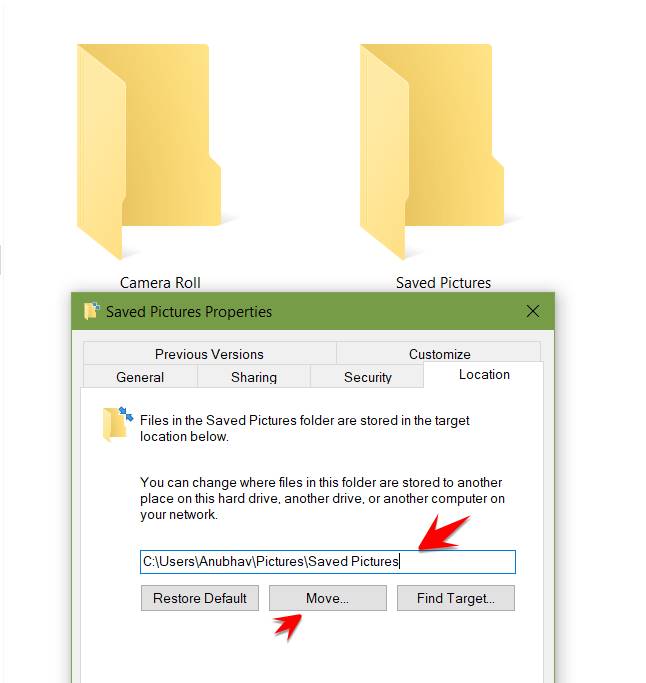
- Right-click the folder and select Properties.
- Go over to the Location tab.
- You will see a field where you need to type in the destination folder’s path.
- In case you do not know the path in question, you can click “Move” and go over to the destination folder you are aiming for. Then click on Select Folder and hit OK to confirm your choice.
To restore the folder back to your Pictures library, you can come back to this screen and hit Restore Default> OK. You can also try cutting and pasting (Ctrl + C and Ctrl + V) the folder elsewhere using File Explorer.
How to find the Camera Roll and Saved Pictures folders quickly
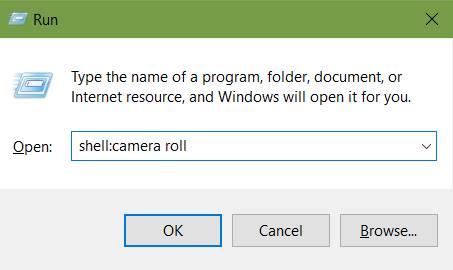
In case you must find the Camera Roll or Saved Pictures folder, and you forgot where you had moved them to, you can relax. There is a simple procedure to locate them quickly. You simply need to follow the steps below:
- Press the Windows Key + R to open the Run window.
- Proceed to input one of the following commands, depending on the folder you are after.
shell:camera roll
shell:savedpictures
Your chosen folder will open up after you press OK. The good news is that regardless of where you moved the folders, these commands should work for you.
How to conceal the Camera Roll and Saved Pictures folders
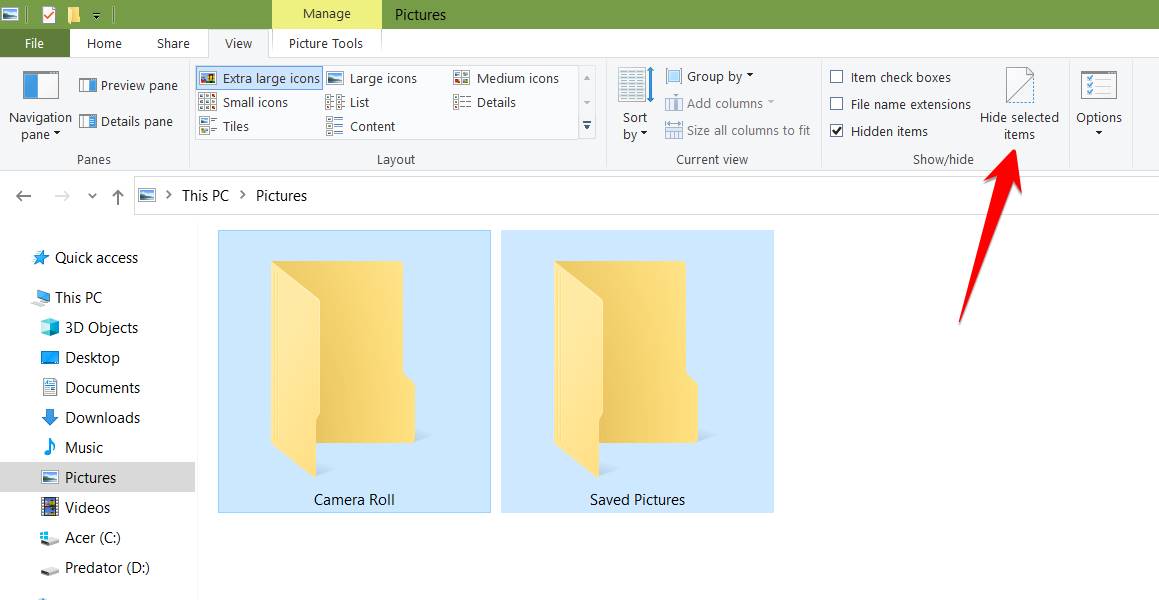
For those of you who don’t want to permanently delete or move these folders, you can also consider simply hiding them. To do this, follow the steps below;
- Highlight both the folders and go to the View tab located on the ribbon.
- Select “Hide selected items” in the Show/hide portion.
In case you still see a folder with a faded icon, it means that your settings allow hidden items to be seen. You can uncheck “Hidden items” in the View tab to correct this. You can make the folders visible anytime you need simply by reversing these instructions.
How to make the Camera Roll and Saved Pictures folders, Super Hidden

This basically involves hiding the folders at a system level. If you do this, you will not see the folders even upon having Hidden items visible. Follow the steps that are given below:
- Press the Windows key + R to bring up the Run window.
- Type in cmd in the field, and hit Enter. The command prompt will open up now.
- Open up the File Explorer, go to the Camera Roll or Saved Pictures folder, and copy its folder path from the address bar, using right clicking and Ctrl + C.
- At the Command Prompt, type in the command given below:
attrib +s +h “C:\Users\Name\Pictures\Camera Roll”
You can replace the folder path with the one you copied in the previous step. Do this for the other folder as well.

- In case you forget the location of the hidden folder, you can find them using the instructions given in the “How to find the Camera Roll and Saved Pictures folders quickly” given above.
- You can make the folder visible again by using the command given below:
attrib -s -h “C:\Users\Name\Pictures\Camera Roll”
Hiding the Camera Roll and Saved Pictures Libraries
The Camera Roll and Saved Pictures folders appear in your Libraries as well. That process requires four different registry keys. It can be streamlined by creating an executable registry file. To do this, open up Notepad and paste the given text in there:
Windows Registry Editor Version 5.00
[HKEY_LOCAL_MACHINE\SOFTWARE\Microsoft\Windows\CurrentVersion\Explorer\FolderDescriptions\{2B20DF75-1EDA-4039-8097-38798227D5B7}\PropertyBag]
“ThisPCPolicy”=”Hide”
[HKEY_LOCAL_MACHINE\SOFTWARE\WOW6432Node\Microsoft\Windows\CurrentVersion\Explorer\FolderDescriptions\{2B20DF75-1EDA-4039-8097-38798227D5B7}\PropertyBag]
“ThisPCPolicy”=”Hide”
[HKEY_LOCAL_MACHINE\SOFTWARE\Microsoft\Windows\CurrentVersion\Explorer\FolderDescriptions\{E25B5812-BE88-4bd9-94B0-29233477B6C3}\PropertyBag]
“ThisPCPolicy”=”Hide”
[HKEY_LOCAL_MACHINE\SOFTWARE\WOW6432Node\Microsoft\Windows\CurrentVersion\Explorer\FolderDescriptions\{E25B5812-BE88-4bd9-94B0-29233477B6C3}\PropertyBag]
“ThisPCPolicy”=”Hide”
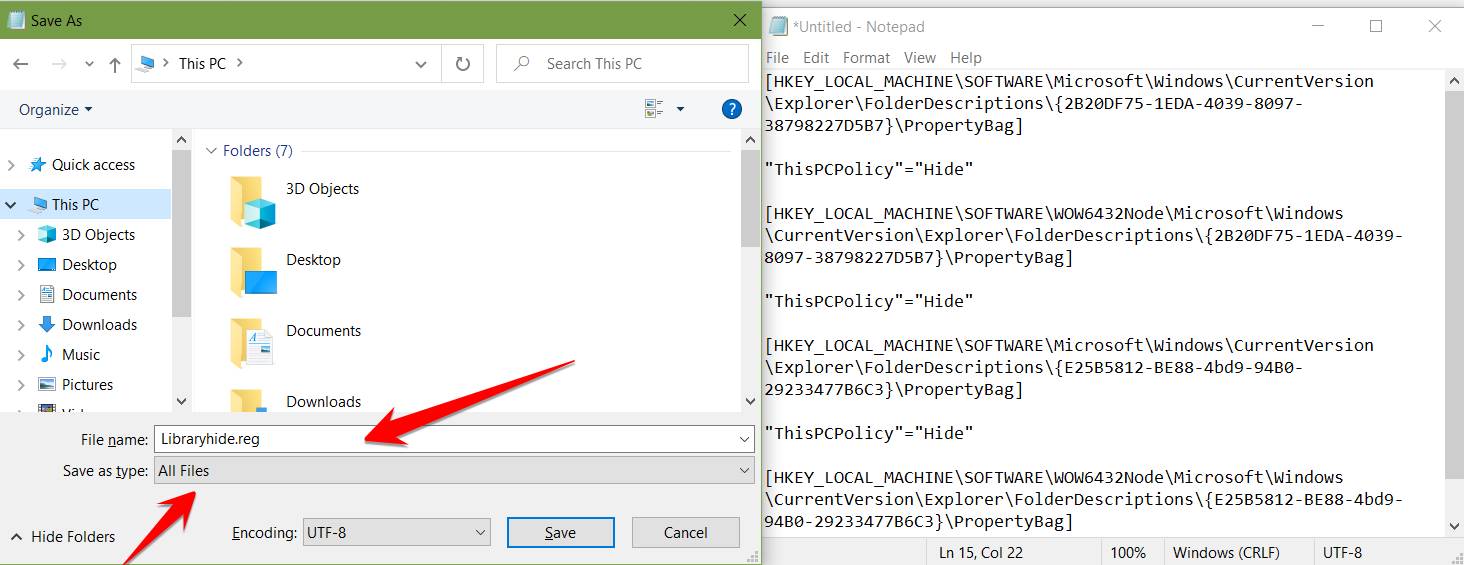
- Choose File -> Save As and enter the File name as “LibraryHide.reg”.
- Now bring up the File Explorer and navigate to the folder where you saved this file. Right-click it and select Merge. Choose “Yes” when questioned by the warning.
Doing this will execute the code given above. It will instruct the registry to incorporate the value of “Hide” all four of the paths above, including the two for every library.
Deleting the Camera Roll and Saved Pictures folders
As mentioned before, the Camera Roll and Saved Pictures folders are intricately linked to the Camera and Photos apps. Thus, you will only be able to delete them permanently by uninstalling those apps. As these apps are included in Windows 10 by default, they cannot be uninstalled conventionally. However, you can use PowerShell to uninstall them. You can do this by following the instructions given below:
- Perform a search for “PowerShell.”
- Right-click on it and click on “Run as administrator.”
- Copy and paste (Ctrl + C and Ctrl + V) each of the commands given below:
To uninstall the Camera app: Get-AppxPackage *windowscamera* | Remove-AppxPackage
To uninstall the Photos app: Get-AppxPackage *photos* | Remove-AppxPackage
With the above method, you will be able to delete the Photos and Windows Camera app, resulting in the deletion of Camera Roll and Saved Pictures.
- After removing the Photos app, you can use the Windows Photo Viewer to continue browsing images on your computer.
- You can reinstall these apps, or any other Windows apps you removed earlier, by virtue of this command in PowerShell:
Get-AppxPackage -AllUsers| Foreach {Add-AppxPackage -DisableDevelopmentMode -Register “$($_.InstallLocation)\AppXManifest.xml”}
That is it for now. We hope our guide helps you hide or delete the Camera Roll and Saved Pictures folders in Windows 10. If you liked this guide, do remember to check out our other Windows Guides, Gaming Guides, Social Media Guides, iPhone Guides, and Android Guides to read more. If you have any queries or suggestions, comment down with your name along with the email ID, and we will reply shortly. Also, subscribe to our YouTube Channel to watch awesome videos on gaming and smartphone tips and tricks. Thank you.
