If in case, you’ve recently installed the latest update on your Windows 10 computer and the system starts behaving weirdly, then you’re not alone here. Meanwhile, plenty of users are getting affected after installing the latest patch update and if the Windows 10 Night Light Not Working on your computer, you can follow this troubleshooting guide to fix the issue completely.
Talking about the Windows 10 Night Light, it’s a useful feature for Windows users that basically works as a Blue Light filter. It reduces the blue light effect on the screen during night-time or even low lighting conditions. That means as a user this feature will help to reduce your eye strain and improves the sleeping quality also. Needless to say that it’s similar to Apple’s Night Shift and Android’s Night mode.
Although it’s always available to use on your Windows 10 computer very easily, sometimes it may not work as expected for some unknown reasons. This particular issue may appear after installing the Windows 10 Feature Update version 2004 or older. For instance, the Night Light feature may not turn off automatically even after scheduling, or restarting, or turning off the computer.
Also Read

Page Contents
How to Fix If Windows 10 Night Light Not Working
To be very precise, Night Light mostly depends on the graphics driver to adjust the color temperature to reduce the blue light effect. If in case, the graphics card driver becomes outdated or corrupted, such an issue may appear. There are several reasons behind this issue as well and we’ve shared some solutions too. Now, without wasting any more time, let’s jump into the guide below.
1. Update Graphics Driver
If in case, you haven’t updated your graphics driver on the Windows 10 computer then make sure to try updating the GPU driver properly. It not only improves multiple graphics-related issues but also fixes plenty of errors. To do so:
- Press Windows + X keys to open the Quick Start Menu.
- Click on Device Manager > Double-click on Display adapters to expand it.
- Right-click on the active device > Select Update driver.
- Choose Search automatically for drivers > If an update available, the system will automatically download and install the update.
- Once done, restart your PC/Laptop to apply changes.
2. Reinstall Graphics Driver
Sometimes it may also possible that reinstalling the graphics driver may fix several system glitches or corrupted files from Windows 10. To do this:
- Click on the Start Menu > Now, type Device Manager, and search for it.
- Click on it from the search result to open the new window.
- Double-click on the Display adapters option to expand it.
- Right-click the active graphics device > Click on Uninstall.
- Select the ‘Delete the driver software from this device’ option.
- If prompted by UAC, make sure to click on Yes to proceed.
- Once the uninstallation is done, restart your computer to apply changes.
- Now, the Windows 10 system will automatically reinstall the missing graphics driver.
3. Disable Night Light Feature
If the above methods didn’t work for you, try completely disabling the Night Light feature by following the steps below:
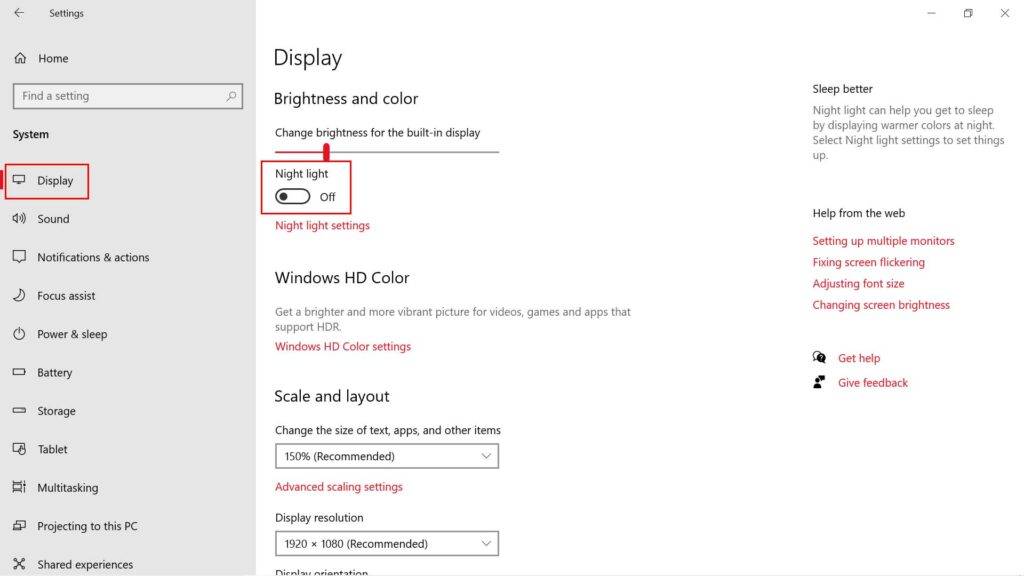
- Press Windows + I keys to open Windows Settings.
- Click on Devices > Select Display Settings from the right window.

- Here you can simply Turn Off the Night Light toggle.
- Finally, make sure to restart your computer to apply changes.
4. Manually Reset Night Light Settings
It looks like the Night Light feature on your Windows 10 issue is triggering due to some of the broken or missing registry keys. So, manually removing the Night Light settings from the Registry Editor can forcefully recreate the system which eventually fixes the issue. To do this:
Please Note: Modifying or removing registry keys may cause serious issues on Windows 10 system. So, if you don’t know what you’re doing, make sure to take a full backup of the system or create a system restore point before doing anything.
- Press Windows + R keys to open the Run dialog box.
- Type regedit and hit Enter to open the Registry Editor.
- If prompted by UAC, click on Yes to proceed.
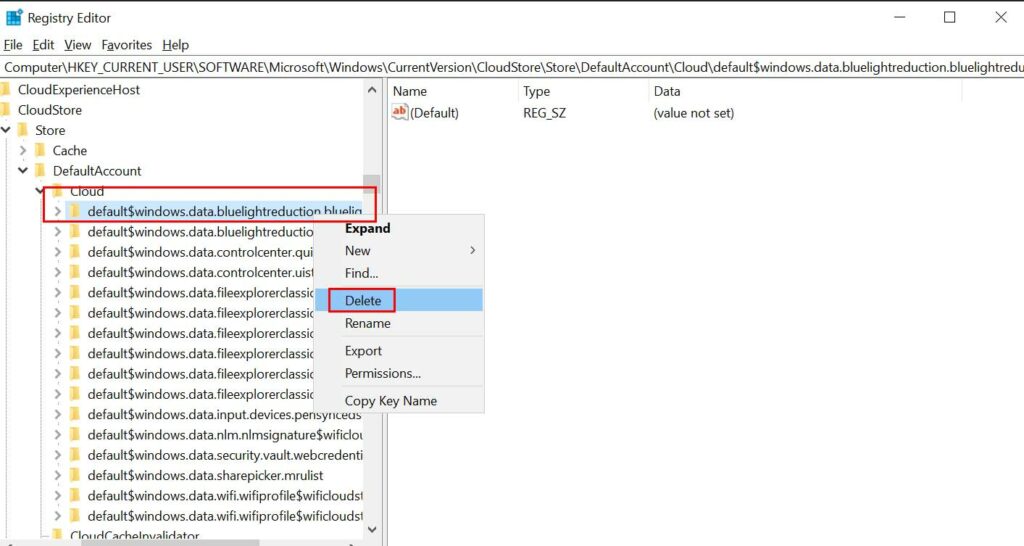
- Next, navigate to the following path:
HKEY_CURRENT_USER\Software\Microsoft\Windows\CurrentVersion\CloudStore\Store\DefaultAccount\Cloud

- From the ‘Cloud’ folder key, you’ll have to right-click on it.
- Now, make sure to delete the following two folder keys completely:
$$windows.data.bluelightreduction.bluelightreductionstate

$$windows.data.bluelightreduction.settings
- Once done, make sure to restart your computer.
- Finally, Night Light settings will reset.
It should resolve the Windows 10 Night Light Not Working issue completely.
5. Sign In and Sign Out of Account
Sometimes signing out and signing in to your account may also fix the Night Light freezing or not working issue. We can understand that it sounds ridiculous but if none of the above methods worked for you, try the rest of the methods too. To do this:
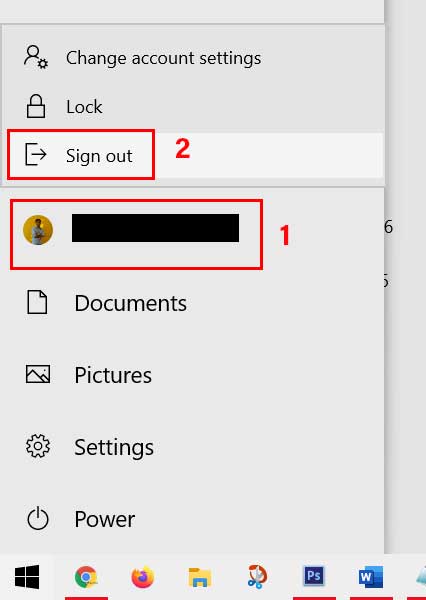
- Click on the Start Menu > Click on the Profile or User Account icon.

- Now, select Sign Out > Once signed out, you can sign back in again.
6. Change Clock Settings
Make sure to change the time temporarily on your Windows computer. As the Night Light feature depends on the time schedule to when turning on or off automatically, changing the clock settings for a while and then revert to the correct time can fix such as issue. To do this:
- Right-click on the clock (date/time) on your system tray (Taskbar).
- Select Adjust Date/Time from the list > Click on Change.
- If in case, the Change button seems grayed out, then make sure to turn off the ‘Set Time Automatically’ switch to enable it.
- Now, you can simply switch the time from AM to PM or vice-versa.
- Then click on Change > Once done, again go back and set the correct time/date.
- Alternatively, you can turn on the Set Time Automatically toggle.
- You’re done.
Finally, you should be able to fix the Windows 10 Night Light Not Working issue properly. However, if nothing worked for you, try the next method.
7. Disable Location Service
Since the Night Light feature also runs on the inbuilt location service with your Windows 10 system, it automatically turns on/off to schedule the sunset to sunrise. So, it’s highly recommended to turn off the location service either from the Action Center or Windows Settings menu. To do this:
- Click on the Notifications icon from the Taskbar.
- Click on the Location tile to turn it off.
However, if you can’t find out the option, you can follow the steps below:
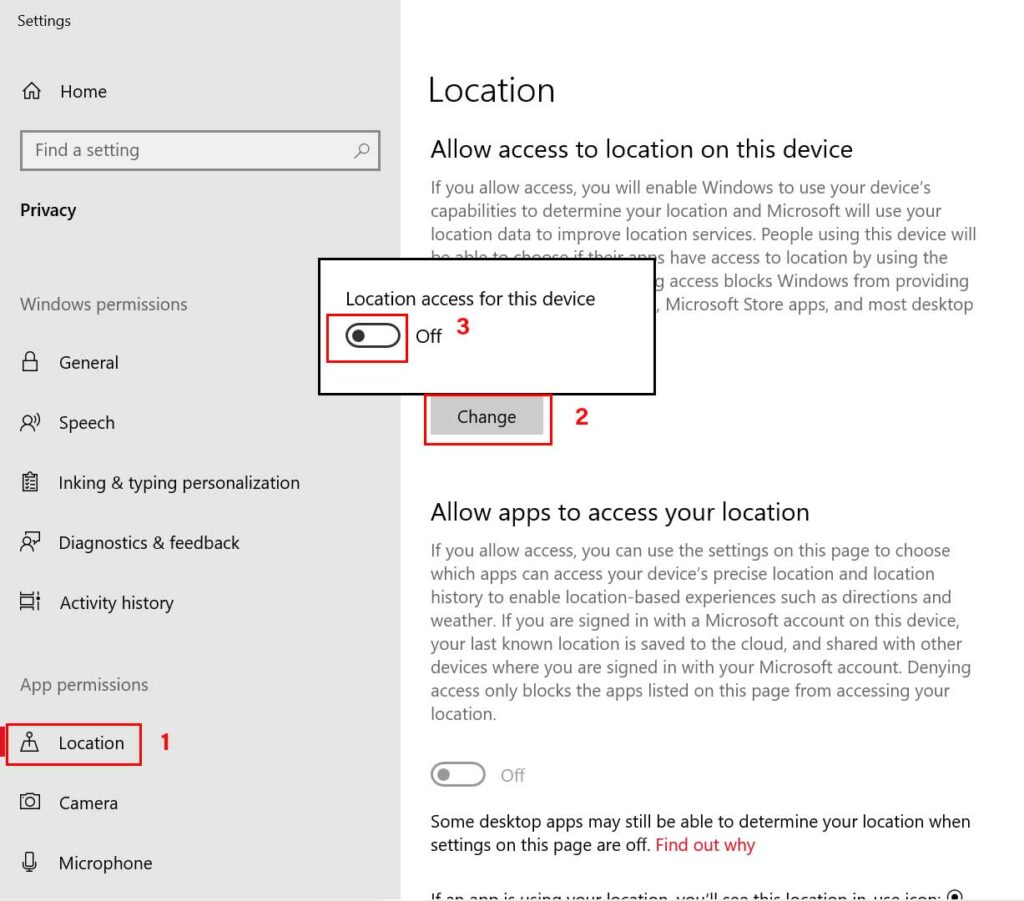
- Click on the Start Menu > Type Location and select Location Privacy Settings from the search result.
- Here turn off the Location Service toggle from ‘Location Privacy Settings’.

- Now, click on Change > Disable the toggle under ‘Location for This Device’.
- Once done, restart your computer, and go to the Location Privacy Settings option again.
- Re-enable both the Location for This Device and Location Service option.
- Enjoy!
That’s it, guys. We assume you’ve found this guide helpful. For further queries, let us know in the comment below.
