In this tutorial, we will show you how to install the AOSP Android 11 ROM onto your Realme XT device. Right after Google announced the latest build of Android, many OEMs were quick to release the preview or beta builds of the same. Talking about Realme, the company has already released the early access program for its X50 Pro device. Along the same lines, the OEM has chalked out a schedule for its other devices, which might welcome the update anywhere between Q4 2020 to Q2 2021.
All in all, it might take some time before you could get a taste of the latest stable Android version. However, if you own the Realme XT device and are ready to step into the custom development, then you could skip this waiting altogether. You could download and install the RevengeOS Android 11 Custom ROM onto your Realme XT device right away. In this guide, we will be listing out the detailed installation steps. But first, let’s check out the feature list of this AOSP based ROM.

Page Contents
What is RevengeOS AOSP ROM?
Part of the Android Open Source Project, RevengeOS is a fast, stable, and a minimally customized custom ROM. In other words, it has managed to maintain an equilibrium between the features and stability factors. Furthermore, its latest build is based on the newly released Android 11 OS. This translates to the fact that you will be able to enjoy a plethora of new features onto your device including a new conversation section in the notifications menu.

Likewise, there is a new one-time permission set and the introduction of chat bubbles. Along the same lines, there is now a native screen recorder and an output switcher in the media player which has itself been relocated to the Quick settings. Then the Smart Device Controls option baked into the Power menu will also come in handy. You could now also schedule the dark mode. And you could now get hold of all these features by installing the AOSP Android 11 ROM onto your Realme XT device. Follow along for the steps.
Screenshots
Download and Install AOSP Android 11 for Realme XT
Before we list out the instruction steps, let’s get you acquainted with the working features as well as the bugs present in this ROM. Then, we will also be mentioning all the prerequisites that your device needs to qualify. Make sure you checkmark all those requirements.
What’s Working
- Boots
- RIL (Calls, SMS, Data)
- Fingerprint (FOD)
- Wi-Fi
- Bluetooth
- Hotspot
- Camera
- Camcorder
- Video Playback
- Audio
- Sensors
- Touch
- VoLTE
- VoWiFi
- ViLTE
- GPS
Bugs
- Selinux permissive.
- SafailNet
Prerequisites
- This custom ROM should only be flashed onto your device that is running the Realme UI and not ColorOS firmware.
- You should also create a complete device backup. Your smartphone will be formatted while installing the ROM as you will have to wipe the data partition.
- Next up, download and install the Android SDK Platform Tools on your PC.
- Likewise, you also have to enable USB Debugging onto your device. For that, head over to Settings > About Phone > Tap on Build Number 7 times > Go back to Settings > System > Advanced > Developer Options > Enable USB Debugging.
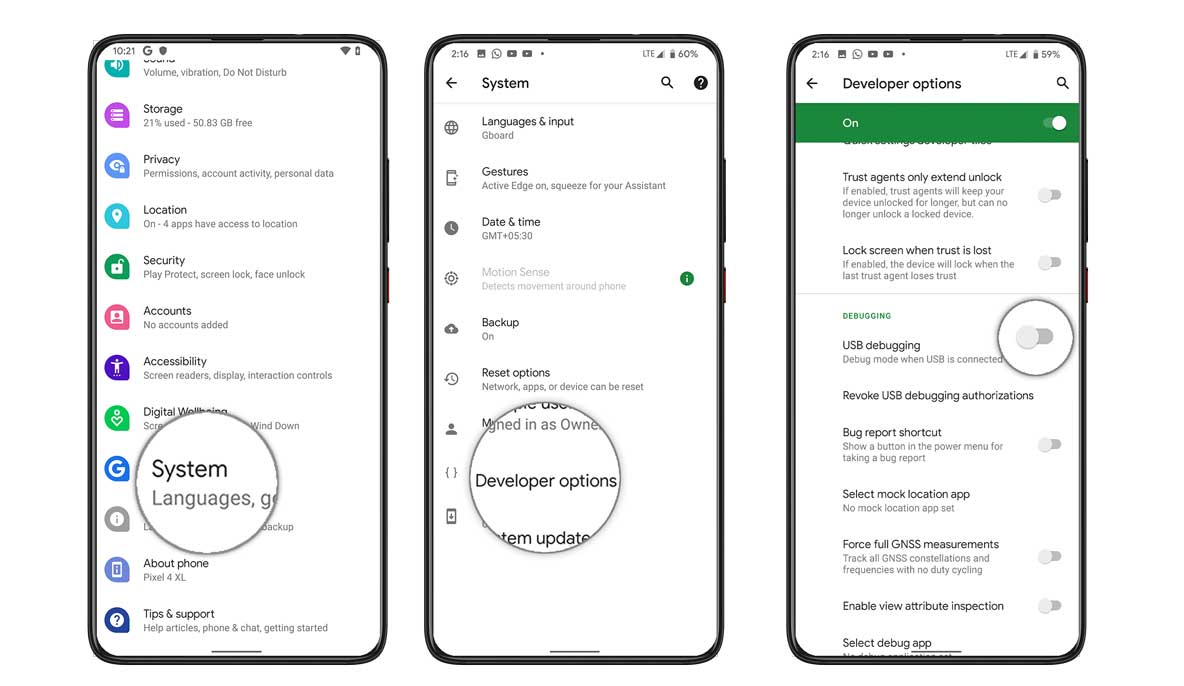
- You will also have to unlock the device’s bootloader. If you haven’t done so, then refer to our detailed guide on How to unlock the bootloader on Realme XT
- Furthermore, the latest build of TWRP Recovery needs to be installed. You may refer to our guide on How to Install TWRP Recovery on Realme XT. The guide also has the steps to root your device, but that is written keeping in mind the stock OS. Since you will be rooting this custom ROM, the required files are different. So from the linked guide, you should only follow the steps to install TWRP Recovery and then proceed with the steps given here to root the RevengeOS ROM.
Download AOSP Android 11 ROM for Realme XT
You may now download the AOSP Android 11 ROM for Realme XT from the below section. We would like to thank XDA Senior Member kaderbava for this ROM.
AOSP Android 11 ROM: Download Link | XDA Development Page | Credits to kaderbava
Pixel Extended 11: XDA Development Page
AncientOS 11.0: XDA Development Page
DerpFest: XDA Development Page
RevengeOS 4.0: Download Link | XDA Development Page | Credits to kaderbava
SuperiorOS: Download Link | XDA Development Page | Credits to just_a.y.a.n
Evolution X: Download Link | XDA Development Page | Credits to kaderbava
Installation Steps
- Connect your device to PC via USB cable. Transfer the ROM and GApps file to your device. Likewise, if you are planning to root, then transfer the Magisk Debug file to your device as well.
- Then head over to the platform-tools folder, type in CMD in the address bar, and hit Enter. This will launch the Command Prompt window.
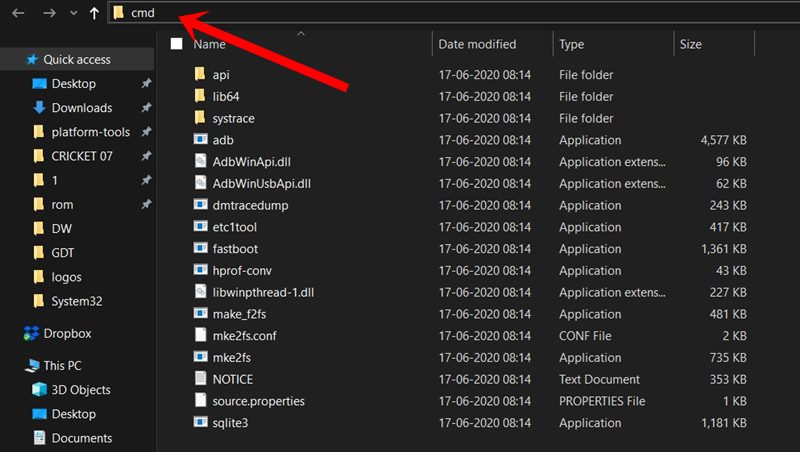
- Execute the below command to boot your device to TWRP Recovery:
adb reboot recovery
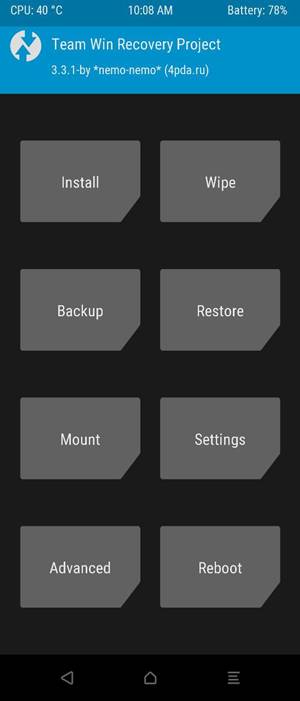
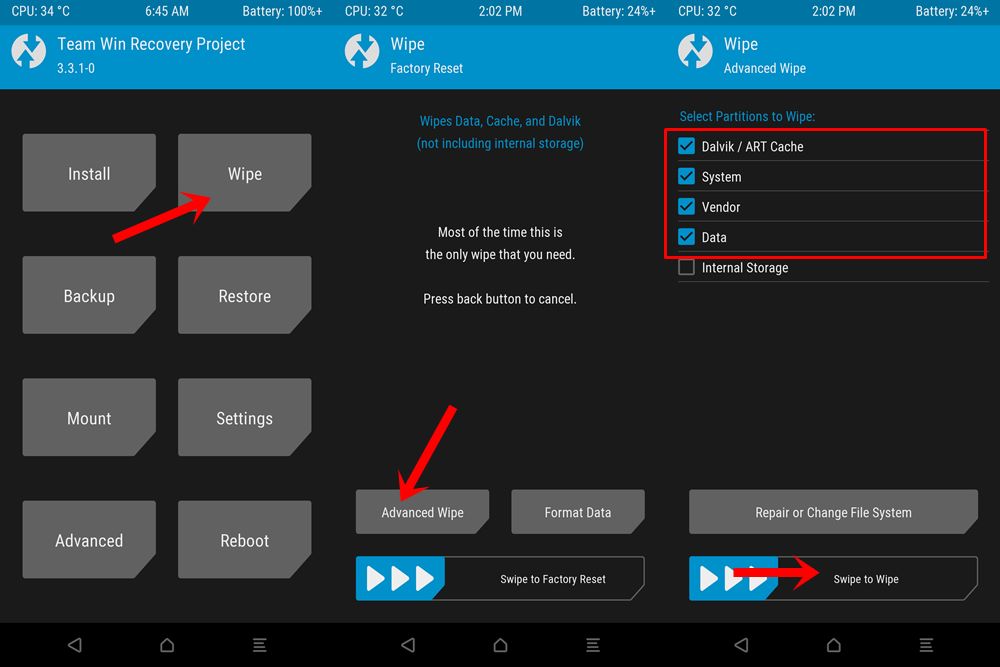
- Now head over to the Wipe section of TWRP and tap on Advanced Wipe.
- Then select System, vendor, data, cache, and Dalvik cache and perform a right swipe to wipe these partitions.
- Now go back to the TWRP home screen and tap on Install. Select the ROM ZIP file and perform a right swipe to flash it.
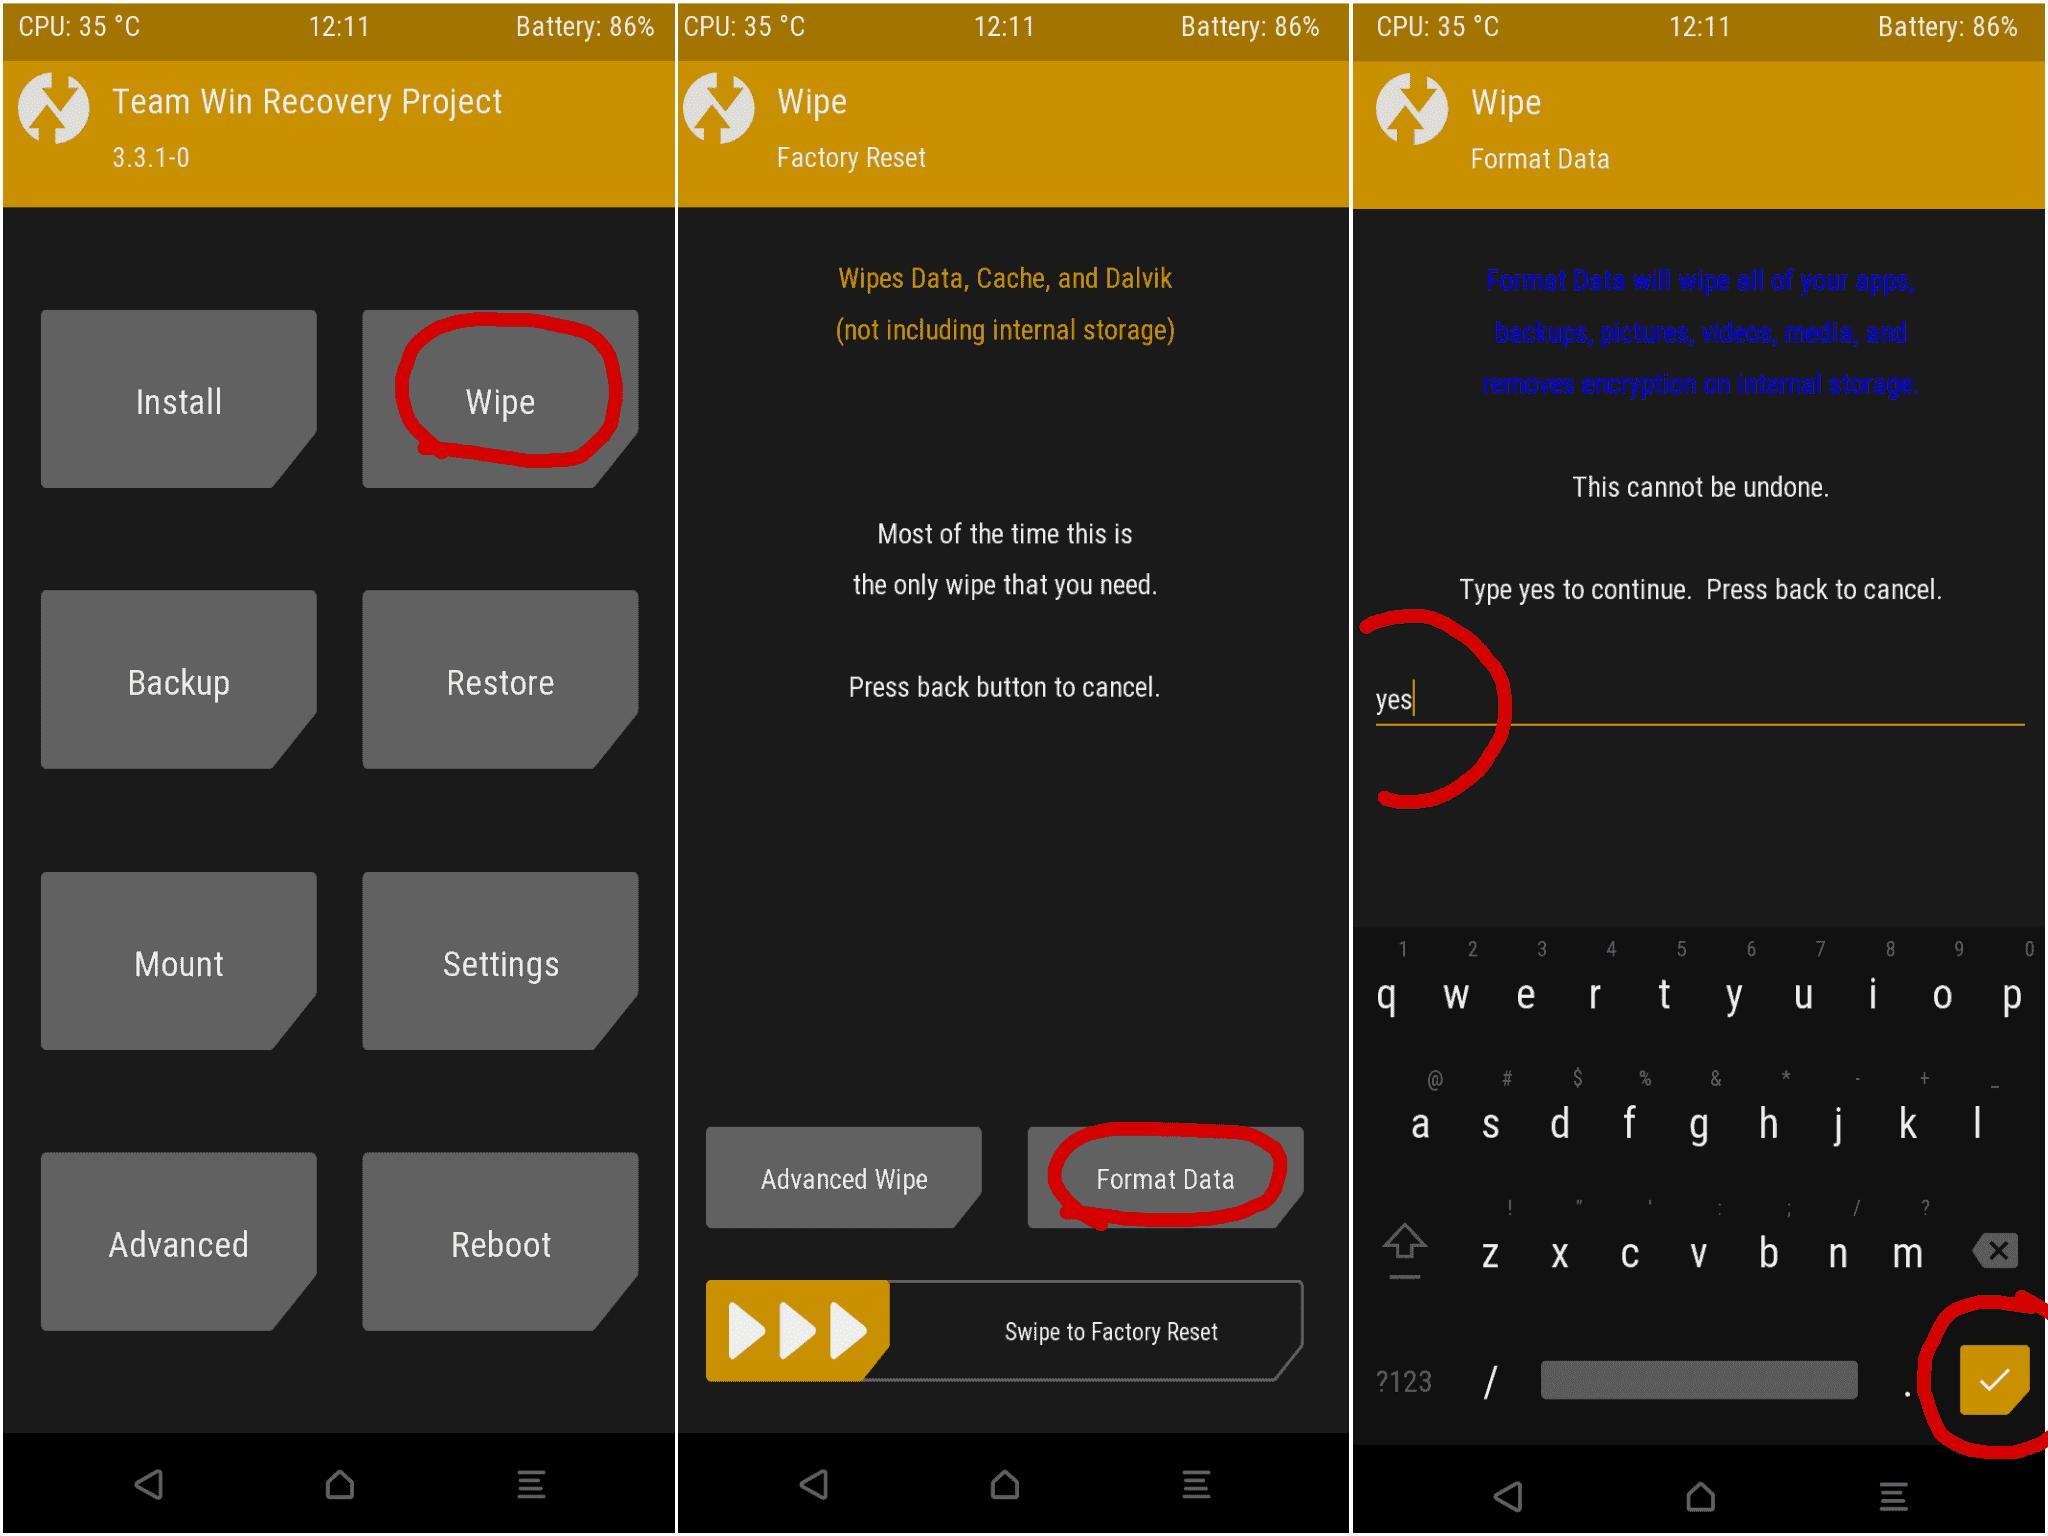
- After the flashing is complete, go to Wipe and tap on Format Data. Then type in YES in the space provided and tap on the checkmark situated at the bottom right.
- Now if you wish to root your device as well, then go to Reboot and tap on Recovery. Upon rebooting to TWRP, head over to Install, select the Magisk debug file and flash it. Then go to Reboot and tap on System.
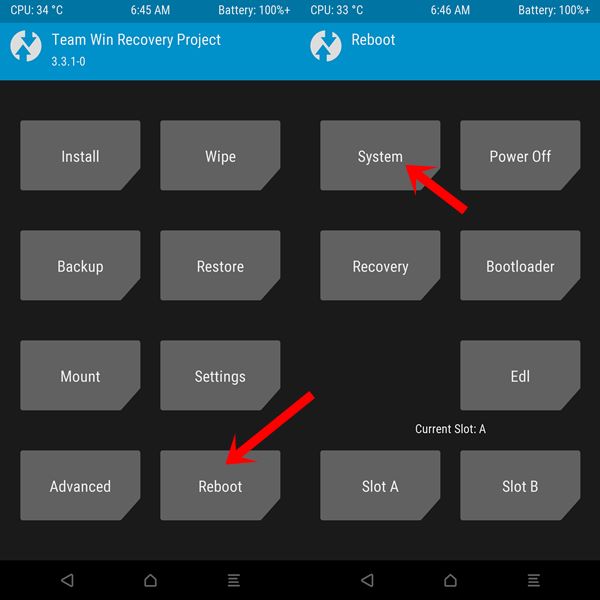
- On the other hand, if you don’t wish to root the device, then simply go to Reboot and tap on System. Your device will now be booted to the newly installed OS.
Conclusion
With this, we conclude the guide on how to install the AOSP Android 11 ROM onto your Realme XT device. The next time you are about to update this ROM, then you could simply perform a dirty flash. That is, only wipe the cache and Dalvik cache before flashing the ROM. Then reboot to TWRP to flash Magisk (optional) and then finally boot to the system.
Furthermore, do keep in mind that the first boot might take up some time. Then you will also have to set up your device from scratch, as a complete device wipe has taken place. On that note, do share your experiences about this ROM in the comments section below. Rounding off, here are some iPhone Tips and Tricks, PC tips and tricks, and Android Tips and Trick that you should check out as well.


