In this guide, we will show you how to backup your Android Phone directly to your PC via TWRP. The open-source ecosystem of Android opens the floodgates to a plethora of customizations. We aren’t just talking about installing icon packs, themes, and custom launchers. Once you step into the custom development, there are a plethora of tweaks to try out. There’s just one requirement- an unlocked bootloader. Once you do this, you then have the option could flash custom ROMs, install a custom recovery, or even root your device via Magisk.
However, all these customizations might bring in a few risks as well. More often than not, there is always a danger of data loss. This is why it is recommended to take a backup beforehand. While you could do so from the device’s Settings page but there’s a much better approach to carry out this task. And that involves taking a Nandroid Backup via TWRP Recovery. By default, the back is stored on your device. However, there exists a pretty nifty method through which backup your Android Phone directly to your PC via TWRP. Let’s check out how it could be done.
Also Read
Page Contents
What is a Nandroid Backup
Nandroid backup is perhaps the most important functionality of TWRP. For the unaware, this feature allows you to take a backup of all the partitions on your device. Every bit of data is taken care of by it. As a result, when you restore this backup, you will get your device just in the exact same condition. There is no need to sign in to your Google Account and restore the backup from the clouds. The contacts, call logs, messages app data, their settings, the way you configured them will be restored as it is. So while this is understandable, you must ask why should you backup your Android Phone directly to your PC via TWRP. Well, here’s why!
Why Backup Directly to PC via TWRP?
Before you create a Nandroid backup, you would have to specify the TWRP where should it store this backup file. The options include the device’s internal storage, SD card, or USB OTG. However, not many could make use of the latter two storage options. While some users might not be having a USB OTG at home, others might not have a native SD card slot on their devices. As a result, the phone memory is the only option left. In a normal use case scenario, this might meet the requirements for the end-user. However, if you step into custom development, keeping a backup of your important data in the internal storage is inviting risk.
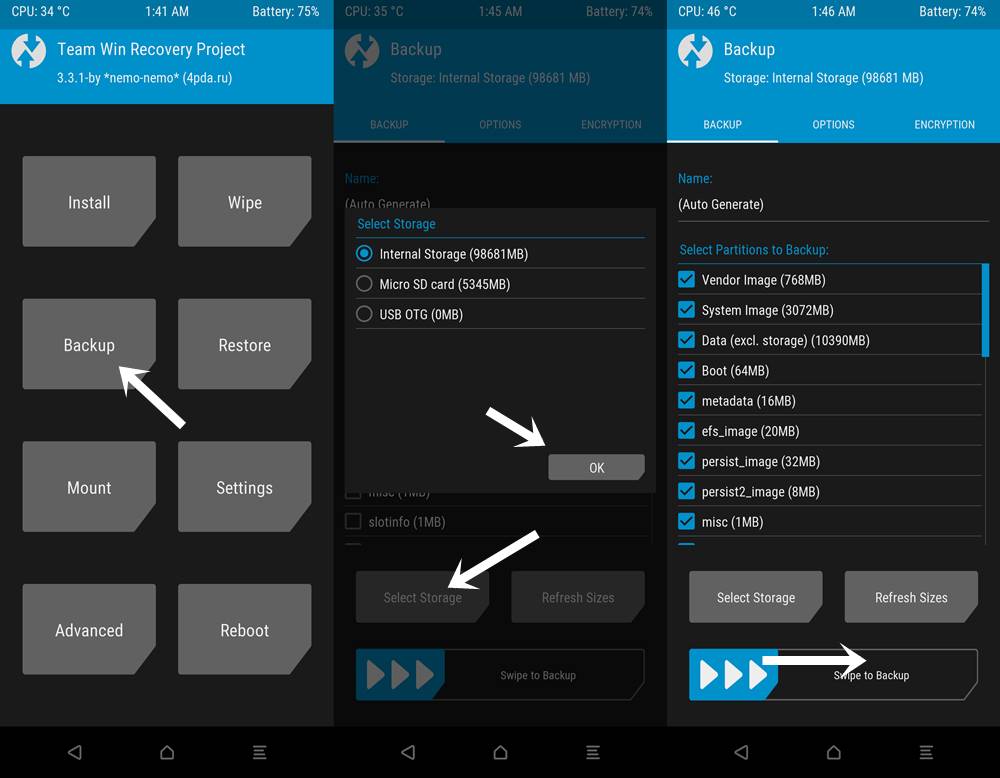
This is because for most of the tweaks, wiping the data partition or performing a factory reset is a major prerequisite. And once you do so, well then you have to bid adieu to all the data, including the Nandroid backup. Therefore, it is always recommended to have this backup stored on your PC, just to be on the safer side. To do so, you could create a Nandroid Backup via TWRP, then reboot your device to the OS and transfer the backup to the PC via USB Cable. While this is a viable option, but not the most feasible. A much faster approach would rather be to backup your Android phone directly to the PC via TWRP. And in this guide, we will help you with just that. Follow along for the detailed instructions.
How to Backup Your Android Phone Directly to PC with TWRP
Before we list out the instructions, there are a few prerequisites that you need to check-mark. Make sure to go through all the mentioned requirements and only then proceed with the steps.
Pre-requisites:
- To begin with, enable USB Debugging on your device. To do so, head over to Settings > About Phone > Tap on Build Number 7 times > Go back to Settings > System > Advanced > Developer Options > Enable USB Debugging.
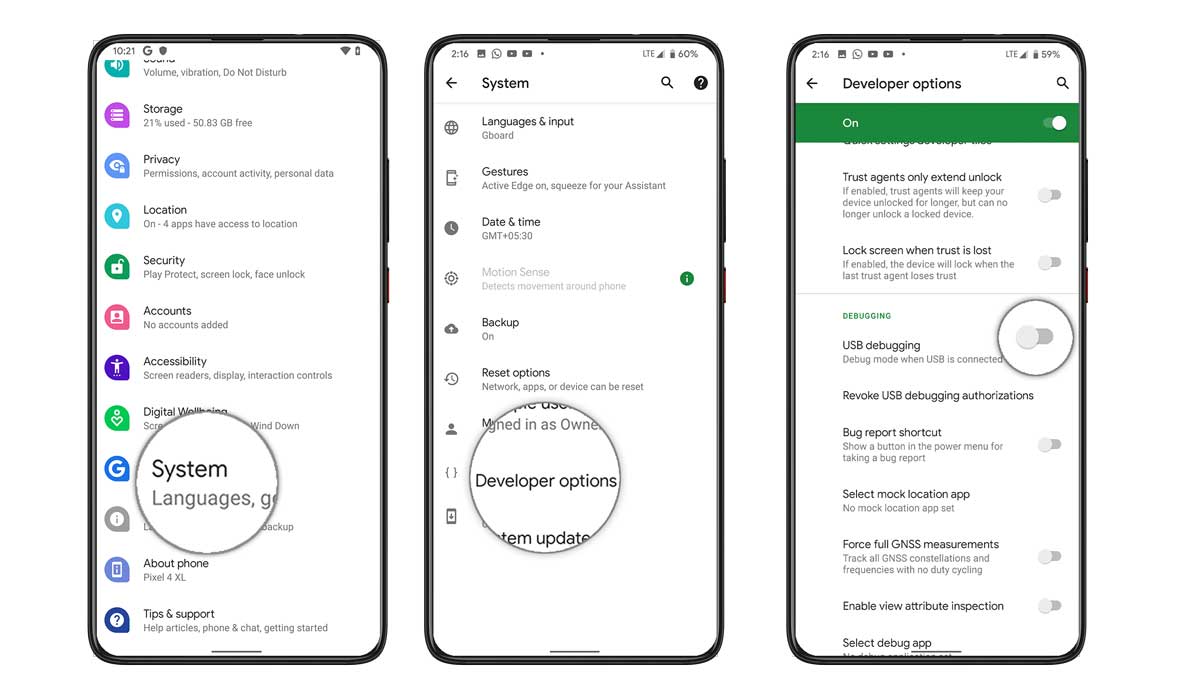
- Next up, download and install the Android SDK Platform Tools on your PC.
- Along the same lines, you should have the TWRP Recovery installed on your device. If you haven’t done so, refer to our detailed guide on How to Flash TWRP Recovery on any Android Phone.
That’s it, these were all the requirements. You may now proceed with the steps to backup your Android phone directly to the PC via TWRP.
Create the Backup Directly to the PC via TWRP
- With USB Debugging enabled, connect your device to the PC via USB cable.
- Then head over to the platform-tools folder. Create a new folder within it and name it backup (or any name of your choice). This is the folder where TWRP will save the backup file.
- Now inside that folder, type in CMD in the address bar, and hit Enter. This will launch the Command Prompt.
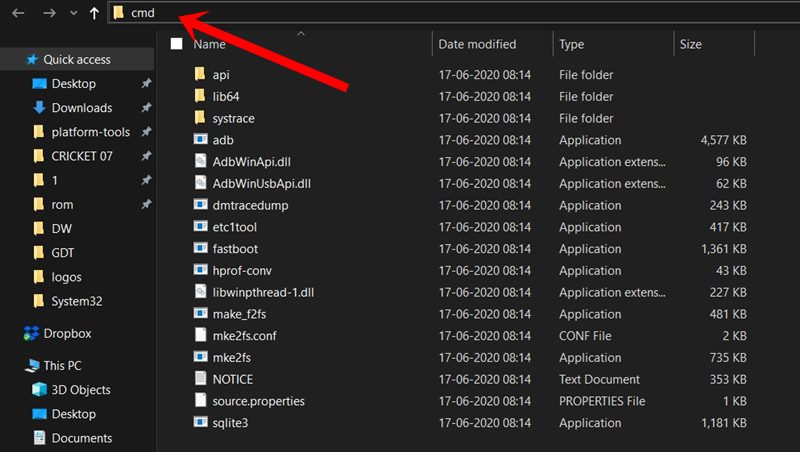
- Type in the following command in the CMD window to verify the ADB Connection:
adb devices

- If you get a Debugging prompt at this stage, tap on Allow. After this, use the following command to boot your device to TWRP Recovery
adb reboot recovery
- Once your device boots to TWRP, go the Backup section and select all the partition that needs to be included in this Nandroid backup.
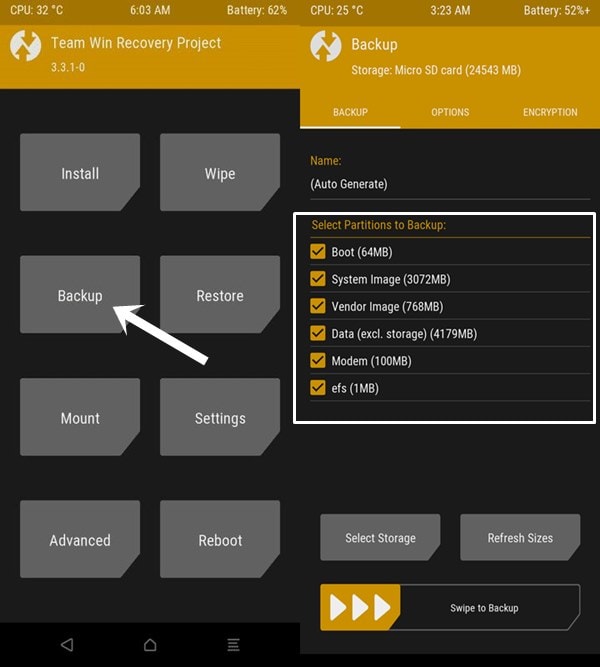
- Once you have made the selection, execute the below command:
adb backup --twrp
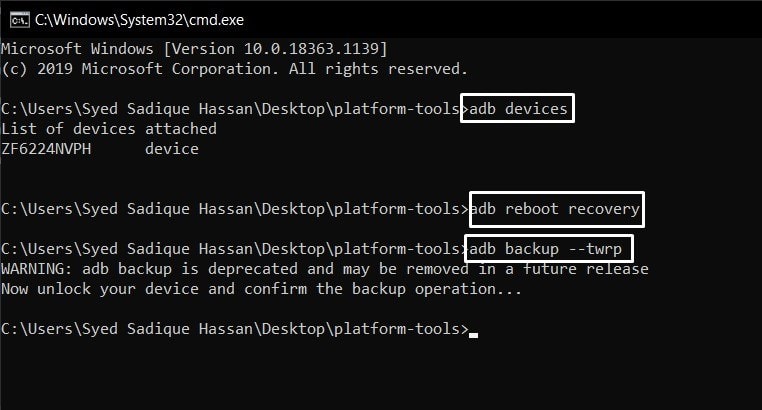
- You might get a warning message, this is completely normal and nothing to worry about. Anyways, the Nandroid Backup of the selected partitions would now have been created. After this, TWRP will then automatically send the backup to the designated folder on your PC. That’s it. These were the steps to backup your Android phone directly to the PC via TWRP. Let’s now see how to restore this backup.
Restoring the Backup
- Make sure that your device is connected to the PC via USB cable and is booted to TWRP Recovery.
- Now launch the CMD window inside the folder where you have created the backup.
- Finally, execute the below command to restore this backup file:
adb restore --twrp
With this, we conclude the guide on how to backup your Android phone directly to the PC via TWRP. We have also shared the steps to restore this backup file. If you still have any queries, do let us know in the comments section below. Rounding off, here are some iPhone Tips and Tricks, PC tips and tricks, and Android Tips and Tricks that deserve your attention as well.
Also Read

Dear sir
my phone micromax q349 crash all the software when I switch on it cannot change to next window how to repair my phone so that I can use as normal before
Thanking you pls mail me at cangvir@yahoo.com
Thanks for the instructions here. Are there errors?
You may be able to, but I could not run abd from the platform-tools\backup directory. I could run it from platform-tools.
Secondly, you might remind readers of the step needed to select storage before they run adb backup –twrp
when restoring why it gets stuck on “restorig efs2”