2015’s Call of Duty: Black Ops III is still one of the best-in-class multiplayer zombie action first-person shooter video games by Treyarch and Activision. It’s a sequel to Call of Duty: Black Ops II, which was released in 2012. Though the game has received positive ratings, some players cannot launch or play the game properly because multiple reports are coming out that the Black Ops 3 game is getting stuck on the loading screen on your PC, which is frustrating.
If you’re having trouble playing Black Ops 3, your computer may have something wrong. Luckily, we’ve mentioned a couple of possible workarounds to help you fix the stuck-on loading screen on Black Ops 3.
Also Read

Fix: Black Ops 3 Stuck on the Loading Screen
Check out the following troubleshooting methods below to easily resolve such an issue on your Windows computer. So, without further ado, let’s jump into the guide below.
1. Check-out System Requirements
Check out the system requirements before jumping to any conclusion whatsoever. If, in case, your computer configuration isn’t compatible enough, then you may find issues with the game launching and gameplay.
Minimum Requirements:
- OS: Windows 7 64-Bit / Windows 8 64-Bit / Windows 8.1 64-Bit
- Processor: Intel Core i3-530 @ 2.93 GHz / AMD Phenom II X4 810 @ 2.60 GHz
- Memory: 6 GB RAM
- Graphics: NVIDIA GeForce GTX 470 @ 1GB / ATI Radeon HD 6970 @ 1GB
- DirectX: Version 11
- Network: Broadband Internet connection
- Storage: 100 GB of available space
- Sound Card: DirectX Compatible
2. Increase Virtual RAM
Virtual memory combines your RAM with temporary space on your hard disk. If you’re running out of RAM and the default size of your virtual memory isn’t large enough for your needs, you’ll need to increase it manually.
- Press the Windows logo key on the keyboard and type advanced system settings.
- Click on View advanced system settings.
- Click on Settings > Click on the Advanced tab > Click on Change.
- Uncheck the box next to Automatically manage paging file size for all drives.
- Select your C: drive [Where you’ve installed Windows] > Click the Options button next to the Custom size and type 4096 in the text box of the Initial size (MB) and Maximum size (MB).
Note: It’s always better to increase the virtual memory three times higher than the current RAM size. [1GB=1024MB]
- Click on Set and then OK to save changes.
- Restart your computer and your game.
3. Properly Place the Storage and RAM in the slot
It’s also recommended to remove the side panel of the CPU cabinet on your PC and then unplug the HDD/SSD & RAM component from the slot. Gently clean the slot, and the component, then place them properly again to check if the Black Ops 3 is stuck on the loading screen issue has been fixed or not.
4. Update GPU Drivers
If, in case, you haven’t updated your graphics driver on the Windows computer, then make sure to install the latest patch version. To do so, you’ll need to check for available updates by following the steps below:
- Press Windows + X keys to open the Quick Link Menu.
- Now, click on Device Manager from the list > Double-click on Display adapters.
- Right-click on the dedicated graphics card that you’re using.
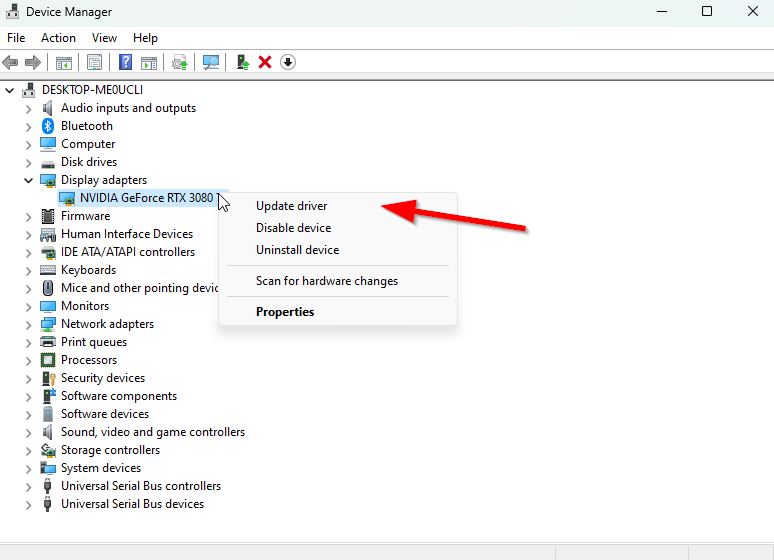
- Next, select Update driver > Choose to Search automatically for drivers.
- If an update is available, the system will automatically download & install it.
- Once done, restart the computer to apply changes immediately.
5. Close Unnecessary Background Tasks
Another thing you can do is simply close unnecessary background tasks on your PC to ensure there is no additional consumption of system resources happening in the background. To clear out background tasks:
- Press the Ctrl + Shift + Esc keys to open Task Manager.
- Click on the Processes tab > Select the task you want to close.
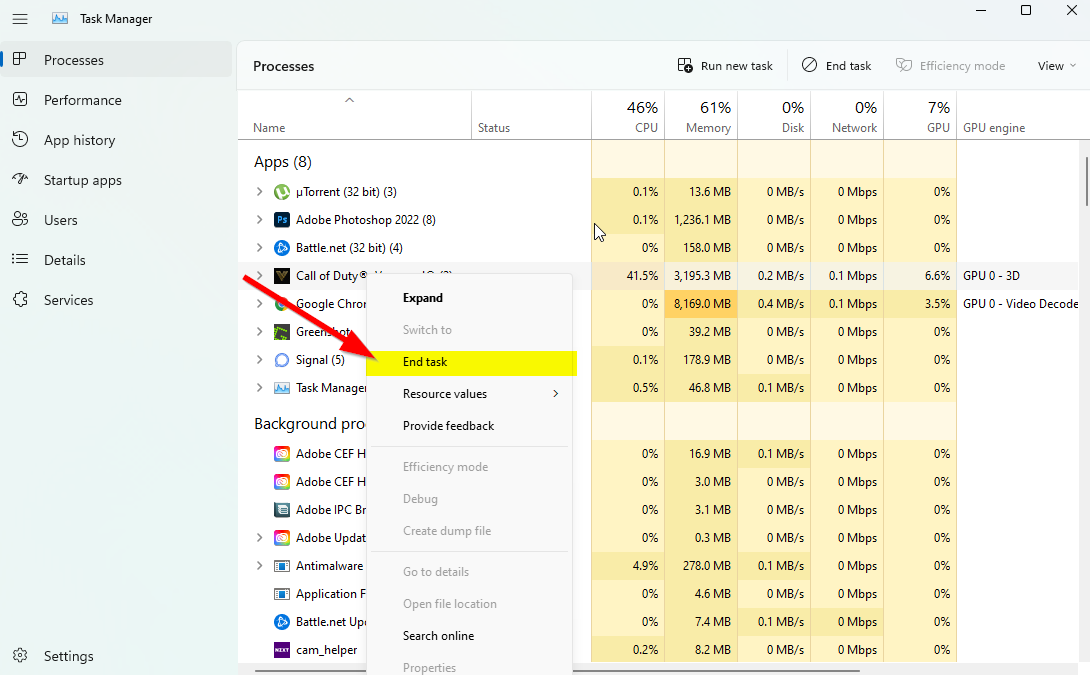
- Once selected, click on End Task. Make sure to do the steps for each task individually.
- Once done, just restart your computer to change effects immediately.
6. Update Black Ops 3
If, in case, you haven’t updated your Black Ops 3 game for a while, then make sure to follow the steps below to check for updates and install the latest patch (if available). To do this:
Battlenet Users:
- Open the Battlenet client > Go to All Games > Click Installed > Click on Call of Duty Vanguard from the left pane.
- Now tap on the Settings icon.
- Tap on check for updates. If there is any update, click on update.
- Once done, make sure to close the Battlenet client.
- Finally, reboot your PC to apply changes, and then try launching the game again
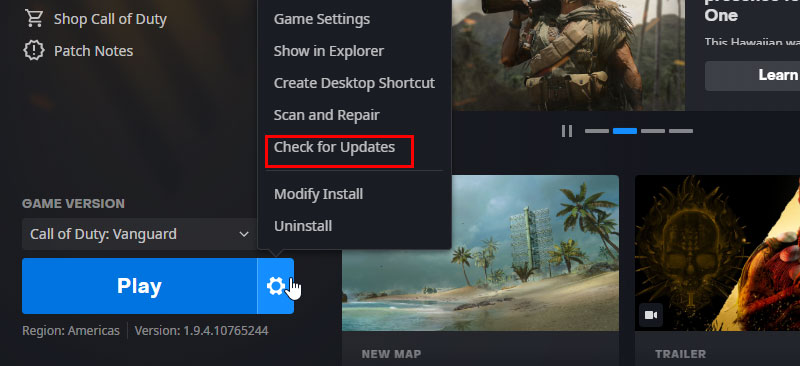
Steam Users:
- Open the Steam client > Go to Library > Click on Black Ops 3 from the left pane.
- It’ll automatically search for the available update. If there is an update available, make sure to click on Update.
- It may take some time to install the update > Once done, close the Steam client.
- Finally, reboot your PC to apply changes and launch the game again.
7. Check for Windows Updates
The chances are high that your Windows OS build becomes outdated enough or corrupted. If you’re also feeling the same, then make sure to follow the steps below to check for Windows updates. If the update is available, then just install it. The latest software updates always offer bug fixes and improvements. To do this:
- Press Windows + I keys to open up the Windows Settings menu.
- Next, click on Update & Security > Select Check for updates under the Windows Update section.
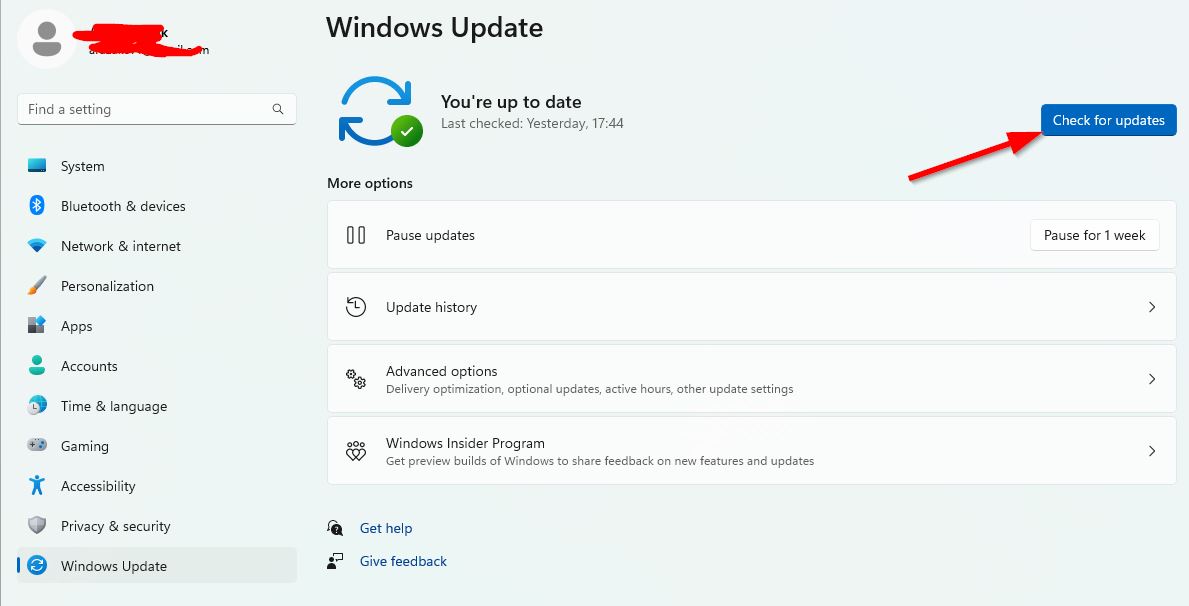
- If there is a feature update available, select Download and install.
- Wait for some time until the update gets completed.
- Finally, reboot your PC to apply changes immediately.
8. Try Disabling Overlay Apps
A couple of popular apps have their overlay program that can eventually run in the background and cause gaming performance or even launching issues. You should turn them off to fix the issue by following the steps below:
- Launch the Discord app > Click on the gear icon at the bottom.
- Click on Overlay under App Settings > Turn on the Enable in-game overlay.
- Click on the Games tab > Select Black Ops 3.
- Finally, turn off the Enable in-game overlay toggle.
- Make sure to reboot your PC to apply changes.
- Press Windows + I keys to open Windows Settings.
- Click on Gaming > Go to Game Bar > Turn off Record game clips, screenshots, and broadcast using the Game bar option.
If, in case, you’re unable to find out the Game Bar option, just search for it from the Windows Settings menu.
Disable Nvidia GeForce Experience Overlay
- Launch the Nvidia GeForce Experience app > Head over to Settings.
- Click on the General tab > Disable the In-Game Overlay option.
- Finally, restart the PC to apply changes and launch the Black Ops 3 game again.
Also, remember that you should disable some other overlay apps like MSI Afterburner, Rivatuner, RGB software, or any other third-party overlay apps that always run in the background.
9. Perform a Clean Boot
Some of the apps and their services may start automatically while booting the system right away. In that case, those apps or services will use many internet connections and system resources. If you also feel the same, perform a clean boot on your computer to check for the issue. To do that:
- Press Windows + R keys to open the Run dialog box.
- Now, type msconfig and hit Enter to open System Configuration.
- Go to the Services tab > Enable the Hide all Microsoft services checkbox.
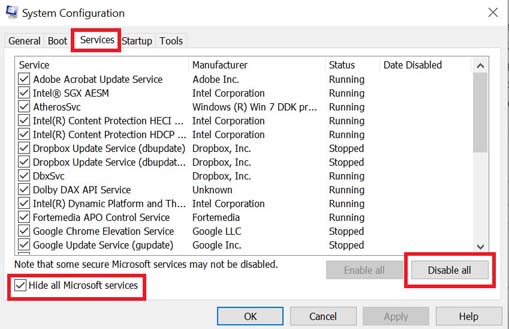
- Click on Disable all > Click on Apply and then OK to save changes.
- Now, go to the Startup tab > Click on Open Task Manager.
- The Task Manager interface will open. Here go to the Startup tab.
- Then click on the particular task which has a higher startup impact.
- Once selected, click on Disable to turn them off from the startup process.
- Do the same steps for each program that has a higher startup impact.
- Once done, make sure to restart your computer to apply changes.
Also Read
10. Repair Game Files on Battle.Net Client
Mostly corrupted or missing game files on your computer won’t notify you, but whenever you try launching the game, it’ll crash, or after loading, sometimes it won’t gonna open. In that scenario, you’ll scratch your head; that’s what’s happening. But repairing the installed game files directly from the client will resolve multiple issues. To do so:
Battle.net:
- Open the Battle.net client on your computer > Head to the library and click on COD Vanguard.
- Click on Options > Select Scan and Repair > Choose to Start Scan.
- Wait for the process to complete, and then you’ll be able to play the game properly. Make sure to reboot the client to apply changes immediately.
Steam:
- Launch Steam > Click on Library.
- Right-click on COD Black Ops 3 from the list of installed games.
- Now, click on Properties > Go to Local Files.
- Click on Verify Integrity of Game Files.
- You’ll have to wait for the process until it gets completed.
- Once done, just restart your computer.
11. Delete Battle.Net Cache Data
It’s needless to say that corrupted cache data files can eventually cause several issues whatsoever. To do that:
- Close all the games first and then quit the Battle.net client too.
- Now, press Windows + R keys to open the Run dialog box.
- Type %programdata% and hit Enter to open the Program Data folder.
- Open the Blizzard Entertainment folder > Head over to Battle.net.
- Click on Cache > Select all files and delete them.
- Once all is deleted, just reboot your computer to apply changes.
Now, you should be able to launch and play the Call of Duty Vanguard game quite easily.
That’s it, guys. We assume this guide was helpful to you. For further queries, you can comment below.
Discussion
2 Commentsat last, you saved my ass. I was about to delete the game.
What a crappy guide.