Microsoft Word is a very versatile application, and there are a lot of features that you probably will never use it. However, there are a lot of useful features available like image compression tools. If you are submitting images online, then most of the sites have limits about size, height, and width of the image.
Well, for that you don’t have to use any third-party application, Microsoft Word does a great job in image compression. Only by a few steps, you can compress an image to your desired size and DPI.
Since Microsoft Word is also available on macOS, therefore we will also discuss the steps to compress images on Word in macOS. The steps are different in MacOs then in windows, but the features that we are going to use are the same.
Further instructions to compress the image in MS Word will be mentioned further below for both Windows and macOS. However, before proceeding, make sure that you add an ALT text to an image because sometimes it is hard to understand images, and the ALT text can describe the content.

Page Contents
How to Compress Images in Microsoft Word Windows
Step 1) Firstly, open up Microsoft Word, drag and drop the image to the MS Word and then click on the Picture Format tab on the menu bar.
Step 2) Now, click the Compress Picture option in the Adjust group under the Picture Format tab.

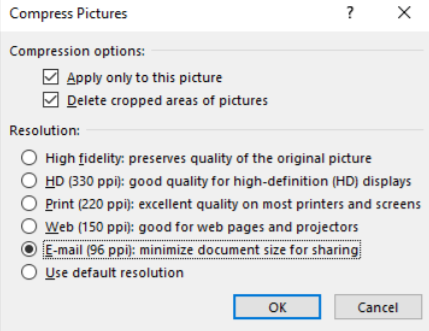
Step 3) A prompt will appear, select the desired compression that you would like to apply in the image. Suppose you want to compress the image size to a minimum. Then select the smaller DPI option, for e.g., E-mail(96 PPI).

Step 4) Lastly, click on the OK button to confirm the changes, and the image will be compressed to a selected DPI. If the changes are not satisfactory, then you can revert it back by clicking on the Undo option.
How to Compress Images in Microsoft Word MacOS
Step 1) If you only wish to compress a particular image in your document. Press the Shift key in your keyboard and select the image that you want to compress.
Step 2) Now, click on the Compress Picture option under the Picture Format tab.

Step 3) Select the compression option from the prompt and click on the Selected pictures only option to confirm the changes; your image will be compressed.
Note
If you want to compress all the images present in your documents, its very easy in macOS. Open the document in MS Word, go to the File option on the menu bar, select the Compress Pictures/ Reduce File Size option. Select the DPI for all the images in your documents, click the ok button, and all the images will be compressed shortly.
Conclusion
Microsoft Word is a very useful application for preparing documents; most of the time, you would have to compress your images for a certain purpose. Microsoft Word has a default feature to compress images.
For Windows users, load or select the image first. Then go to the Picture Format tab, and click the Compress Pictures option below. Select the DPI you want to compress your picture into, click on the ok button, and your image will be compressed.
In macOS, you can compress all the pictures in the documents by going to File>Compress Pictures and selecting the Reduce File Size option. After that, the steps are similar to windows, select the DPI, and continue.
To only compress a particular picture, press the shift button first on your keyboard and then select the image. Then go to Picture Format>Compress Pictures, select the DPI and click on the Selected pictures only option.
