When it comes to flashing the latest firmware files on any Sony Xperia device, the XperiFirm is one of the ultimate firmware flashing tools out there. However, if you’re one of the Sony Xperia users and want to flash the firmware file using the FlashTool then you’ll have to Create your own FTF Firmware Files using XperiFirm and FlashTool as a combo.
Yes! The combination of the XperiFirm and FlashTool is a great recovery solution for Sony Xperia device users. So, that users can simply download the flashable firmware file and the FlashTool will decrypt them. Then creating a bundle of all the files to flash easily. This is one of the useful and easier ways for the Xperia device users to flash new firmware updates.

Page Contents
How to Create own FTF Firmware Files using XperiFirm and FlashTool
So, as we’re gonna using both the XperiFirm and FlashTool on the computer, you’ll need to follow individual steps one by one.
1. Steps for XperiFirm
- First of all, make sure to download the latest XperiFirm tool and install it on your PC by following the steps mentioned in the link.
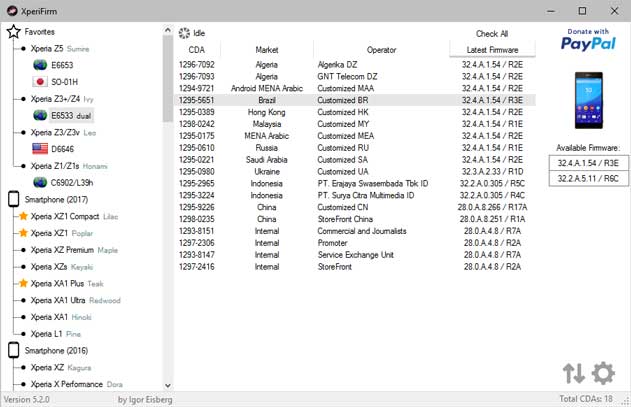
- Once you’ve installed the tool, launch it, and you’ll find out the interface something like the screenshot below:

- Next, go to the left pane and search for your specific Sony Xperia model.
- Make sure to click on it to select the model according to the region or carrier.
- Now, you’ll see the firmware CDA, Market, and Operator from the right pane window.
- Just click on it to easily download the firmware file on the computer.
- Once clicked, all the necessary info will appear in a smaller window.
- Additionally, it’ll ask you “Do you want to download this firmware?”
- So, click on the Download button if you want to proceed.
- Wait for the file to download completely. Once done, you’ll get a “Downloaded successfully!” message.
- Hit the Close button > Now, you’ll find a couple of firmware files in the Downloads folder.
- Some of these files will have the ‘FILE’ prefix in the name for sure.
Please Note: Make sure to simply delete the fwinfo.xml file from that folder (if available). Otherwise, the FTF (Flash Tool Firmware) will be corrupted.
Now, you’re ready to move to the FlashTool method below.
2. Steps for FlashTool
If you’re not aware of FlashTool, it’s S1 flashing software that works well for all Sony Xperia smartphones because Sony uses the S1 protocol for flashing stock firmware files on their Xperia devices officially.
- You’ll have to download FlashTool and install it on your PC.
- Now, run FlashTool > Click on the Tool tab from the interface.
- Select Bundles > Then click on FILESET Decrypt.
- Next, you’ll have to click on the Browse button (three dots icon) to locate and select the Source Folder.
- So, just select all the firmware files which have the name starting with the ‘FILE’ prefix.
- Once you added those files on the FlashTool interface, you’ll see those files in the ‘Available files’ section.
- Now, click on all those added files to select or highlight them altogether.
- Then click on the right arrow icon to shift all the files to the right-sided box (Files to convert).
- Once done, you’ll see all the moved files on the right-sided box.
- Click on the Convert button and wait for the process to complete.
- It may take some time. So, have some patience.
- The FlashTool will start decrypting all the added ‘FILE’ prefix firmware files.
- Once finished, you’ll see a new window called ‘Bundler’.
- Here click on the ‘Device’ field to automatically select your specific Sony Xperia model.
- Now, type the specific region under the ‘Branding’ field.
- Then type the Build Number in the ‘Version’ field.
- Make sure to select and move all the files that you can see on the left pane. [But do not select & move .ta files]
- So, you’ll have to move the selected files to the ‘Firmware content’ box on the right side.
Please Note: We repeat that do not select and move .ta files for sure. That’s important.
- Now, click on the Create button and wait for the process to finish.
- The FlashTool will start creating the bundle and once the process is complete, you’ll see a message that says “Bundle creation finished”.
- You’re done. Just close the FlashTool window.
- Finally, you have now created your FTF firmware for your specific Sony Xperia device according to the region.
Note: You’ll find the created FTF firmware file inside the FlashTool firmware folder on your PC. It should be located in the C:\Flashtool\firmwares path by default. However, if you’ve selected another location, check there.
This is all you need. Now, you’re free to flash the FTF firmware file on your specific Sony Xperia device using the FlashTool via PC. Grab a USB cable to connect the handset to the PC, and follow this in-depth guide to successfully install the firmware.
That’s it, guys. We hope this guide was helpful to you. For additional queries, you can comment below.
Credit: XDA
Must Read:
- Download Newflasher Tool: How to Flash Firmware on Sony Xperia device
- List of Android 11 Supported Sony Xperia Devices
- Sony Xperia Android 12 Update Tracker | Supported Device List
