Diablo IV is the new action role-playing game developed and published by Blizzard Entertainment and is the fourth main installment in the Diablo series. As per multiple reports, the Diablo 4 game is stuttering or freezing constantly on the PC while getting into the gameplay sessions, no matter which specs you’re using.
Page Contents
- Why is Diablo 4 Experiencing Stutters, Lags, or Freezes?
- 1. Check System Requirements
- 2. Run Diablo 4 as an Administrator
- 3. Update GPU Drivers
- 4. Update Diablo 4
- 5. Try Lowering In-Game Graphics Settings
- 6. Disable Fullscreen Optimizations
- 7. Turn On Nvidia DLSS
- 8. Disable NVIDIA ShadowPlay
- 9. Set CPU Affinity via Task Manager
- 10. Verify and Repair Game Files
- 11. Update Windows
- 12. Close Background Tasks
- 13. Perform a Clean Boot
- 14. Disable Overlay
- 15. Increase Virtual Memory
- 16. Keep the PC in Well Ventilated Area
- 17. Reset BIOS Settings to Default
- 18. Try Upgrading the Physical RAM
Why is Diablo 4 Experiencing Stutters, Lags, or Freezes?
Various factors could be causing the performance issues you’re encountering with Diablo 4. Some potential culprits include fullscreen optimizations, corrupt game files, outdated graphics drivers or game versions, out-of-date system software, and other background tasks. Overlay applications, limited RAM, in-game graphics settings, and compatibility with your PC’s specifications can also play a part. Overclocking your GPU or not running the game with administrative privileges might exacerbate these problems.
Fear not, though! We have compiled a list of effective solutions that should significantly improve your gaming experience. It’s crucial to methodically test each solution to pinpoint and remedy the exact cause. Now, let’s delve into these solutions without further ado.
1. Check System Requirements
You should check for the system requirements of the Diablo 4 game to ensure there is no issue with the compatibility of the game and PC specifications. If in case, you find that your PC build isn’t meeting all the system requirements, then make sure to upgrade the specific hardware/software to make it compatible. Otherwise, you can skip to the next method.
Minimum System Requirements:
- OS: 64-bit Windows 10
- Processor: Intel Core i5-2500K or AMD FX-8100
- Memory: 8 GB RAM
- Graphics: NVIDIA GeForce GTX 660 or AMD Radeon R9 280
- DirectX: Version 12
- Storage: SSD with 45 GB available space
- Internet: Broadband Connection
Recommended System Requirements:
- OS: 64-bit Windows 10
- Processor: Intel Core i5-4670K or AMD R3-1300X
- Memory: 16 GB RAM
- Graphics: NVIDIA GeForce GTX 970 or AMD Radeon RX 470
- DirectX: Version 12
- Storage: SSD with 45 GB available space
- Internet: Broadband Connection
2. Run Diablo 4 as an Administrator
First, you should run the game exe application file on your PC as an administrator to grant the user account control access. It’ll allow the system to run the program file properly, preventing crashes or launching issues. You can follow the steps below to do so:
- Right-click on the Diablo 4 exe file on your PC.
- Select Properties > Click on the Compatibility tab.

- Make sure to click on the Run this program as an administrator checkbox to checkmark it.
- Click on Apply and select OK to save changes.
- Now, run the game to launch it.
Please Note: If you’re one of the Battle.net client or Steam client users to run the game, then make sure to follow the same steps for the specific game launcher, too.
Also Read
3. Update GPU Drivers
Checking for the graphics driver update on the PC is highly recommended by following the steps below. By doing so, you’ll be able to install the latest update which will fix several graphical issues with the program. To do so:
- Right-click on the Start Menu to open up the Quick Access Menu.
- Click on Device Manager from the list to open it.
- Double-click on Display adapters to expand it.
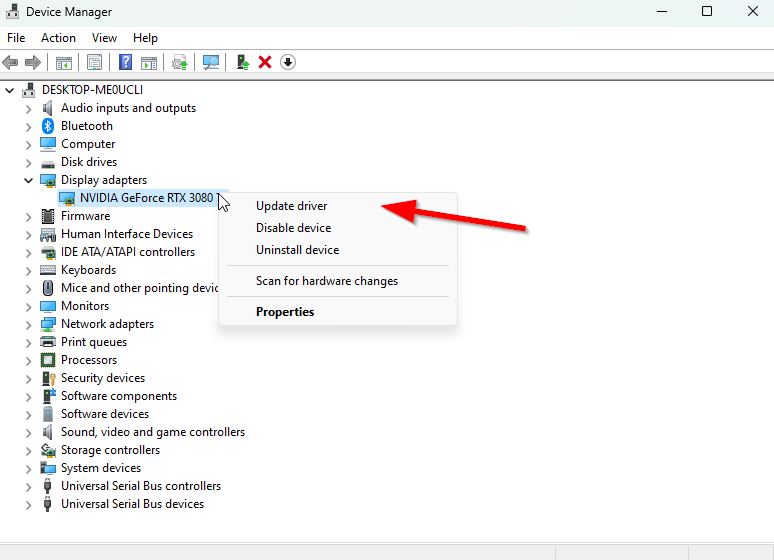
- Right-click on the dedicated graphics card that you’re using.
- Click on Update driver > Choose Search automatically for drivers.
- The system will automatically check for the available updates.
- An update will automatically download and install the latest version if available.
- Once done, ensure to restart your PC to apply the changes.
If there is no update available on the PC, visit the official manufacturer website of the graphics card and manually grab the latest version. Search for the particular graphics card model by the following links.
4. Update Diablo 4
It’s highly suggested to check for the game updates on your PC by following the steps below to ensure no outdated game version is present. Sometimes, issues with the outdated game patch version might cause several conflicts at your end that can affect the game launching or gameplay experience badly. To do that:
For Battle.net:
- Open the Battle.net (Blizzard) launcher > Click on the Blizzard logo from the top left corner.
- Go to Settings > Click on Game Install/Update.
- Scroll down to the bottom of the page > Click on Apply latest updates and download future patch data for recently played games to enable it.
- Now, click on Done to save changes > Restart the Battle.net launcher to apply changes.
- It should automatically update the game to the available version.
5. Try Lowering In-Game Graphics Settings
In most scenarios, the chances are high that your in-game graphics settings are causing such an issue. Depending on your PC configuration and display device, setting up valid graphics settings is suggested so the game can run smoothly. If your PC isn’t powerful and you’ve set graphics settings to a higher level, then you may encounter lags or stutters a lot. So, open the game settings menu and reduce the graphics options as per the PC’s capacity.
6. Disable Fullscreen Optimizations
The Full-screen optimization and DPI settings can be found on Windows programs by default. Sometimes these options may trigger issues with the game performance. You should manually try disabling the fullscreen optimizations by following the steps below.
- Go to the Diablo 4 game directory.
- Now, right-click on the Diablo 4.exe application file.
- Select Properties > Click on the Compatibility tab.
- Click on the Disable Full-Screen Optimizations checkbox to enable it.
- Next, click the Change high DPI settings button > Select the Override high DPI scaling behavior checkbox.
- Select Application from the drop-down menu > Click Apply, then OK to save changes.
- Once done, you can check the Diablo 4 Stuttering, Lags, or Freezing constant issues again.
7. Turn On Nvidia DLSS
If your Diablo 4 game is stuttering or freezing a lot and you’re using the Nvidia graphics card, then make sure to enable the Nvidia DLSS feature to reduce the in-game stutter issue up to some extent. Sometimes the game may not run smoothly on the FidelityFX CAS option, which comes enabled by default. So, disable FidelityFX CAS and then turn on DLSS. You can set DLSS to Quality to see visual improvements and fewer FPS drops.
8. Disable NVIDIA ShadowPlay
It would be best to try turning off the Nvidia ShadowPlay feature on the Nvidia GeForce Experience app to ensure no issue with the game loading or gameplay experience. Like an overlay app, Nvidia ShadowPlay allows you to record and share high-quality video games, take screenshots, and perform live streams with your friends. So, it may cause game performance issues in some scenarios unexpectedly. If you’re an AMD GPU user, skip this one.
- Open the Nvidia GeForce Experience app.
- Click on Settings > Click on the General tab.
- Go to the Share option and disable it.
- Ensure to save changes and reboot the PC.
9. Set CPU Affinity via Task Manager
You can try setting up the CPU Affinity via Task Manager if your processor runs a 6-12 core architecture. Set the CPU Affinity by following the steps below to reduce frame drops or stutters in the game.
- Press the Ctrl+Shift+Esc keys to open Task Manager.
- Now, click on the Details tab > Right-click on the Diablo 4 process (.exe).
- Click on Set Affinity > Manually tickmark the CPU cores to use as CPU 0, 1, 2, 3.
- Then, uncheck the rest of the processors > Click on OK to save changes.
- You should also reboot the PC to apply changes.
10. Verify and Repair Game Files
If in this case, missing or corrupted game files on the PC may trouble players a lot. You can follow the steps below to verify and repair game files on the computer so that the game can run properly.
For Battle.net:
- Open the Battle.net client on your PC.
- Click on the Diablo 4 game.
- Now, click on OPTIONS (Gear icon) > Click on Scan and Repair.
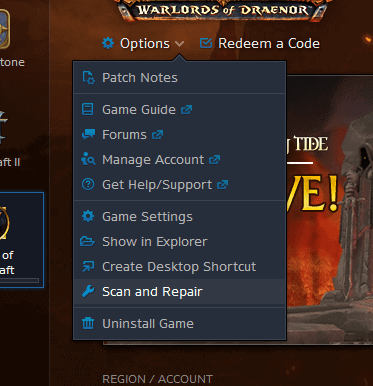 Choose Begin Scan and wait for the process to complete.
- Once done, close the Battle.net launcher and restart your PC.
11. Update Windows
Updating Windows OS build is always essential for PC users and gamers to reduce system glitches, compatibility issues, and crashes. Meanwhile, the latest version mostly includes additional features, improvements, security patches, and more. To do that:
- Press the Win+I keys to open Windows Settings.
- Click on Update & Security > Select Check for updates under the Windows Update section.
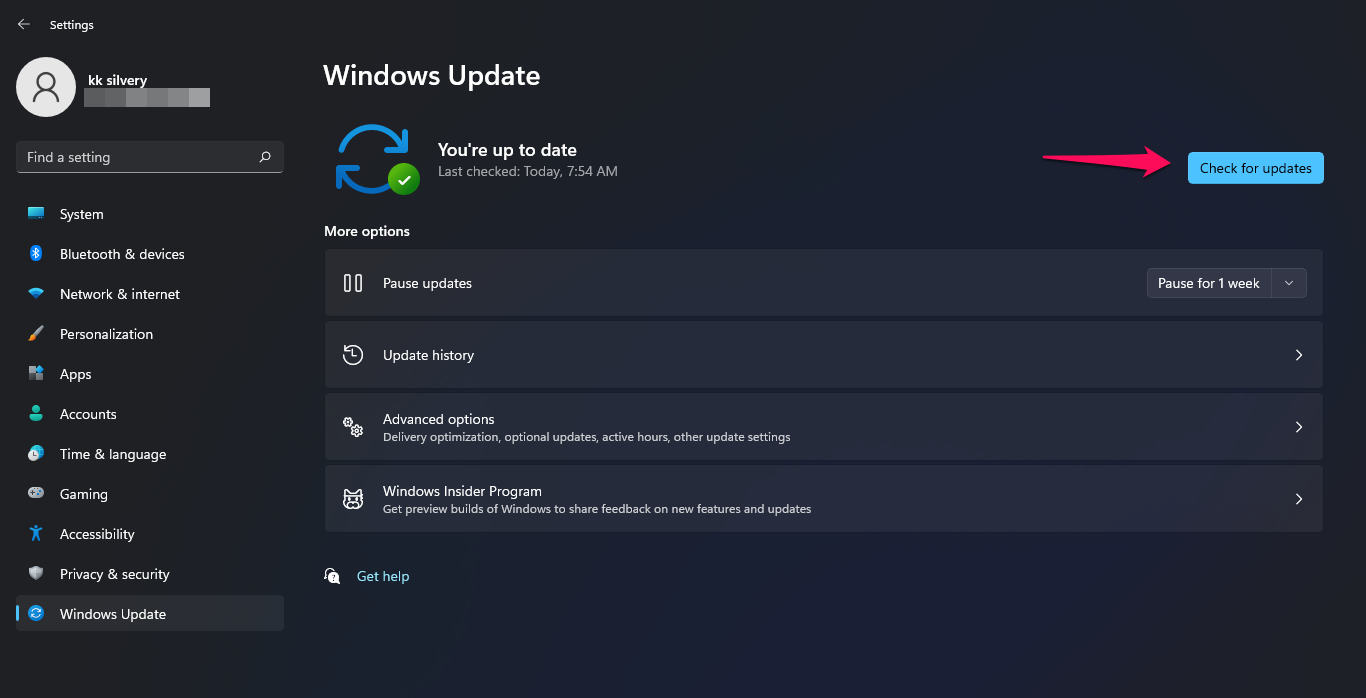
- If there is an update available, select Download and Install.
- It may take a while to complete the update.
- Once done, restart your computer to install the update.
12. Close Background Tasks
Unnecessary background running tasks or programs can eat up a lot of system resources like CPU or Memory usage that literaly reduces system performance. Hence, the startup crashing, lagging, and not loading issues often appear. Close all the unnecessary background running tasks completely. To do this:
- Press the Ctrl+Shift+Esc keys to open Task Manager.
- Now, click on the Processes tab.
- Click to select the task individually that you want to close. [Running in the background and consuming enough system resources]
- Click on End Task to close it one by one.
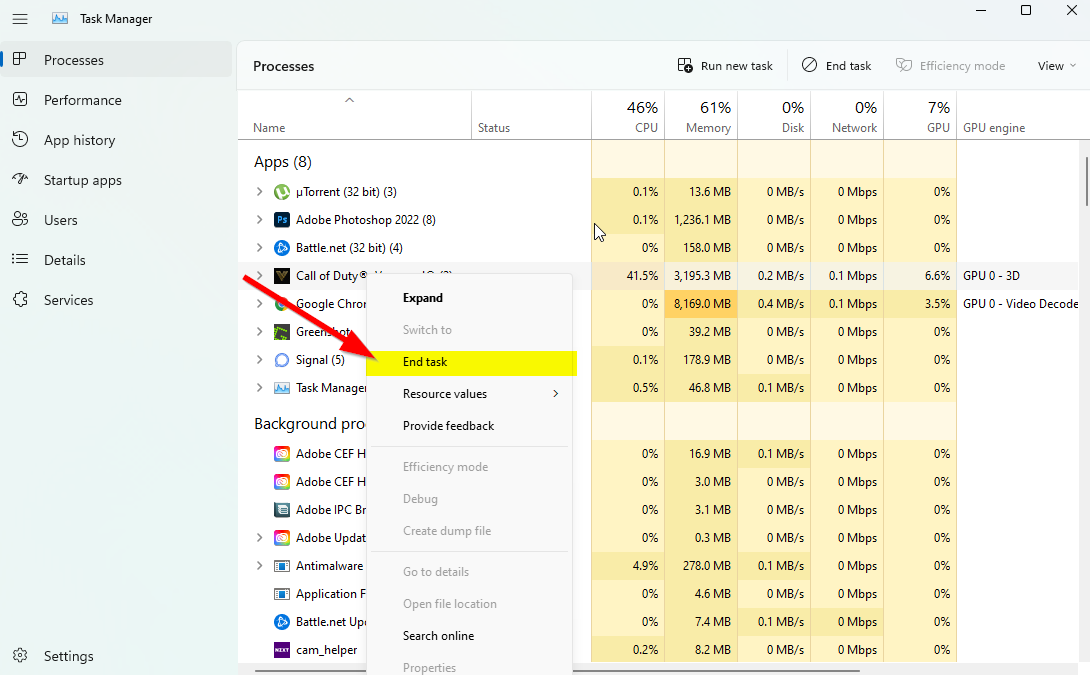
- Once done, restart your system.
13. Perform a Clean Boot
Some of the programs or services may run in the background whenever you boot up the Windows system without your intent. Those apps or services will gonna use a lot of internet connection as well as system resources. If you’re also feeling the same, make sure to perform a clean boot on your computer to check for the issue. To do that:
- Press the Win+R keys to open the Run dialog box.
- Now, type msconfig and hit Enter to open System Configuration.
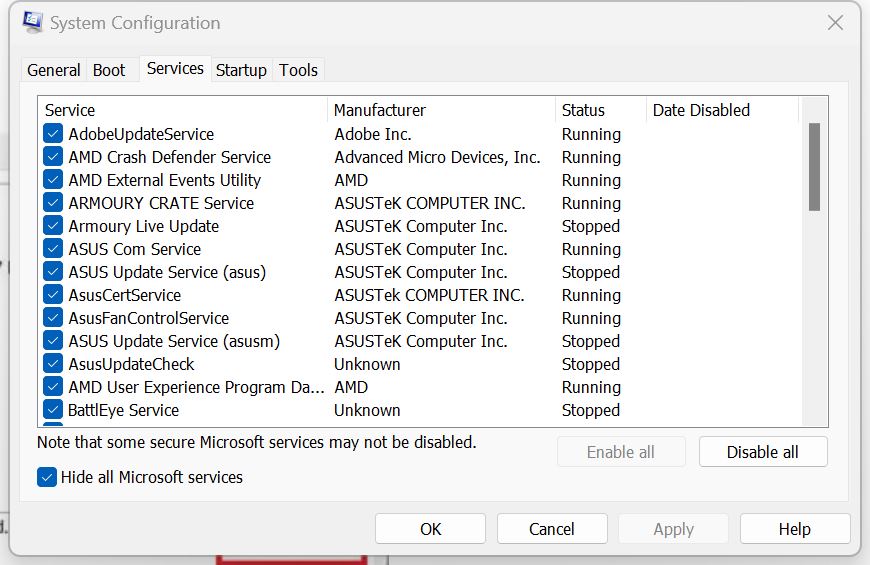
- Go to the Services tab > Enable the Hide all Microsoft services checkbox.
- Click on Disable all > Click on Apply and then OK to save changes.
- Now, go to the Startup tab > Click on Open Task Manager.
- The Task Manager interface will open. Here go to the Startup tab.
- Then click on the particular task which has a higher startup impact.
- Once selected, click on Disable to turn them off from the startup process.
- Do the same steps for each program that has a higher startup impact.
- Once done, make sure to restart your computer to apply changes.
14. Disable Overlay
Blizzard games may crash or experience black screens due to certain overlay programs. Overlays are present in various programs and enable the display of information on top of another program. Many voice programs have this feature enabled by default, allowing players to see who is talking while playing games.
To fix this issue, update the programs with overlays to their latest versions. If updating the program doesn’t help, try disabling or uninstalling it. If this resolves the crashes, reach out to the support section of that program for further assistance.
Some examples of overlay programs that may cause issues are Airfoil, EVGA Precision, Mumble, Taksi, NZXT CAM, Dxtory, MSI Afterburner, RadeonPro, XFire, and Discord.
15. Increase Virtual Memory
Make sure to increase the virtual memory manually on the PC by following the steps below to confirm whether the virtual RAM works well with the game or not.
- Open Control Panel from the Windows Start menu > Go to System.
- Click on Advanced system settings > Go to the Advanced tab.
- Open Settings under Performance > Click on the Advanced tab.
- Click on Change under Virtual memory.
- Now, click on Disable next to the Automatically manage paging file size for all drivers option.
- Then you’ll need to select a Custom size > Type in a higher value of your actual RAM size in both Initial size and Maximum size. [For example, if you’ve 8GB RAM then input 12000 MB]
Note: Kindly enter the RAM value in MB size. 1GB means 1024MB in storage. So, do accordingly, and use C: drive where Windows is installed.
- Click on Ok and restart your computer > Once done, make sure to reboot the PC to apply changes.
16. Keep the PC in Well Ventilated Area
You can keep your PC in a well-ventilated place where the PC can get enough air circulation to dissipate heat faster. If in case, you’re using a PC mostly inside an air-conditioned room, you don’t need to worry about overheating. Make sure to power off your computer once a day whenever you complete your work or gameplay. Just power it off to give some rest if the weather is too hot or you’re using the PC for a long time.
It’s also highly recommended to not place your computer near a window or any open area where the outside is heat or under direct sunlight. Make sure to use a good quality thermal paste on your CPU to maximize cooling. If in case, you’re using a gaming rig and the overheating issue appears most of the time with other games or heavy programs too, then you should use water cooling, which is costly but worth the value.
Also Read
17. Reset BIOS Settings to Default
Another thing you should do is reset the BIOS settings to the optimized default one by following the user manual guide of your specific laptop model or desktop configuration. It’s recommended to only proceed with this method if you’re aware of the consequences (if something goes wrong). Make sure to note down the boot drive settings or information before jumping into it. Turn on TPM (if disabled).
Some laptop brands do automatically push BIOS updates periodically via their own update software or support application. For example, Lenovo laptop users may get BIOS updates via the Lenovo Vintage application and device driver-related official updates whenever available from the company. Once the BIOS is updated to the latest version, you should check whether the Diablo 4 Stuttering, Lags, or Freezing issue has been fixed.
18. Try Upgrading the Physical RAM
It’s quite unfortunate that the above methods didn’t work for you, and your physical RAM isn’t sufficient enough to run video games properly. In that scenario, upgrade the physical RAM to double if your PC supports RAM expansion. Most laptops or desktops support up to 8GB/16GB of RAM expansion, so you should upgrade it. Ensure you buy the same generation of compatible RAM stick to avoid the hassle.
It may take some extra money from your pocket, but this one-time upgrade of RAM will last many years without any issues. However, there is a catch. If your PC has only one RAM channel, you’ll need to replace your older RAM stick with a new one. But if your PC has dual-channel for RAM, you can use both new and old ones, like 4+4 or 8+8, depending on how much RAM storage you want.
That’s it, guys. We assume this guide was helpful to you. For further queries, you can comment below.
