Today let’s talk about some interesting tweaks that will ensure faster internet speed on your PC. Normally, people blame the slow internet connectivity when their download stalls or websites won’t load. Little do they know that there are certain aspects that they can control and improve the network speed. Of course, you may not get the best possible maximum speed. However, you can always optimize your PC and its task to achieve better speed.
In this guide, I have mentioned some simple methods that you can use to get faster internet speed on your PC. I have talked about Windows PC in this guide. You can manage your torrent files, manage bandwidth usage of your applications. This will help optimize the internet speed on your PC. Also, you can tweak the DNS server and try to access web portals through a DNS server other than the ISP’s. Let’s discuss all this in detail.
Related | Best Tips to Increase Internet Speed at Home and Office WiFi Network
Page Contents
- How to Get Faster Internet Speed on your Windows PC
- Manage Your Torrent Files
- Try using Alternate DNS Server
- Don’t Use the Programs that are Utilizing a Lot of Data
- Try to Limit the Bandwidth Usage of the Apps
- Disable Peer-to-Peer Update Sharing Feature on Windows OS
- Manage Other Devices in the Network to Have Consistent Faster Internet Speed
- Stream in Lower Resolution Instead of 4K to Get Faster Internet Speed
How to Get Faster Internet Speed on your Windows PC
Manage Your Torrent Files
If you are using Torrent applications to download torrent files, then make sure that you do not download a bunch of files at once. This will slow down the overall internet use on your PC. Carry out the downloads one file at a time. Also, you can set the particular torrent file to consume less bandwidth.
Most importantly, take care not to seed any torrent file after you download it. Unless you are someone who manages a torrent creation portal, then do not seed any torrent. If you have internet service with up to 1 to 2 Mbps capacity of data transmission, then you should not seed any file. It’s like you are wasting your internet for someone else. People do not understand this concept and waste of a lot of data, suffer from slow connectivity and other issues that accompany a slow internet speed.
Try using Alternate DNS Server
Normal DNS request to change the human-readable website to computer-readable IP address goes through the ISP’s DNS server. However, you can change it to go through an alternate DNS server. This is how you can do it.
- Type Control Panel on Type Here to Search box.
- As Control Panel Opens, on the top right corner, there is View by section. Change it to Large icons.
- From the icons select Network and Sharing Center
- As your latest WiFi connection shows up, click on it Beside Connections
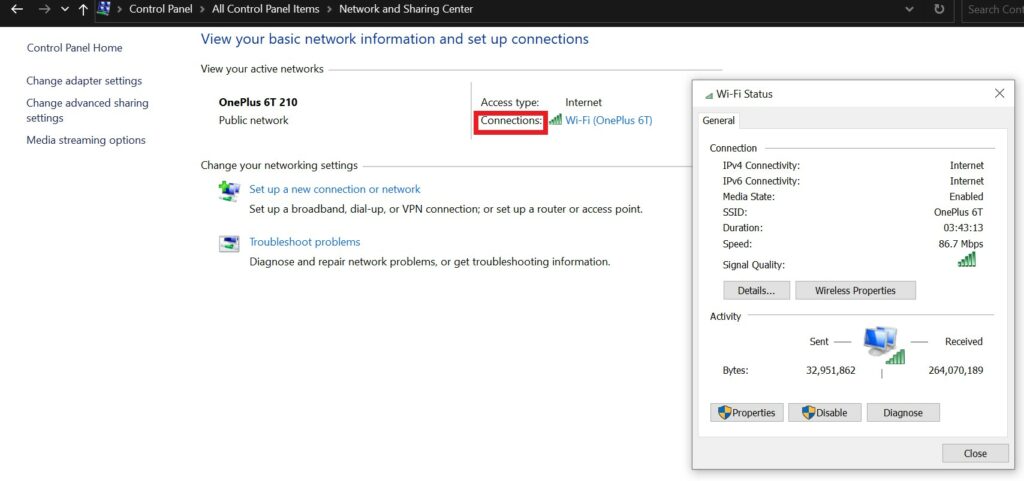
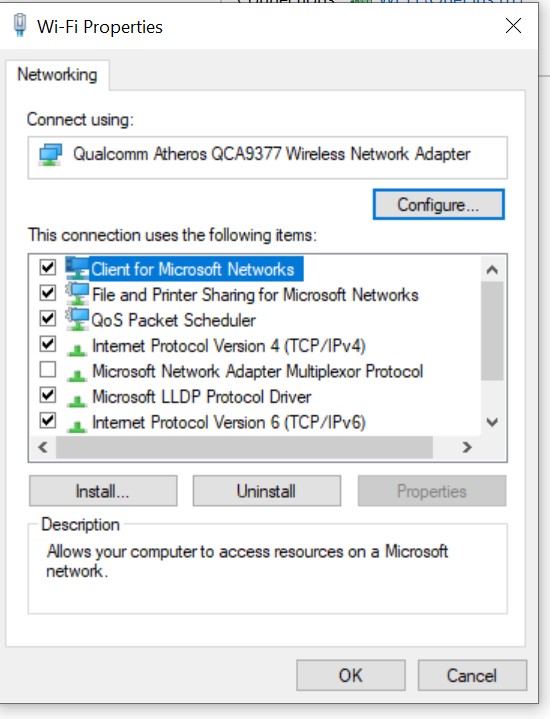
- From the small network status window, click on Properties
- You will see a series of checkboxes. Double click on the one that says Internet Protocol Version 4
- from the next window, select Use the Following DNS Server Addresses
- The set the Preferred DNS Server as 8.8.8.8 and Alternate DNS Server as 8.8.4.4
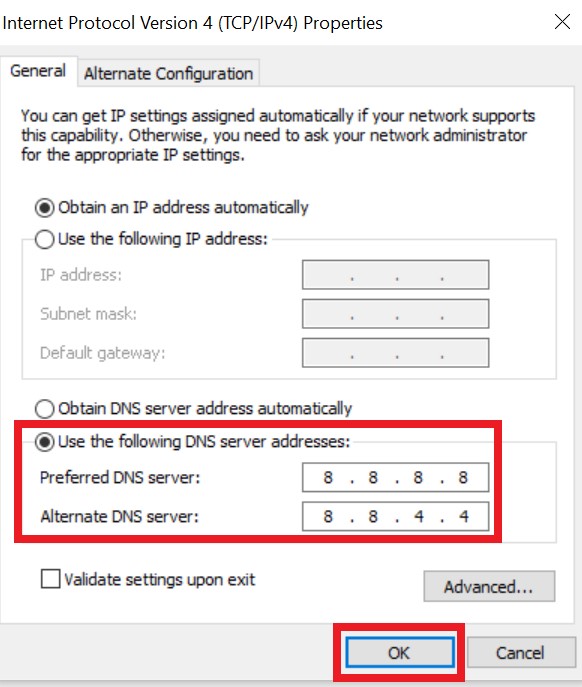
- To finish the setup click OK.
Don’t Use the Programs that are Utilizing a Lot of Data
This means if you are not using multiple apps at one time, then check and close those apps that are consuming a lot of internet data.
- Press Ctrl +Shift+Esc to open task manager
- Then click the Network to see the PC automatically showing the data-intensive apps on the top of the list.
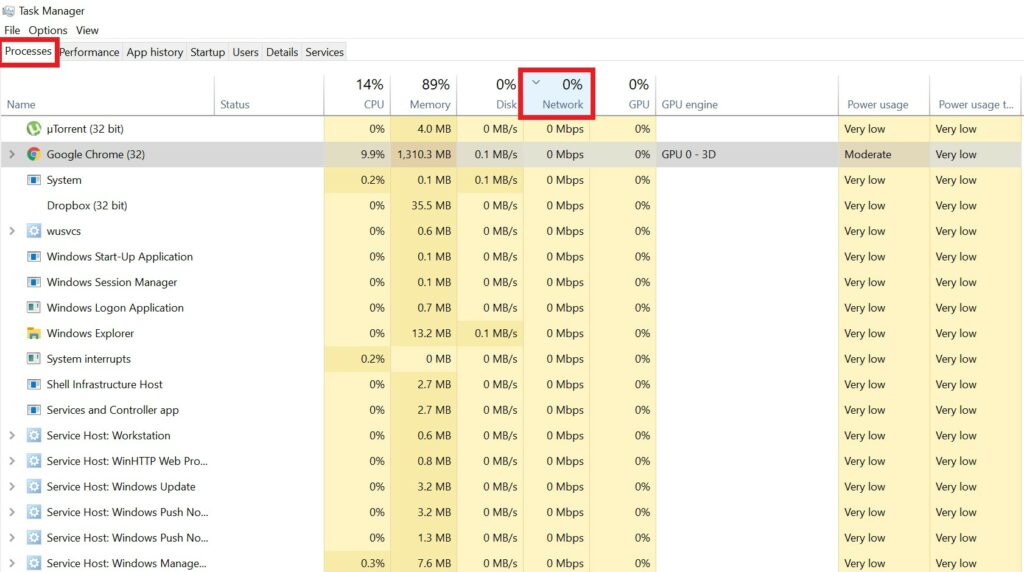
- Depending upon how much data an app is using, or whether you are using the app at that moment, you can let it run or close it to make the internet bandwidth available for other applications.
Try to Limit the Bandwidth Usage of the Apps
Sometimes there are apps that tun in the background and consume a lot of internet data. Mostly these are the cloud storage apps such as Dropbox. You can view how much data is being consumed by the application.
- On the system tray, click on Dropbox icon
- Next, click on the profile picture > select Preferences from the menu
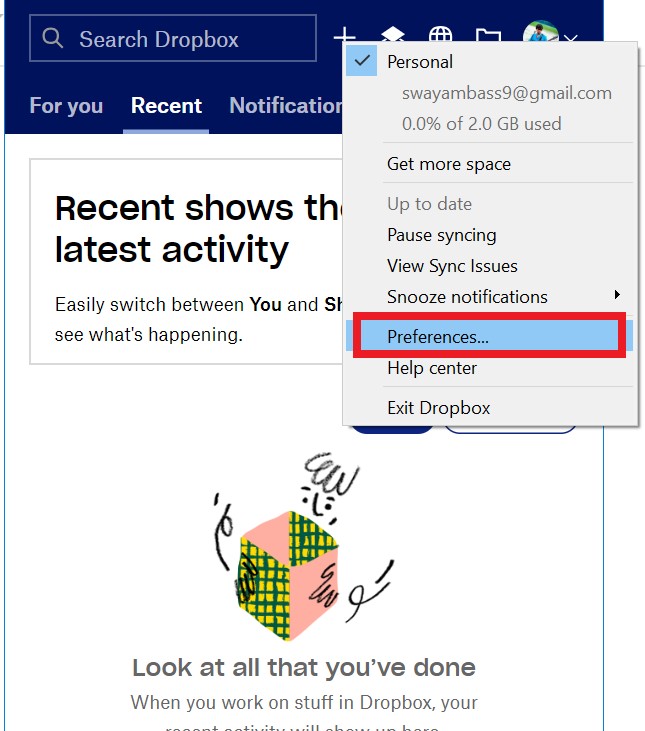
- Next click on Bandwidth
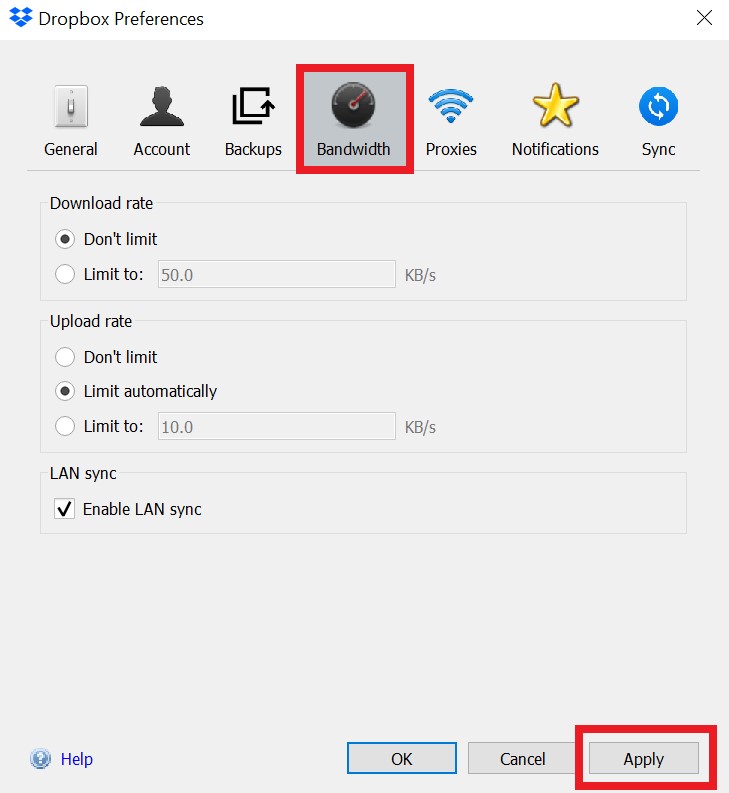
- Now, as you can see, you can manually limit the amount of data Dropbox can use for downloading or uploading any content. Simply select Limit To radio button to enable the manual tweak.
Disable Peer-to-Peer Update Sharing Feature on Windows OS
On Windows 10, you can share the update you download for your PC with the other PCs connected to the network. Though it’s a great feature, remember that other devices will be getting the update at the cost of your internet data. So, can you limit it or disable it..? Yes, you can.
- Go to Settings > Update & Security
- On the left-hand panel, click on Delivery Optimization
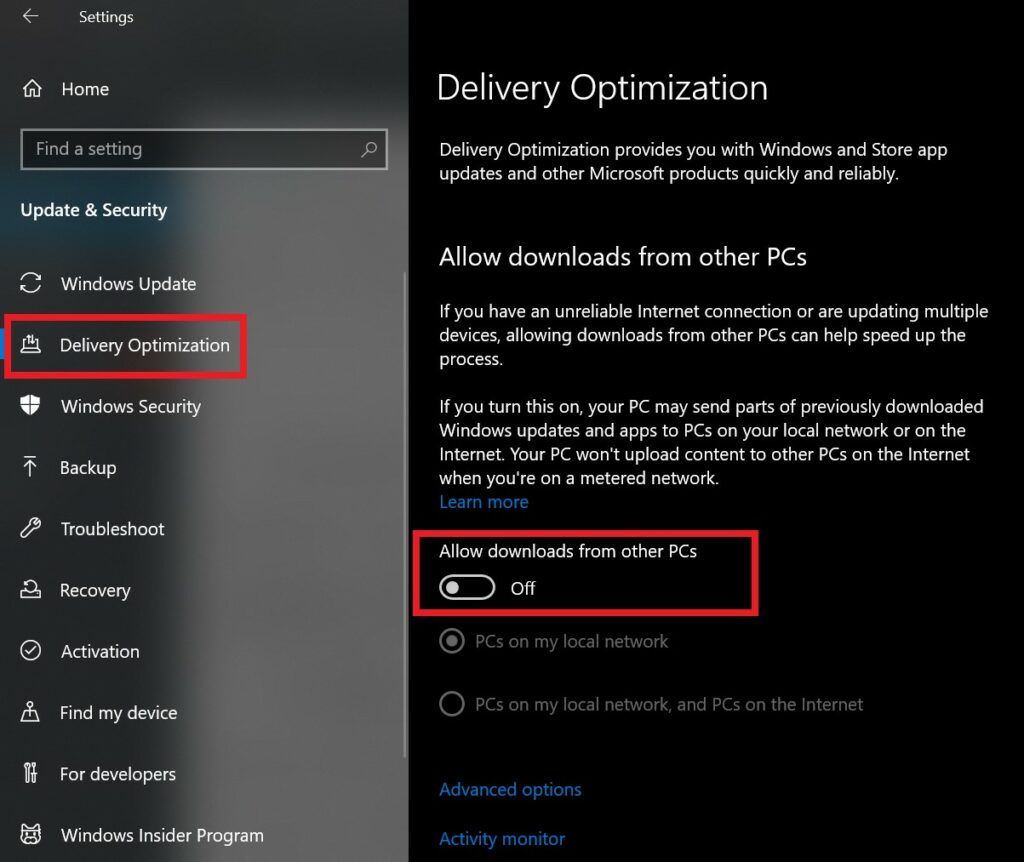
- Click on the toggle to disable the option Allow Downloads from other PCs
Note
Manage Other Devices in the Network to Have Consistent Faster Internet Speed
I always believe that the internet should be used productively for something useful. It may happen that on your home network, 3 devices (PC/smartphone anything) are connected to your main network. If the internet speed is slow, this means, some device on the network may be downloading something intensively. Otherwise, there may be a batch of downloads happening simultaneously on all the devices.
We can also say the same about torrents. If 2 PCs are downloading torrent files from a single network, then obviously, the internet speed will decrease substantially. So, depending upon what is important, you should manage the downloads or download/browse what is important. Later you can carry out other downloads. The point is if you download and browse a lot of dynamic webpages one at a time from multiple devices, it will affect the internet speed. So, wisely line up your internet usage of devices over the home/office network.
Stream in Lower Resolution Instead of 4K to Get Faster Internet Speed
If you watch YouTube, OTT platforms like Netflix or Amazon prime, then try to stream at 720p instead of 4K. see, if you are entirely okay with spending that much amount of data through viewing in 4K, then go for it. Otherwise, if you are keen on saving data, then choose to view it at a lesser resolution.
I do have a good internet connection that caters up to 2 Mbps of speed but I choose to stream at 480p for preserving data for my official work. Yes, occasionally, depending upon what the content is, I tend to stream at 720p or 4K. Try this one out if you are looking for saving loads of data on your network.
So, that’s all about getting faster internet speed on your Windows PC by optimizing these things that I have mentioned in the guide above. I hope that you found this guide informative.
Read Next,
- Superboost WiFi: Is it A Scam or It Works
- 5 Important Use of Router USB Port You Must Know
- How to Fix if Windows Key is Not Working on Your PC
- Which is the Best Translation App in 2020: Google Translate or Microsoft Translator
