The Logitech C920 has been the top of the most popular webcam around for the last few years. The quality, the video image that this thing throws out, is just insane. That’s why a lot of video creators have been using this webcam to create video content over an actual camera.
Talking about Logitech, it is an international S.A., a Swiss PC peripherals and software manufacturer. Logitech is based in Lausanne, Switzerland. Its been around four decades since Logitech dominate the computer peripherals and software market. But, sometimes, users have to face many issues while using their products.
This time the Logitech C920 user is complaining that the autofocus is not working. Well, although it is still not clear whether the issue is occurring due to hardware or software issues. But, after so much research, our team find out the best workaround that will help you get out of this situation, and guess what? Everything we have mentioned here in this guide. So, let’s see them.
Also Read

Page Contents
How To Fix Logitech C920 AutoFocus Problem
So, if you are upset because your Logitech C920 webcam is not working on your Windows PC. Then, don’t worry as you are not alone; there are many users who are also encountering the same error. So, try the following fixes without worrying about this and see if these fixes help you.
Fix 1: Power Cycle Your Logitech C920
There are many reports where users claim that the Logitech C920 autofocus again started working properly just after power cycling it completely. So, you should also try this out. Now, to do so, you can simply turn off your Camera and plug out all the cables attached to it. Then, leave it for 5 minutes, then again plug in the cables and check if it starts working properly or not. After power cycling it, you’ll see that the autofocus problem gets vanished like magic.
Fix 2: Allow App To Access Your Camera
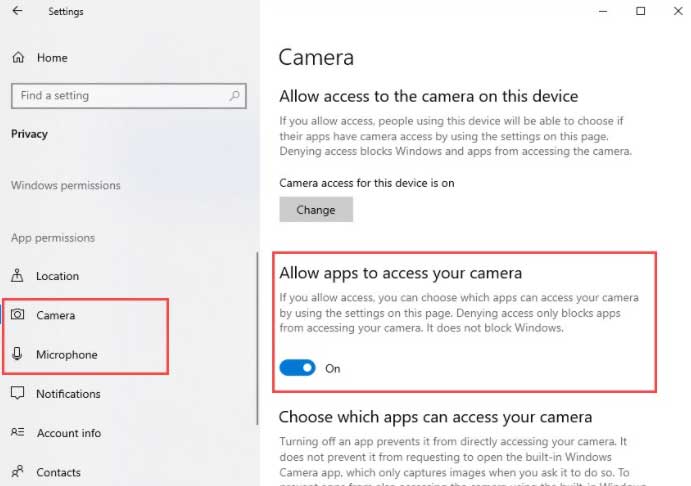
Well, in case you notice that while using any particular app when you access the webcam, it shows an autofocus issue, then there’s a chance that that apps on your PC don’t have the permission to use the Camera. So, you must check if you have enabled this option on your PC or not. Moreover, for some users, this method really works with them as a boon. So, now let’s take a look at the necessary steps to do this:
- First of all, press the Win+I button simultaneously to open the Windows Settings.
- After that, go to the Privacy tab and click on the Camera.
- Then, toggle the button located in front of the Allow apps to access your Camera.
- Now, click on the Microphone and toggle the button located in front of the Allow apps to access your Camera.

Also, don’t forget to scroll down and switch the Camera button to the on position. Once done, try using the Logitech C920 and check if the autofocus is now working or not. Most probably, the issue will get fixed now, but suppose in a very unfortunate situation, if you are still encountering the same error, then don’t worry; simply follow the next method.
Fix 3: Reinstall The Logitech Software
So, in case the above method won’t work, then there are chances that the installation files of your Logitech software may get damaged or corrupted due to which it fails to work properly. Therefore, in that situation reinstalling the Logitech software on your Windows PC will be the right choice. Moreover, if there is any other issue that causes problems in the future will get resolved automatically just by reinstalling it. So, now, let’s move towards the steps for that:
- Firstly, you must press the Win+R button simultaneously to invoke the Run prompt box.
- After that, search for the appwiz.cpl using the Run box.
- Then, locate and right-click on the Logitech Software.
- After that, select the Uninstall button from the drop-down menu that appears.
That’s it. But, now you have to keep in mind that during the uninstall process, only select The Driver. Then, after the uninstallation process gets finished, simply run the Camera and check if the autofocus problem gets resolved or not.
Fix 4: Update Your Driver
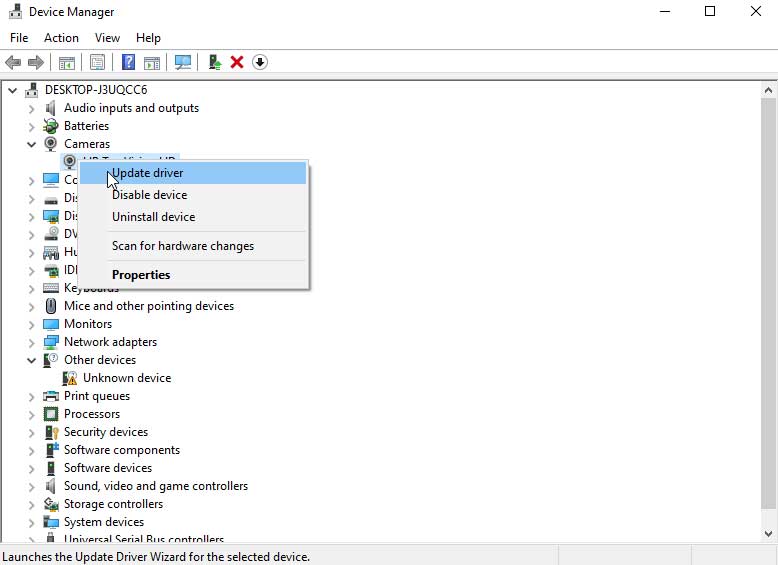
Now, as we have already mentioned in this guide before, the main cause behind this error may be your outdated camera driver. So, it is better to update it from time to time. Well, there are two methods that you can use to update your Camera driver on your Windows PC. The first and the easiest one is to open your browser and hover to Logitech’s official website. Then, download and install the latest driver manually on your PC.
On the other hand, in the second method, you need to access your Device Manager and locate the Cameras option. After that, expand the Cameras tab and right-click on the Logitech C920, then from the drop-down menu, select the Update Driver option.
That’s it. Now, wait for a few minutes until it downloads and installs the driver on your PC. Once done, simply reboot your PC and open the Camera to check if the autofocus problem gets resolved or not.
Fix 5: Disable The Conflict Apps
There is a huge possibility that some app running in the background may conflict with your Camera and prevent it from working properly, and that’s the main reason why you are getting the Logitech C920 autofocus problem on your Windows PC. So, it is recommended to disable all the conflict apps running in the background. But, if you don’t know the steps, don’t worry, as we are here to help you only. So, walkthrough with the needy steps to do so:
- Initially, right-click on the Start menu, and from the pop-up menu, select the Task Manager.
- After that, select the applications running in the background one by one and disable them until you get the conflicting app causing the error.
But, make sure not to disable the process related to your system. Once done, reboot your system and open the Camera to check whether the issue gets resolved or not.
Also Read: Fix: Logitech C920 Webcam Not working Issue
Wrap Up
So, that’s it on how to fix the Logitech C920 autofocus problem. We hope the fixes mentioned in this guide helped you. But, in a very unfortunate situation, if the error won’t get fixed, we recommend you hover to your nearest repair center and get a repair. Anyway, comment below if you have any questions or requests for us.
