Insomniac Games and Nixxes Software have just released Marvel’s Spider-Man Remastered as a sequel or an improved version of the 2018’s Marvel’s Spider-Man title for the PC and PS5 edition. Well, this action-adventure open-world superhero video game is all about the same Peter Parker character who fights against crimes and iconic villains. However, some players are experiencing multiple issues with Marvel’s Spider-Man, and the Screen Flickering or Tearing Issue on PC is one of them.
Now, if you’re also one of the victims of such an issue, don’t worry because here, we’ve shared the troubleshooting guide for you that should help you out. For years, screen flickering, screen tearing, or even the freezing issue has been quite common among PC games. No matter whatever game you’re playing, you might encounter such issues on multiple occasions. But there are some ways to easily fix this issue that you can check out.
Also Read

Page Contents
- Fix: Marvel’s Spider-Man Screen Flickering or Tearing Issue on PC
- 1. Enable V-Sync in Nvidia Control Panel
- 2. Try Lowering In-Game Graphics Settings
- 3. Update GPU Drivers
- 4. Close Unnecessary Background Tasks
- 5. Check Your Internet Connection
- 6. Update Marvel’s Spider-Man
- 7. Verify Integrity of Game Files
- 8. Set High Performance in Power Options
- 9. Set High Priority in Task Manager
- 10. Update Windows
Fix: Marvel’s Spider-Man Screen Flickering or Tearing Issue on PC
We should mention that if you’re facing the screen flickering or tearing issue while playing the multiplayer game modes or during any specific sessions or even during any particular checkpoints, you should check out whether your internet connection is working properly. Sometimes in-game graphics settings may also trigger these issues whatsoever. Some reports are also coming out that during the cutscenes, screen shimmering occurs.
Whereas it’s also worth recommending cross-checking the V-Sync option for Marvel’s Spider-Man game because that can trouble you a lot for some titles on the PC. So, until the problem gets fixed for you, make sure to follow all the methods one by one. Now, without wasting any more time, let’s jump into it.
1. Enable V-Sync in Nvidia Control Panel
It’s recommended to turn on the Vertical Sync feature on your Nvidia Control Panel app for Marvel’s Spider-Man game to avoid graphical glitches up to some extent. Remember that this method is only applicable if you’re using an Nvidia graphics card.
- Launch the Nvidia Control Panel from the Start menu. If it’s not installed, go to Microsoft Store and install it.
- In the Nvidia Control Panel interface, go to ‘3D Settings’ > Select ‘Manage 3D settings’.
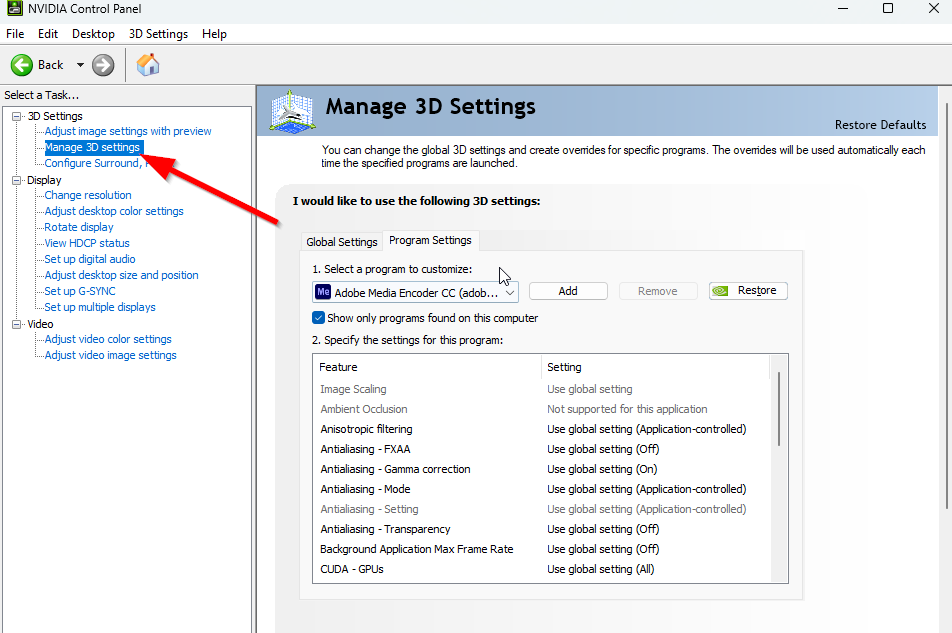
- Select ‘Program Settings’ > Click on ‘Add’ and select ‘Marvel’s Spider-Man’ from the list of programs on your PC.
- If the game application isn’t listed then click on ‘Browse’ and head over to the installed Marvel’s Spider-Man directory on the drive. Simply locate the Marvel’s Spider-Man folder and add the HaloInfinite.exe application > Then make sure to select the game in the list and add it.
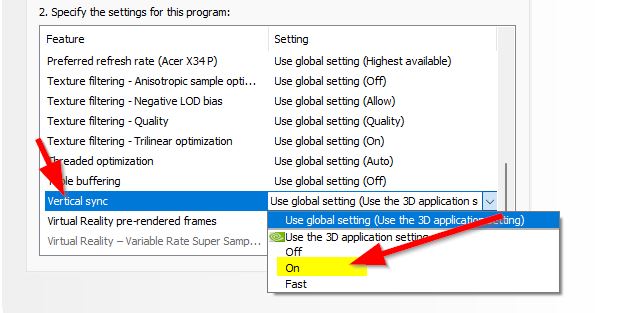
- Now, scroll down to ‘Vertical sync’ > Click on it and select ‘On’ to enable it. This will force the Marvel’s Spider-Man game to use V-Sync every time.
- Restart your computer to apply changes and play the game to check for the issue again.
2. Try Lowering In-Game Graphics Settings
First of all, you should try lowering the in-game graphics settings on your PC or console to check if that helps you to fix the frame drops or stuttering issues. Try turning off some of the display settings for Marvel’s Spider-Man game, such as texture details, shadow effect, v-sync, anti-aliasing, etc. This should improve the FPS count and performance/smoothness in gameplay.
3. Update GPU Drivers
If in case, you haven’t updated your graphics driver on the Windows computer, then make sure to install the latest patch version. To do so, you’ll need to check for available updates by following the steps below:
- Press Windows + X keys to open the Quick Link Menu.
- Now, click on Device Manager from the list > Double-click on Display adapters.
- Right-click on the dedicated graphics card that you’re using.
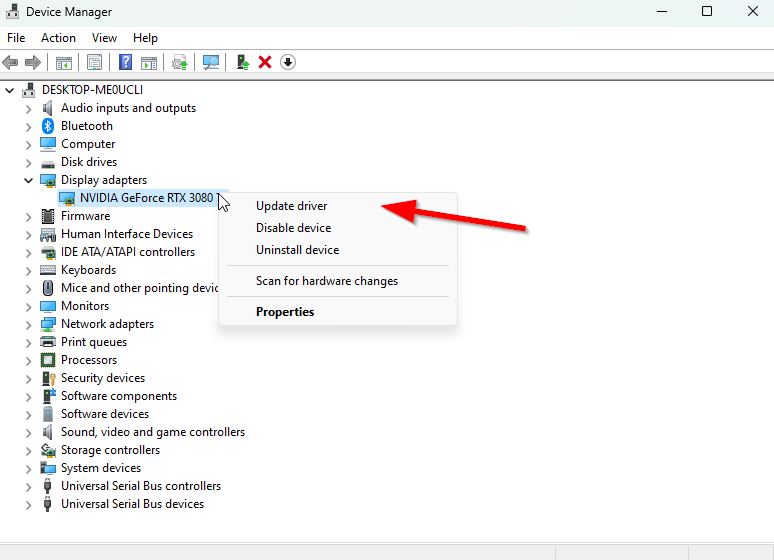
- Next, select Update driver > Choose to Search automatically for drivers.
- If an update is available, the system will automatically download & install it.
- Once done, restart the computer to apply changes immediately.
4. Close Unnecessary Background Tasks
Another thing you can do is simply close unnecessary background tasks on your PC to ensure there is no additional consumption of system resources happening in the background whatsoever. Make sure to keep Marvel’s Spider-Man, Steam, and other system-related tasks running as it is. To clear out background tasks:
- Press the Ctrl + Shift + Esc keys to open Task Manager.
- Click on the Processes tab > Select the task you want to close.
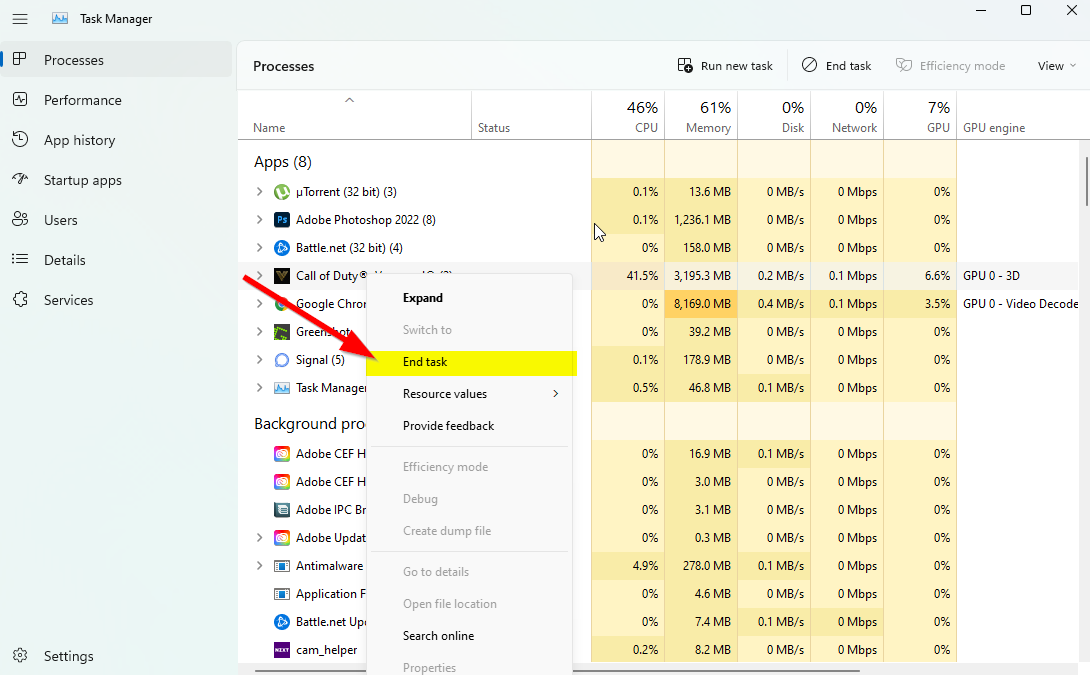
- Once selected, click on End Task. Make sure to do the steps for each task individually.
- Finally, just restart your computer to change effects immediately, and check for Marvel’s Spider-Man screen flickering or tearing issue.
5. Check Your Internet Connection
You should also try checking for the internet connection on your PC whether it’s running well or not. A slower internet speed or unstable connectivity can cause issues with the game launching or fetching data from the server. You can also try switching the internet connection from wired (ethernet) to wireless (Wi-Fi) to cross-check the network connectivity problem.
If your IP address has some issues or your DNS address is troubling you a lot then make sure to use the Google DNS address on the PC to avoid rubberbanding connection or stuttering or even lagging issues which can happen due to slow internet.
6. Update Marvel’s Spider-Man
Sometimes an outdated game version can also bring multiple bugs or issues. It’s better to update your Marvel’s Spider-Man game by following the steps below. If an update is available then simply install the latest patch. To do this:
Steam Users
- Open the Steam client > Go to Library > Click on Marvel’s Spider-Man from the left pane.
- It’ll automatically search for the available update. If there is an update available, make sure to click on Update.
- It may take some time to install the update > Once done, make sure to close the Steam client.
- Finally, reboot your PC to apply changes, and then try launching the game again.
Epic Launcher Users:
- Open the Epic Launcher client > Go to Library > Look for Marvel’s Spider-Man from the left pane.
- On your Marvel’s Spider-Man application, you have to tap on the three-dot icon.
- Make sure to check the auto-update to get a new update installation automatically.
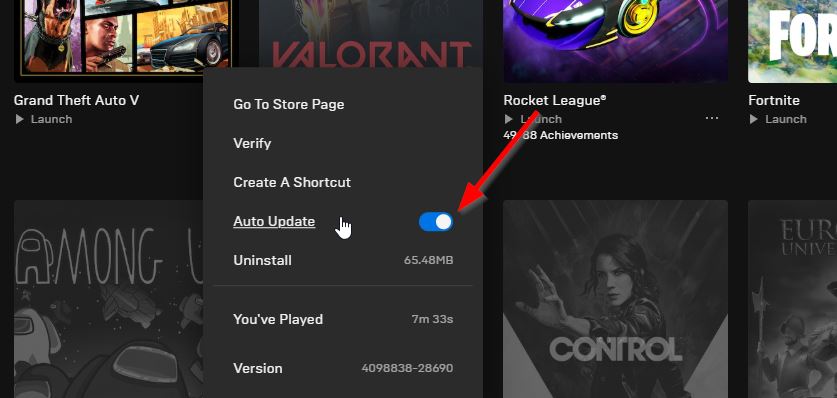
- It’ll automatically search for the available update. If there is an update available, make sure to click on Update.
- Finally, reboot your PC to apply changes, and then try launching the game again.
7. Verify Integrity of Game Files
If in case, there is an issue with the game files and somehow it gets corrupted or missing then make sure to perform this method to easily check for the issue.
Verify Game Files on Steam:
- Launch Steam > Click on Library.
- Right-click on Marvel’s Spider-Man from the list of installed games.
- Now, click on Properties > Go to Local Files.

- Click on Verify Integrity of Game Files.
- You’ll have to wait for the process until it gets completed.
- Once done, just restart your computer.
Verify Game Files on Epic:
8. Set High Performance in Power Options
If in case, your Windows system is running on the Balanced mode in Power Options, just set the High-Performance mode for better results. Although this option will take higher power usage or battery usage. To do this:
- Click on the Start Menu > Type Control Panel and click on it from the search result.
- Now, go to Hardware and Sound > Select Power Options.
- Click on High Performance to select it.
- Make sure to close the window and fully shut down your computer. To do this, click on the Start Menu > Go to Power > Shut Down.
- Once your computer is fully turned off, you can power it on again.
9. Set High Priority in Task Manager
Make your game priority in the higher segment via the Task Manager to tell your Windows system to run the game properly. To do this:
- Right-click on the Start Menu > Select Task Manager.
- Click on the Processes tab > Right-click on Marvel’s Spider-Man game task.
- Select Set Priority to High > Close Task Manager.
- Finally, run Marvel’s Spider-Man game to check if it crashing on PC or not.
10. Update Windows
Updating Windows OS build is always essential for PC users as well as PC gamers to reduce system glitches, compatibility issues, and crashes. Meanwhile, the latest version mostly includes additional features, improvements, security patches, and more. To do that:
- Press Windows + I keys to open up the Windows Settings menu.
- Next, click on Update & Security > Select Check for updates under the Windows Update section.
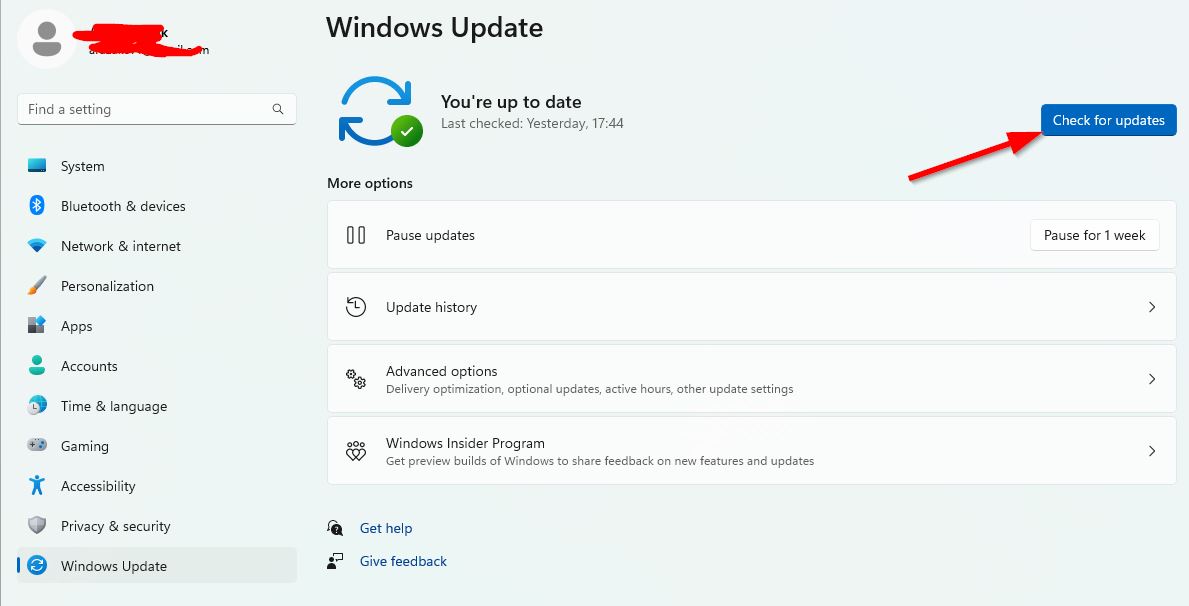
- If there is a feature update available, select Download and install.
- It may take a while to complete the update.
- Once done, restart your computer to install the update.
That’s it, guys. We assume this guide was helpful to you. For further queries, you can comment below.
Also Read

I’ve done all the above but it won’t stop flickering. It’s like laser lights everywhere. What else can I do?