Though having a bootloader unlocked Android device can be beneficial in several ways, especially if you’re a developer or an advanced-level of Android user to do things like flashing custom firmware, installing custom recovery, enabling root access, installing custom modules, etc, sometimes it can be a hassle for some users due to security or privacy reasons. Well, if you’re a Samsung Galaxy user and want to get back to the factory-locked bootloader status again, you can check how to Relock Bootloader on any Samsung Galaxy Phone easily.
Google’s SafetyNet feature considers the locked bootloader of an Android device to be safe and secure. But whenever it detects any kind of system firmware modification or rooting or bootloader unlocking status, it eventually prevents some of the services like online payment or online banking regarding applications to run properly. Although Magisk-rooted devices can be able to use all apps and services without any restriction, relocking the bootloader does have plenty of benefits too.
These days, Samsung Galaxy devices come with many advanced features and customizations out of the box. But most advanced users prefer bootloader unlocking and flashing third-party files on their phones to get more modifications and admin privileges over the subsystem files. But if you’re trying to sell your handset to someone else, you might need to relock the bootloader. Otherwise, an unlocked bootloader warning message will appear every time the user boots the device.
Also Read

Page Contents
What is Bootloader?
A device bootloader is a code or a program that starts when the device is powered on to choose and run the operating system on our device every time we boot our handset. It basically tells the operating system and kernel to run the recovery mode or initiate the boot process in the system. It’s also worth mentioning that the device bootloader can be found on each operating system running devices or gadgets like smartphones, tablets, PCs, etc.
Due to Android’s open-source nature, it’s quite easy to unlock the device’s bootloader. By unlocking it, you will be able to flash any third-party Custom ROM, Root, Mod files, Custom Recovery, and more. This will give you simple access to tweak your Android device. Similarly, you can even relock the bootloader, and that’s what we’ll gonna provide you in this guide.
How to Relock Bootloader on Any Samsung Galaxy Phones?
It’s also worth mentioning that a bootloader-unlocked device automatically voids the Google Play Protection Certification and leads to unusable services like Netflix on your handset. So, it’s always a better idea to relock the bootloader unless you’re a third-party firmware lover or need root access. Luckily, here we’ve shared with you a full-depth guide on how you can relock the bootloader on your Samsung Galaxy device. So, without further ado, let’s jump into it.
1. Things to Remember:
- After installing TWRP or enabling Root access on your Samsung Galaxy device, the Samsung KNOX security will be tripped.
- Samsung KNOX security can’t be reverted once tripped even after installing the stock firmware via the Odin tool. So, keep that in mind.
- Tripped KNOX security indicates you won’t be able to use Samsung Pay, Secure Folder, and more.
Disclaimer:
2. Requirements
- Relocking the bootloader will delete all the device data like internal storage files, documents, media, etc. So, make sure to take a complete backup of all your data before going into the bootloader relocking method below.
- You will require a PC or Laptop and a USB cable for this.
- Keep your device charged sufficiently before doing anything.
- Download the ADB & Fastboot Platform Tools on your PC for Windows | Mac.
- You should Install the Samsung USB Drivers on the PC properly.
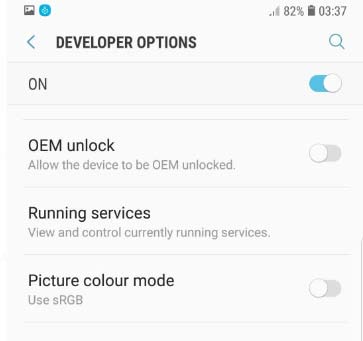
- Make sure to Turn On the OEM Unlocking and USB Debugging on your Samsung Galaxy handset. To do so:
- Go to the Settings menu of your Android device.
- Then scroll down and go to About.
- Now you need to head to Software Information>> More.
- Here tap on the Build Number around 7 times until you see the message ‘You are now a developer’.
- Go back to the previous settings menu > Tap on Developer Options.

-
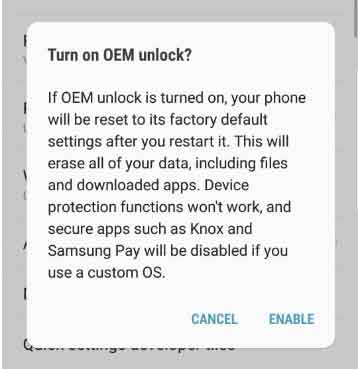
- Turn On the OEM Unlock toggle. If prompted, tap on Enable. [Important]

-
- Similarly, Turn On the USB Debugging toggle.
- You should also download the currently running stock firmware version for your Samsung Galaxy model from this guide link. After downloading the firmware (zip) file, extract it on the computer.
- Download the latest ODIN Tool version here.
3. Steps to Relock Bootloader on Samsung Devices
- First of all, you’ll need to boot your Samsung Galaxy device into the Download Mode. To do this:
- Power Off your Samsung Galaxy device completely.
- Then press and hold the Bixby + Volume Down buttons together for a few seconds.
- Don’t release the buttons and immediately connect your Galaxy phone to the PC via a USB cable.
- A blue ‘Warning’ screen will appear on your Galaxy device > Now, long-press the Volume Up button to enter the ‘Device Unlock Mode’.
- Your device will now prompt you to confirm if you want to relock the bootloader or not.
- As we’re interested in relocking the bootloader, press the Volume Up button to confirm the bootloader relock on your Samsung Galaxy device.
- Once done, your handset will reboot automatically, and the bootloader will be locked again.
- You’re good to go. Enjoy!
4. Restore or Reinstall the Stock Firmware on Samsung Galaxy
If you’ve installed the third-party firmware then even after relocking the bootloader, your handset will be still in the Download Mode consisting ‘VBMeta: Error Verifying vbmeta image’ message at the top. Therefore, you’ll need to flash the Stock ROM on your Samsung Galaxy handset manually by following the full-depth guide here.
That’s it, guys. We assume this guide was helpful to you. For further queries, you can comment below.
