Videos are an amazing source of information, both visual and audio. However, in some scenarios, audio is not necessary for the purpose of explanation. Many teachers. instructors and presenters often face this dilemma on how to remove audio from video on their Windows and Mac PC. With many advanced tools, this process is now easier than ever.
Users can remove audio by wither muting the speaker while showcasing the video. But in many scenarios this won’t work either, so the best way to remove audio from any video is to edit the video to cancel out the audio files.
It is possible that you want to edit a video file, and you don’t want the present Audio. Therefore, you would like to remove the audio. You can either remove the Audio in a Video Editor application on your Mac and Windows device. Or there are other methods which we will discuss in this article like using an Online service or using VLC, for instance.

Page Contents
How to Remove Audio From Video on Windows and Mac
Down below are some method you can use to remove audio from Vidoe; these methods will work on both Windows and Mac PC. Some methods do use other third-party apps such as “VLC” media player.
Before following the method down below, there is a quick way you can silence the audio from your videos. If the video you’re playing is on Youtube, then you can mute the tab while playing the audio. Also, you can mute the speaker while playing the video from your local storage. This will save you time and will server the purpose.
Method 1: Using an Online Service for Removal of Audio From a Video
This is the easiest method to remove the Audio from a Video file both on Windows and Mac Device. Firstly, you will have to open up the Web Browser of your preferences, for Mac, Safari Web Browser and for Windows users Chrome or Microsoft Edge.
Now visit the Audio Remover tool webpage, and there click on the Upload Video button. However, the limit here is 500MB, video file larger than that won’t be uploaded.
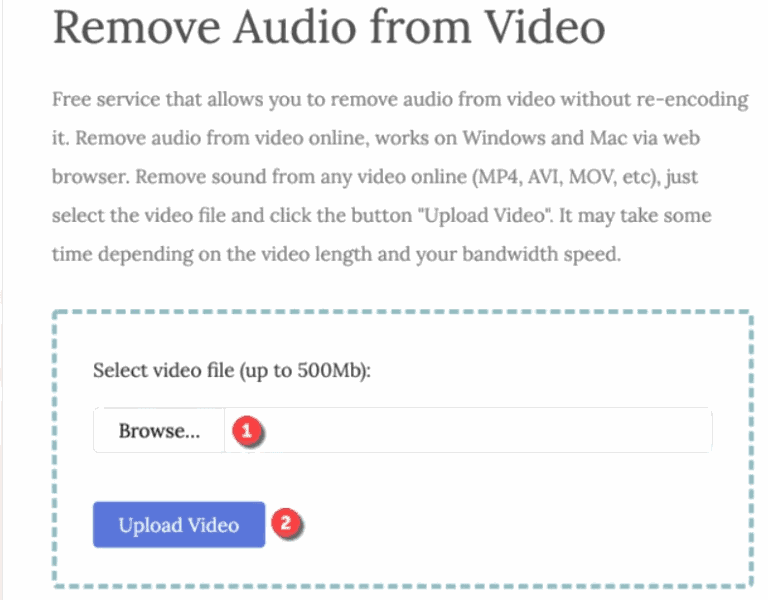
After you have uploaded the Video, the Audio Remover will automatically remove the Audio from the Video. Once this process is done, a Download Link will appear on the screen.

Click on that to download the Video which has no Audio. Or if you don’t want the Video file click on the Delete file now option.
Method 2: Using VLC
VLC is generally a Video player application that can play any codec of Video and Audio files not only that it has some robust features which you can use to remove the Audio from a Video.
Also, the application is available for both Mac and Windows devices, the steps may vary a little, but the procedure is the same. Firstly, you will have to download and install VLC on your Windows or Mac device.
Then follow the steps mentioned below for Windows and Mac to remove the audio from the Video.
On Windows
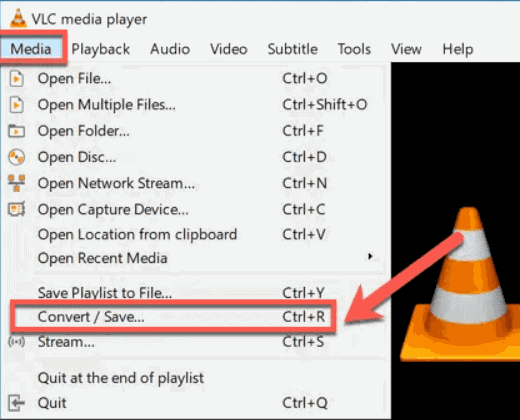
Open up VLC on your Windows than on the top menu click on the Media option, from the menu select the Convert/Save option. Alternatively, you can press the Ctrl + R keys on your keyboard.
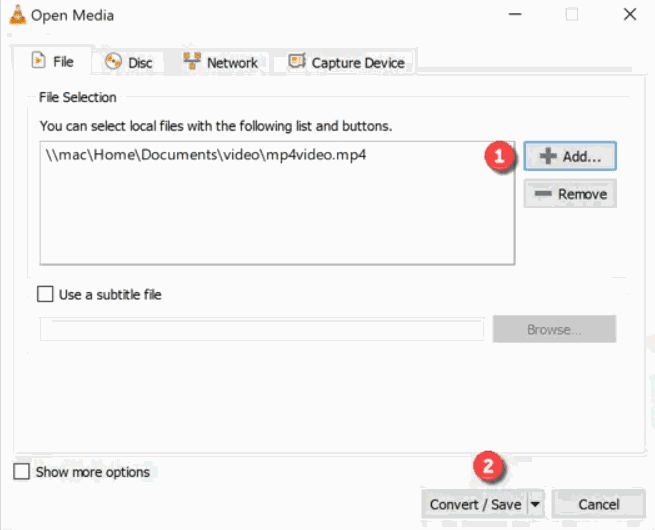
The Open Media window will be prompt on your screen, there go to the File tab, and then click on the Add button, add the video from where you want to remove the audio. After that, click on the Convert/Save button below.
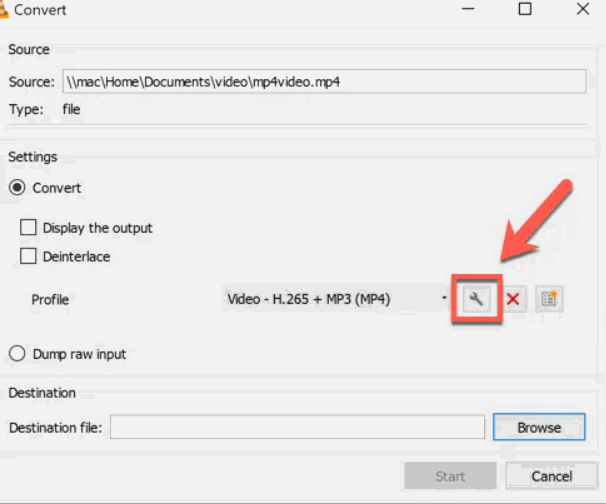
Now, you will be in the Convert Window, there under the Settings category beside the Profile click on the Settings icon that also looks like a Wrench.
After you have clicked on the Settings icon, the Profile Edition window will open up, here go to the Audio Codec and uncheck the Audio option and click on the Save button.
Lastly, select the destination for the output video file and click on the Start button to generate the Video file without Audio.
On Mac
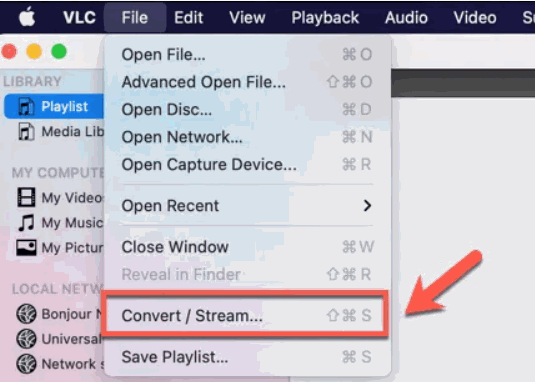
Open up VLC on your Mac device, then on the top-menu panel click on the File option and select convert/stream option.
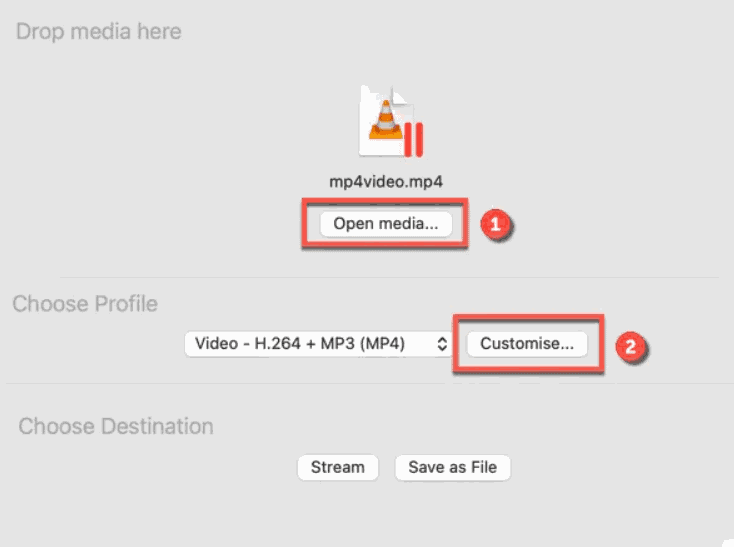
On the prompt click on the Open Media button and select the video file that you want to remove the audio from. After that, under the Chosen Profile category, click on the Customize button.
Now, on the next pop-up window go to the Audio codec tab and there uncheck the Audio option. Click on the Apply button to remove the Audio from the Video.
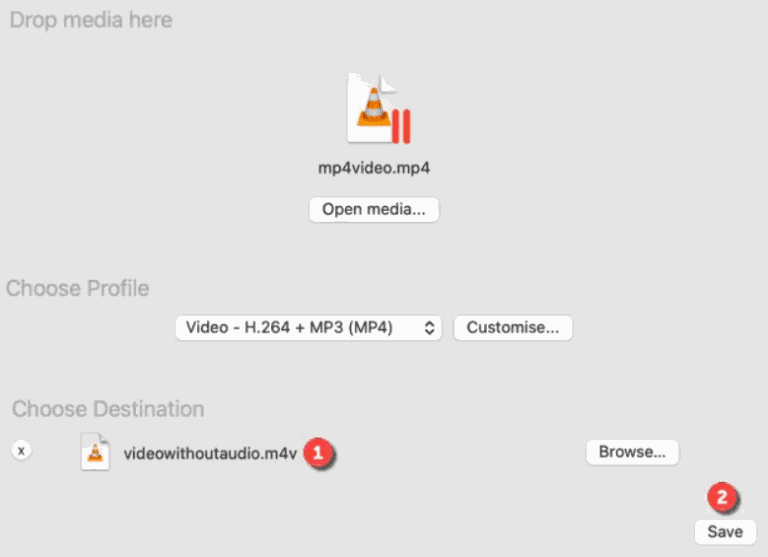
Lastly, choose the destination folder for the video output. Then click on the Save button generate the Video file without Audio.
Conclusion
This is how you can remove any audio component of your videos. The best way to remove audio is essentially editing the video itself. We recommend you to use any free video editor, however, VLC works fine too, and it is free to use. The free online converter options are also a good option, but they are limited and often add a watermark which can reduce the originality of your videos.
