Do you want to remove the OneDrive cloud storage app from your Windows File Explorer.? In this guide, I will explain two methods to do it. Today there are several popular cloud storage apps available for use. To avoid clutter it is better to use only one cloud drive. Make sure to back up only those files you use and need in the future. Anyways, if you use OneDrive and now don’t want to have it around, you can easily delete it.
Windows has two types of users. The Home Edition users and the Professional/Enterprise/Education users. The former can easily remove OneDrive directly from the Control panel settings. The latter can use the Local Group Policy Editor to remove the cloud drive of Microsoft. I have explained both methods. You can use them depending on the version of Windows you have installed.
Also Read
Page Contents
Remove OneDrive from File Explorer on Windows 11/10
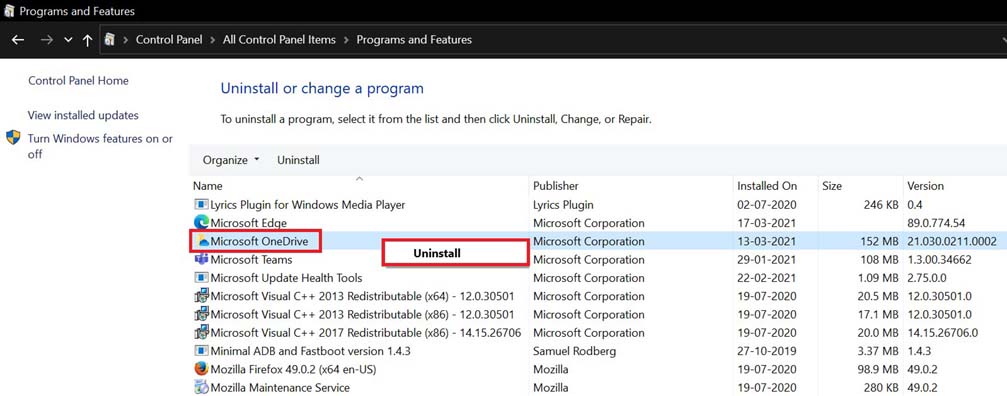
First, let’s mention the steps the Home edition users must follow to uninstall OneDrive.
- In the Search box, type Control Panel and hit enter
- Click Open
- Then click on Programs and features
- The list of installed programs will show up
- Navigate to Microsoft OneDrive

- Right-click on the Microsoft Onedrive option and select Uninstall
Uninstalling OneDrive from Windows 11/10 Professional/Enterprise/Student Edition
Those who use any of these versions of Windows 11/10, have to tweak the Local Group Policy Editor. Here are the steps.
- Press Windows + R to invoke the Run dialog box
- Then type gpedit.msc and hit enter
- The Local Group Policy Editor for Windows 11/10 will open up
- On the left-hand side go through Computer Configuration > Administrative Templates
- Then go to Windows Components > OneDrive
- Now, on the right-hand side click on Prevent the usage of OneDrive for file storage
- Click on the radio button Enabled and click on OK to confirm
In case you wonder what does the above setting would do, let me explain it. OneDrive will be inaccessible to you. It will be removed from the File Explorer as well. If you search for OneDrive in Windows Store, there also you won’t find it.
Is it Possible to Revert the Changes and Access OneDrive?
Yes, it is pretty easy. Remember the radio button you set to Enabled to prevent the use of OneDrive throughout the system.? In that set of radio buttons, there is one that says Not Configured. Click on it to discard the changes. Now, you will be able to access OneDrive once again and continue to use all its features.
How to Remove the OneDrive Folder from the File Explorer
If you are on Windows Home edition, then you won’t really see the OneDrive folder(an empty one) in the File Explorer. If you are on other versions such as Professional or enterprise the empty folder will be still there. Not that the folder will cause any issue but if you want to remove that as well, there is a way to do that. You have to remove the folder by making changes to the Windows registry.
Disclaimer: Modify the Windows Registry at your own risk. GetDroidTips will not be responsible for any issues that may happen after tweaking the registry.
- In the search box type for Regedit and hit enter
- Now, the Registry will open
- In the address bar, paste the following
HKEY_CLASSES_ROOT\CLSID\{018D5C66-4533-4307-9B53-224DE2ED1FE6} - Double-click on System.IsPinnedToNameSpaceTree
- Set the value to 0.
- Click on OK
This will ensure that the empty OneDrive folder will be permanently removed.
So, that’s how you can remove OneDrive cloud storage from your Windows 11/10 Home and Professional/Enterprise editions. I hope that you find this guide useful.
