In this tutorial, we will show you how to remove the TWRP Data Encryption Warning on Mediatek devices. The safety of the data stored on your smartphone is the top-most priority for every user. In this regard, you might have used two-factor authentication on various accounts, used a stringent PIN or Password, and have kept FRP enabled. Along the same lines, data encryption is another pretty important security aspect. Google, after the release of Android 5.0 Lollipop, automatically encrypts all the data on your device.
And when this happens, all your data gets converted to a non-readable random string of characters. When the user with the correct credentials (password, pin,) unlocks the device, the data gets decrypted on the go. Then they could easily access that data. However, when it comes to custom development, things might get a little bit complicated, especially if you are using a custom recovery. In this guide, we will make you aware of the need and the steps to remove TWRP Data Encryption on your MediaTek devices.
Page Contents
What is TWRP Data Encryption?
So here is what really happens. Since the Encryption is enabled on your device by default, TWRP respects that decision. As it is a custom binary, therefore, Google will prevent it from getting access to the data stored on your phone. In other words, when TWRP will try to access any file on your Internal Storage, it will instead be greeted with random alphabets and numbers. This in turn might cause an issue or two to the end-user.
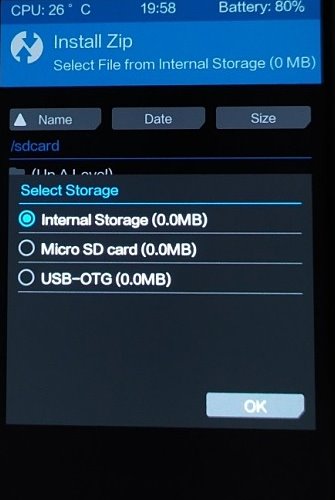
This is because the user wouldn’t be able to recognize any files stored on their device. As a result, you would be in no position to flash the file. Even your Internal Storage would be shown as 0MB inside the recovery. In earlier TWRP builds, you just needed to enter the default device password and the data would then be decrypted. However, with newer builds, this is no longer applicable. But even then there exists a pretty nifty method through which you could remove the TWRP Data Encryption Warning on Mediatek devices.
How to Remove TWRP Data Encryption Warning on Mediatek Phone
There are a few prerequisites that you need to checkmark before proceeding with the instructions. Make sure your device qualifies all these requirements.
Prerequisites
- First and foremost, create a complete device backup. This is because the below process is going to wipe off all the data on your device.
- Then install the Android SDK Platform Tools on your PC.
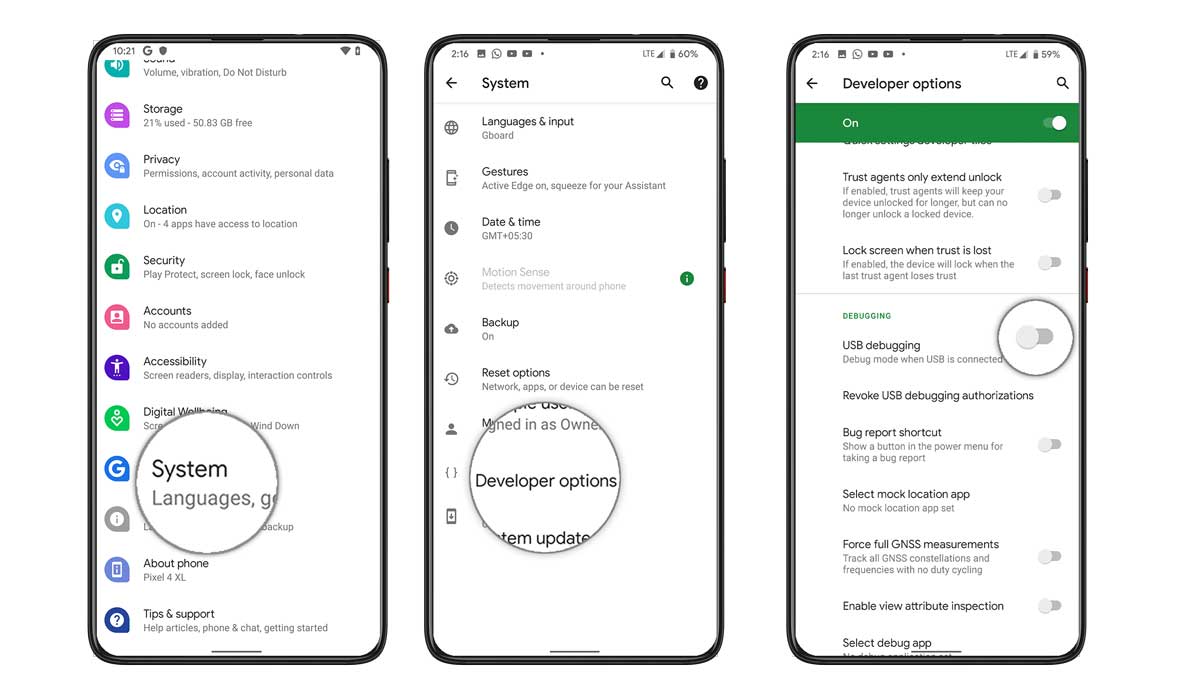
- Also, enable USB Debugging on your device. Head over to Settings > About Phone > Tap on Build Number 7 times > Go back to Settings > System > Advanced > Developer Options > Enable USB Debugging.
- Next up, your device needs to have an unlocked bootloader. If that is not the case, then refer to our detailed guide on How to Unlock Bootloader via Fastboot Method on Android.
- Likewise, you should have the TWRP Recovery installed as well. You could refer to our tutorial if that is not the case: How to Flash TWRP Recovery on any Android Phone
- Finally, download the latest build of the Magisk Installer ZIP file. Then transfer this Magisk file to the SD Card or USB OTG. Do not keep it in Internal Storage as we would be erasing the data partition later on.
These were the required files. You may now proceed with the steps to remove the TWRP Data Encryption Warning on Mediatek devices.
STEP 1: Boot to TWRP
- Connect your device to PC via USB cable. Make sure USB Debugging is enabled.
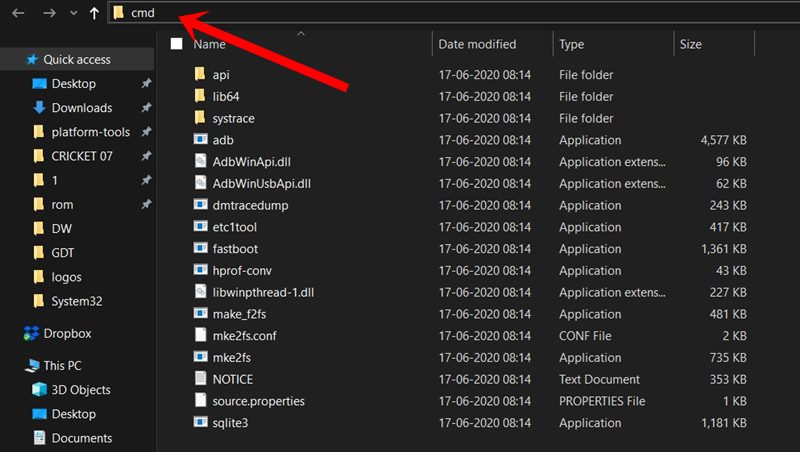
- Then head over to the platform-tools folder, type in CMD in the address bar, and hit Enter. This will launch the Command Prompt.
- Type in the following command in the CMD window to boot your device to TWRP Recovery:
adb reboot recovery
STEP 2: Format Data
- If this is the first time you have installed TWRP, check-mark the “do not show again” option and then perform a swipe to allow modification.
- If you head over to the Backup option to create a Nandroid backup or go to the Install option, it will show 0MB storage size. This is because your device is encrypted and TWRP couldn’t access any files as of now.
- To overcome this, head over to Wipe and tap on Format Data (all the data is going to be wiped off, make sure you have taken a backup beforehand).
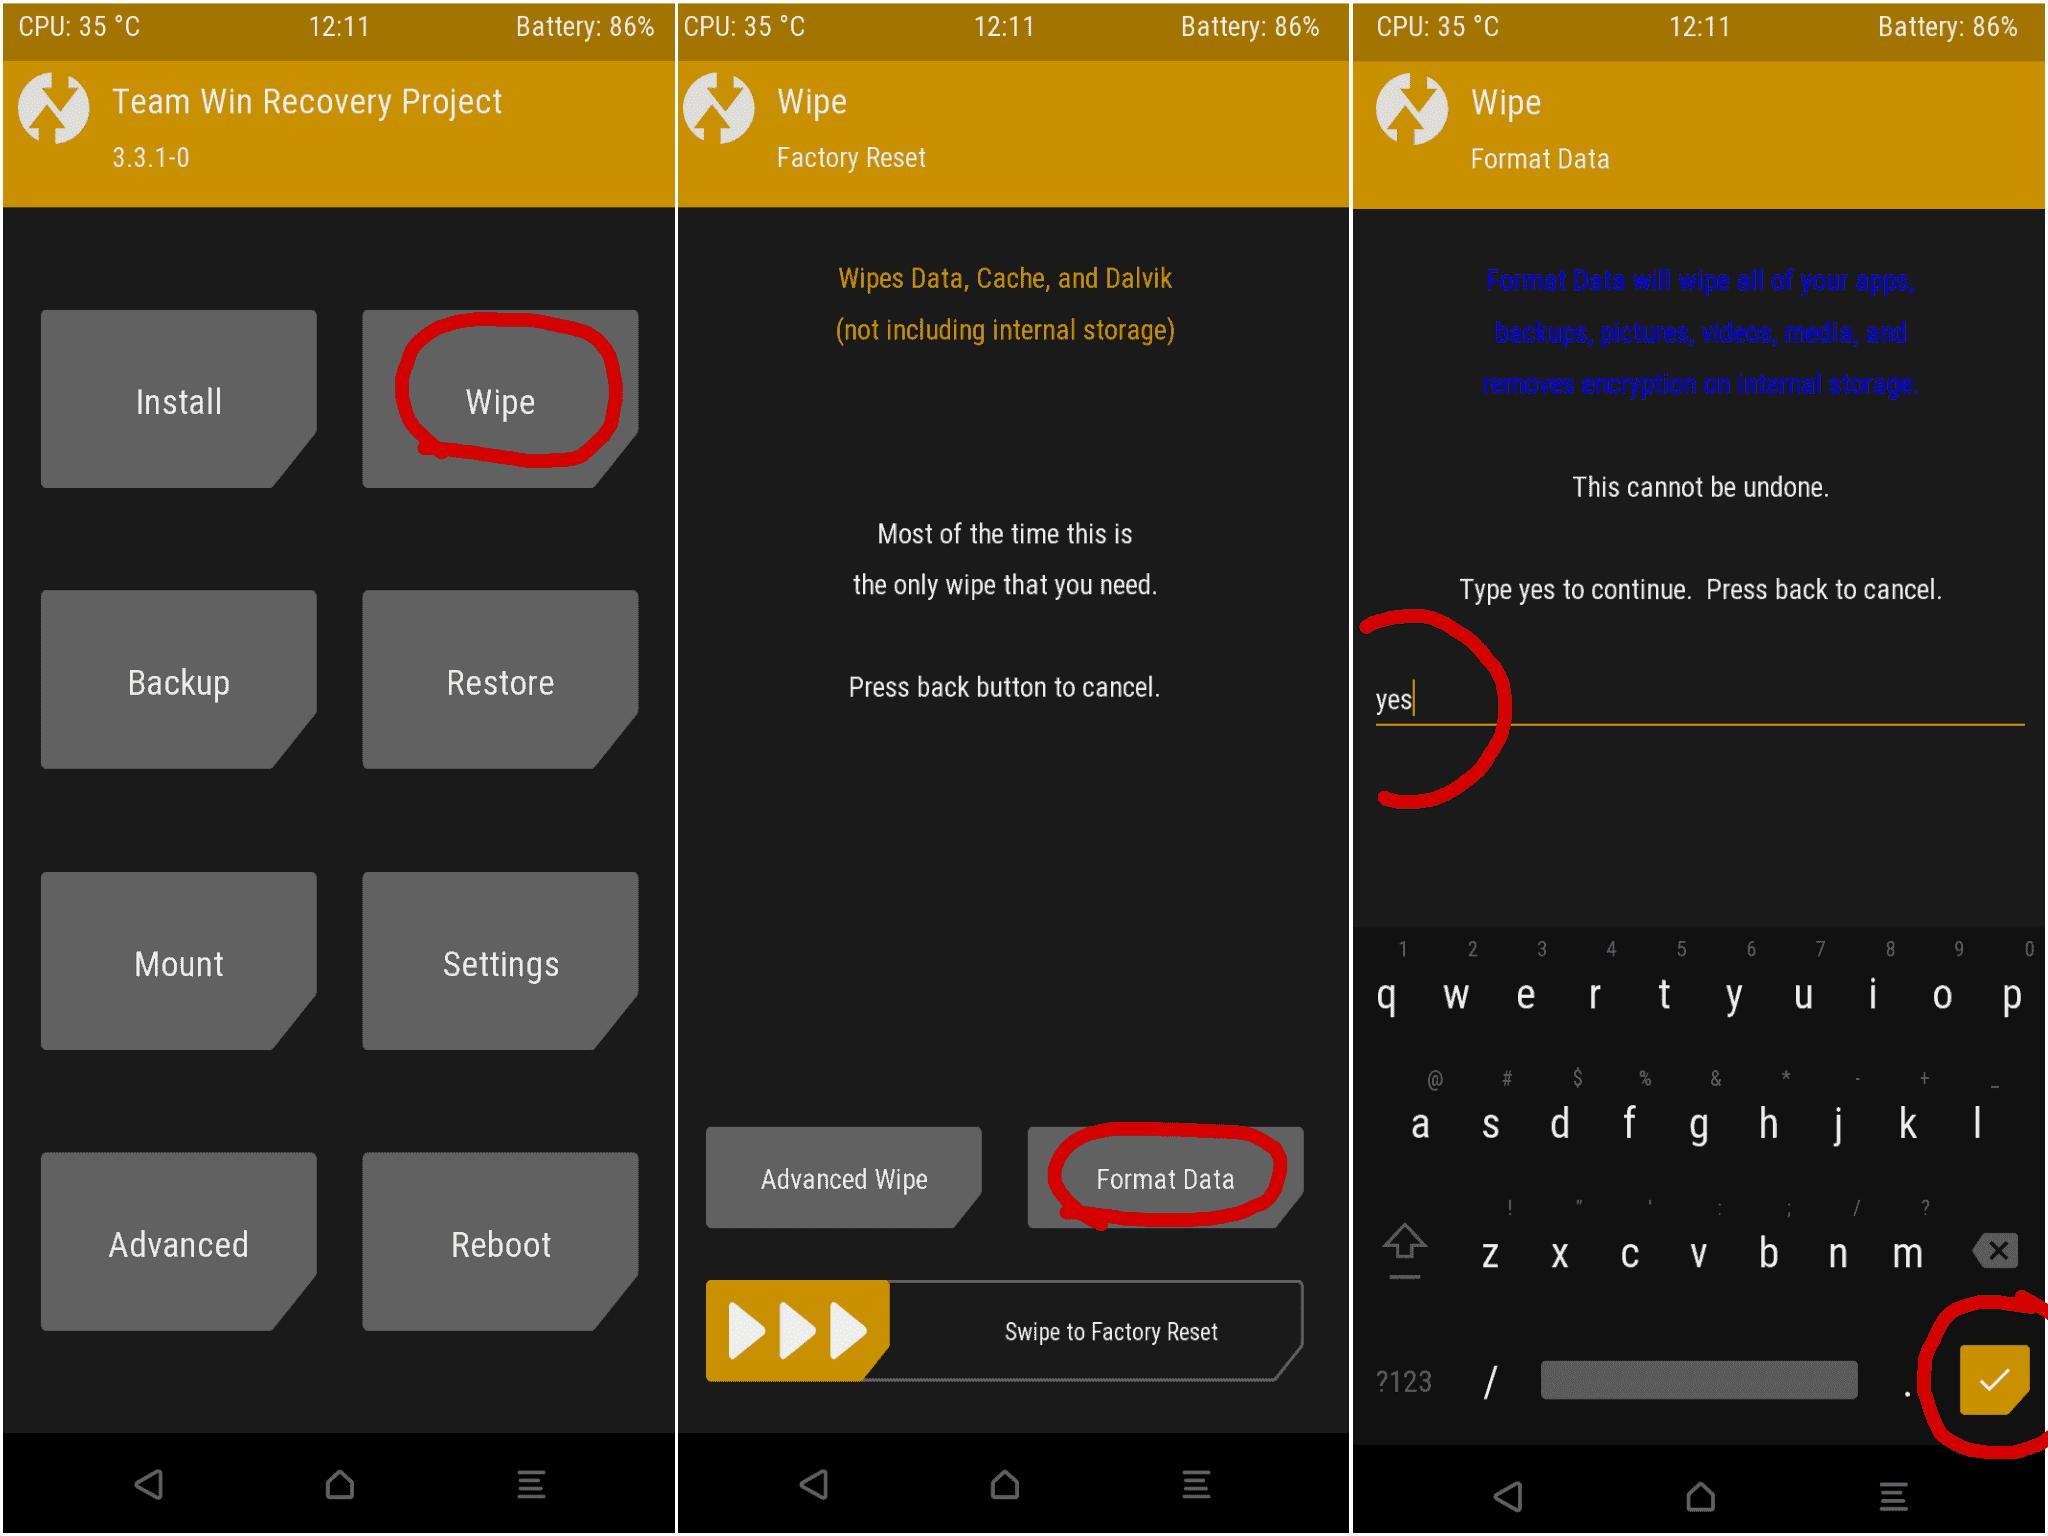
- Then type in YES in the space provided and hit the tick mark situated at the bottom right.
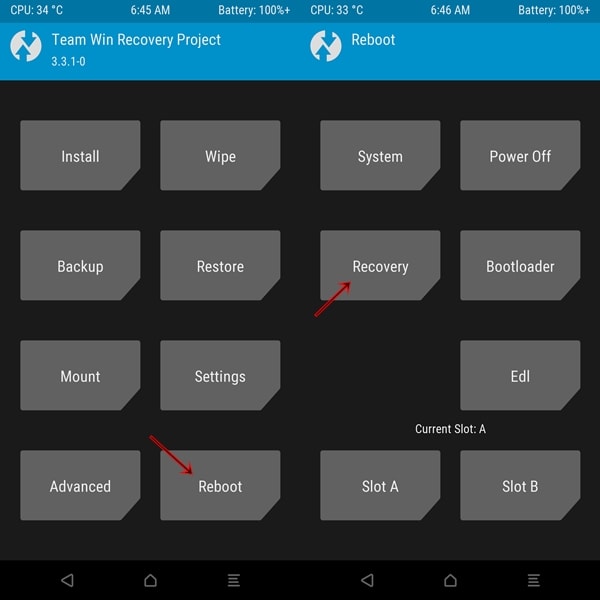
- When that is done, head back to the TWRP home screen. Go to Reboot and select Recovery. Do not reboot to the System as of now or it will nullify the entire process.
STEP 3: Remove TWRP Data Encryption
- Once your device boots to TWRP, it’s time to flash the Magisk file. If it is placed in USB OTG, then you would first off have to mount it under TWRP’s Mount menu. Or if it is placed in SD Card, no need to carry out any additional step.
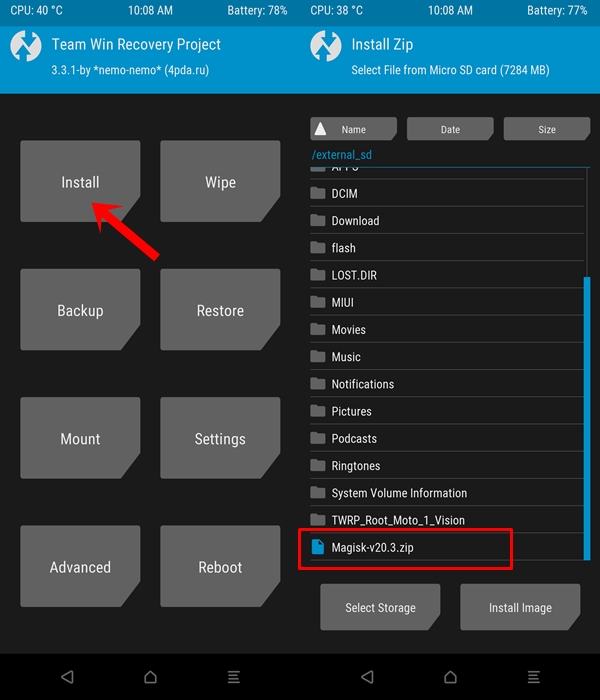
- Now head over to Install and tap on the Select Storage button situated at the bottom. Select the SD card or USB OTG from the menu.
- Then navigate to the Magisk ZIP file and perform a right swipe to flash it.
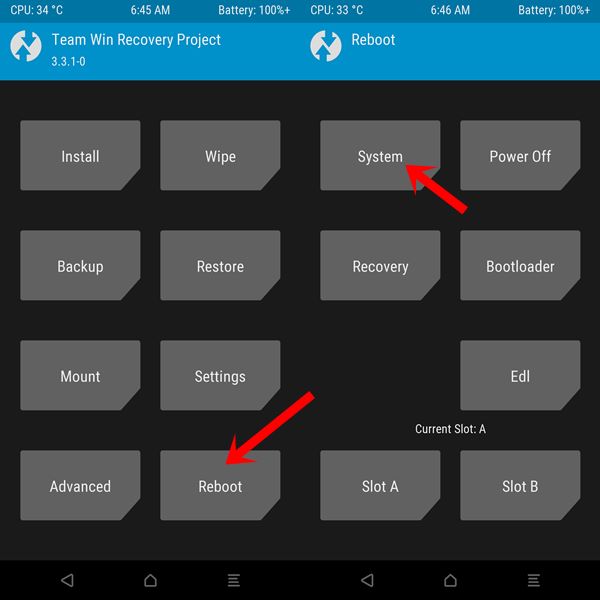
- Once that is done, you may now reboot your device to the OS. For that, go to Reboot and tap on System.
Concluding Remarks
These were the steps to remove the TWRP Data Encryption Warning on Mediatek devices. You may also verify the same. Launch the Magisk Manager app on your device and notice the “Preserve force encryption” option, it should now be unticked.
Likewise, heading over to the Settings > Security > Encryption will give you the option to encrypt the device, meaning that is currently decrypted. So this with, we conclude the guide, if you have any queries, do let us know in the comments. Rounding off, don’t forget to check out iPhone Tips and Tricks, PC tips and tricks, and Android Tips and Trick as well.
