If you’re an advanced user who does customizations, flashing files, etc on an Android device and using the Asus Zenfone 8 smartphone or planning to buy it, this guide is for you. In this tutorial, we will guide you on how to root the Asus Zenfone 8 ZS590KS using Magisk without TWRP Recovery. We will use the Magisk by patching the stock boot image file and flashing it to the device boot partition.
Also Read
You will require to download the patched image file from Magisk Manager and flash it. For doing this, your device bootloader should be unlocked. By rooting your handset, you will get a superuser or administrator access to your system. Therefore, you can easily customize, change or edit system files according to your preference. Let’s take a closer look at Rooting access.
Asus Zenfone 8 Specifications and Features
The Zenfone 8 is a compact phone from Asus. It features a 5.9 inch Super AMOLED screen with a resolution of 1080 x 2400 pixels and an aspect ratio of 20:9. The display is set at 120Hz and supports HDR10+ content. The display even has a peak brightness of 1100 nits, so outdoor visibility won’t be a problem. Under the hood, we have the flagship Qualcomm Snapdragon 888 built on a 5nm manufacturing process. It is an octa-core processor with one Kryo 680 core clocked at 2.84 GHz, three Kryo 680 cores clocked at 2.42 GHz, and four Kryo 680 cores clocked at 1.8 GHz. For handling the graphics-intensive tasks, we have the Adreno 660.
In terms of optics, we get a dual-camera setup at the rear and a single selfie camera at the front. The dual setup at the rear consists of a 64MP primary sensor paired with an f/1.8 lens and a 12MP ultrawide sensor paired with an f/2.2 lens. On the front side, we get a 12MP sensor paired with an f/2.5 lens. The rear setup is capable of capturing 8K videos at 24fps. And the front selfie camera can also do 4k recording at 30fps.
The smartphone is available in four storage variants: 128GB internal storage + 6GB RAM, 128GB internal storage + 8GB RAM, 256GB internal storage + 8GB RAM, and 256GB internal storage + 16GB RAM. The smartphone comes with Android 11 out of the box with ZenUI 8 skin on top. We also get IP68 dust & water-resistant with this smartphone.
In terms of communications, we get Wi-Fi 802.11 a/b/g/n/ac/6e, Bluetooth 5.2, GPS, NFC, FM radio, and USB Type-C 2.0. For sensors, we have an under-display fingerprint sensor, accelerometer, gyro, proximity, and compass. This is a compact smartphone, and due to the less space, Asus went with a 4,000 mAh cell that can be topped up to 100% in 80 mins using the 30W fast charging adapter included in the box. The smartphone is available in two color options: Obsidian Black and Horizon Silver.
What is Rooting?
Rooting for Android means similar to jailbreaking the device to get access to the root directory of your android mobile. It will give you superuser access as an administrator to use your device over an Android subsystem and system apps.
Though sometimes improper rooting may brick your device or void your device warranty as well (if applicable). But it will give you some unleash power and access to change or edit the system settings, themes, icons, install other mod files, etc.
Advantages of Rooting
- You can get access to all files on your Asus Zenfone 8, even the files present in the root directory of your phone.
- You can increase the performance of your device by overclocking.
- By rooting you can increase battery life by underclocking the device.
- Uninstall Bloatware on Asus Zenfone 8.
- You can block Ads on any application.
- By Rooting Asus Zenfone 8, you can View, Edit, or Delete any system file inside the root directory.
- You can install the Xposed Framework and Xposed module support.
[/note]
Steps To Root Asus Zenfone 8 ZS590KS via Magisk
In general cases, one could easily flash the Magisk Installer ZIP file via TWRP to root the device. However, since there isn’t any working TWRP for this device, you cannot flash the Installer file. Therefore we will be using the Magisk patched boot image file for the entire process. Go through the below prerequisites and then proceed with the steps to root your Asus Zenfone 8 device.
Warning
Prerequisites
- Create a complete device backup. Although rooting doesn’t wipe off the device data but unlocking the bootloader will. Moreover, it is always recommended to be on the safer side.
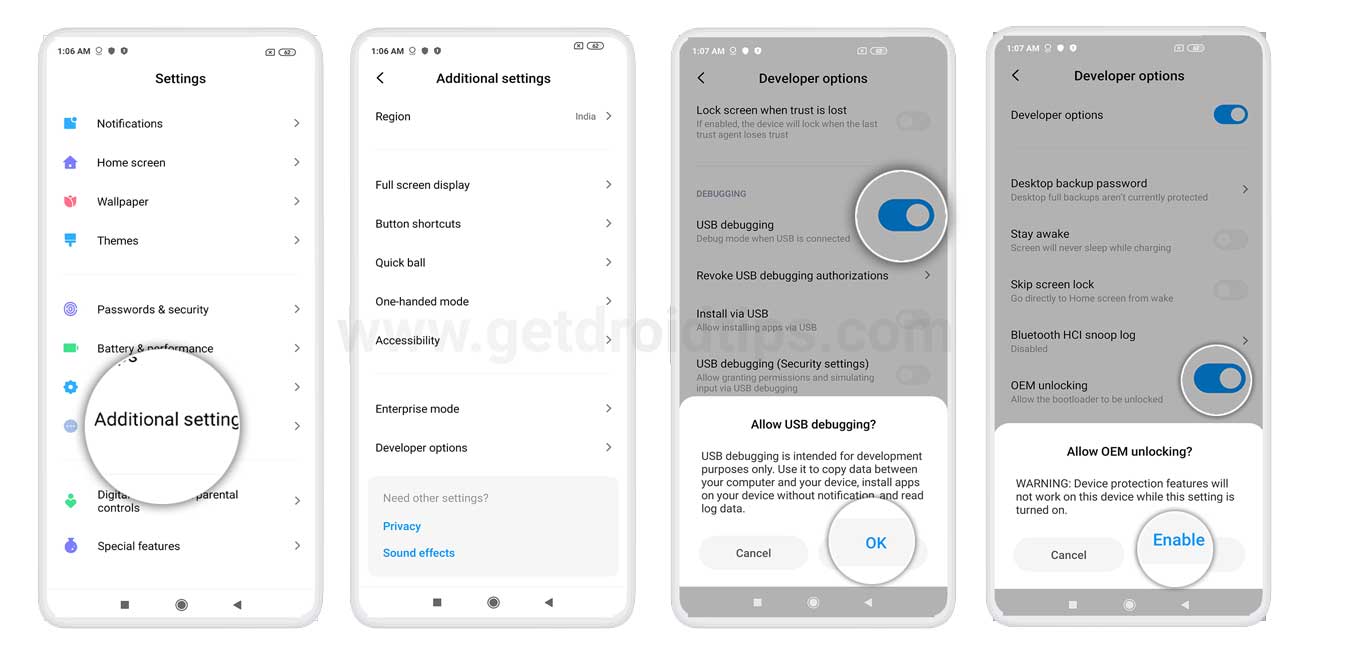
- Enable USB Debugging and OEM Unlocking on your Asus Zenfone 8 device. The former will be needed to execute ADB commands while the latter will be used for the unlocking process. To enable them, go to Settings > About Phone > Tap on Build Number 7 times > Go back to Settings > System > Advanced > Developer Options > Enable the USB Debugging and OEM Unlocking toggle.
- It goes without saying that your device should be sufficiently charged as well.
Downloads
- Download the latest version of Magisk Manager APK on your device. Don’t install it now as we would be unlocking the bootloader which will wipe off all the data from your device. Hence, install Magisk Manager APK once the unlocking process has been completed.
- To patch the boot image, extract the boot image from the stock ROM collection here.
- Download Asus Zenfone 8 ZS590KS Firmware File
- Download and install Android SDK Platform Tools on your PC. This will provide us with the necessary ADB and Fastboot binaries.
That is all the required files. You may now proceed with the steps to root your Asus Zenfone 8 device. The entire instructions will be broken down into separate sections for ease of understanding. Follow along.
STEP 1: Unlock Bootloader
To begin with, you will have to unlock the bootloader on your Asus Zenfone 8 ZS590KS device. The below instructions should help you out in this regard. For the detailed instructions set, you could refer to our guide to unlock the bootloader on Asus Zenfone 8 ZS590KS.
STEP 2: Extract and Patch Boot Image using Magisk?
- First of all, download and extract the ROM to your PC.
- Attach your device via USB cable and copy only the boot.img file from the extracted folder to your device storage
- Launch Magisk Manager. When a popup appears asking to install Magisk, select INSTALL and choose install again.
- Tap on “Patch Boot Image File”.
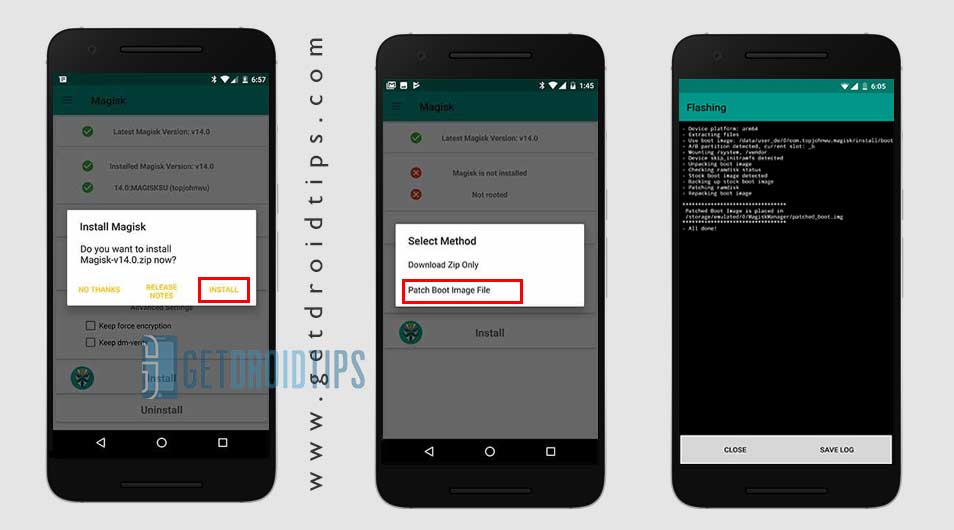
- Navigate to internal storage and select your phone’s boot image that you transferred earlier.
- Wait for a couple of seconds. Magisk will start patching the boot image.
- Once the boot image has been patched, copy the “patched_boot.img” from the internal storage and replace it in the ADB fastboot extracted ROM folder on your PC.
Now you can follow the second step to flash the patched boot image file.
STEP 2: Install the Patched Boot Image
Follow the given link to install Patched Boot Image on Asus Zenfone 8 ZS590KS:
- We assume that you have already downloaded the ADB & Fastboot tool from the link given above.
- Now, extract the ADB fastboot tool, then move the patched boot image to the same folder.
- Hold the Shift key and right-click on the mouse to open the command window/PowerShell.
- Next, enter the following command:
- Flash the “patched_boot.img” to install Magisk and root your Android device:
fastboot flash boot patched_boot.img
- For devices with an A/B partition system, use the following commands:
fastboot flash boot_a patched_boot.img

fastboot flash boot_b patched_boot.img
Please replace [patched_boot.img] with the name of the boot image file you downloaded followed by the .img extension.
- Flash the “patched_boot.img” to install Magisk and root your Android device:
- The flashing process will begin. Once done, run
fastboot reboot
How to Verify if your phone has a systemless root?
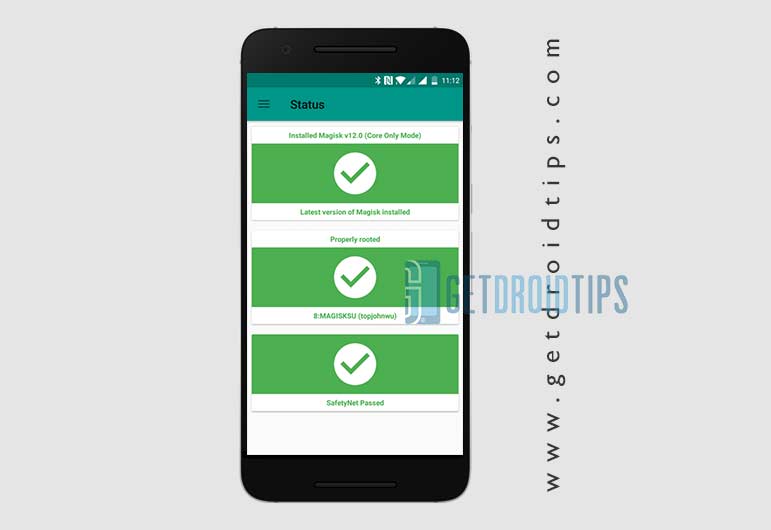
- Download and install the Magisk Manager app APK, and launch it.
- To verify that you have a systemless root, check the top of the screen, and if you see all options with Green Tick which means you have successfully rooted and bypassed SafetyNet.
That’s all folks! If we helped you in rooting your Asus Zenfone 8, then we’re glad we could be of use. If you have any queries regarding the guide, then let us know down below, we’d be happy to assist you!