If you’re using the Galaxy Note 10 Plus device or planning to buy it and you’re an advanced user who likes customizations, flashing files, etc then this guide is for you. We will use the Magisk by patching the stock boot image file and flashing to the device boot partition. The Galaxy Note 10 Plus delivers the premium goods, from a killer 6.8-inch screen and all-day battery life to excellent camera tools. Here in this article, we will share with you Easy Method To Root Galaxy Note 10 Plus Using Magisk [No TWRP needed]. Just follow the full article with all the requirements, download links, and flashing steps with images.
Also Read
The device does have a couple of variants like SM-N975F (Europe); SM-N975F/DS (Global); SM-N975U (USA); SM-N975U1 (USA unlocked); SM-N975W (Canada); SM-N9750/DS (LATAM, Brazil, China); SM-N975N (South Korea).
You will require to download the patched image file from Magisk Manager and flash it. In order to this, your device bootloader should be unlocked. By rooting your handset, you will get a superuser or admin access on your system. Therefore, you can easily customize, change or edit system files according to your preference.
![How To Root Galaxy Note 10 Plus Using Magisk Patched Boot Image [Without TWRP]](https://www.getdroidtips.com/wp-content/uploads/2019/08/Samsung-Galaxy-Note-10-Plus.jpg)
Samsung Galaxy Note 10 Plus Specifications: Overview
The Galaxy Note 10 Plus sports a 6.8-inch Quad HD+ Dynamic AMOLED Infinity-O display with 3040×1440 pixels resolution. The display is HDR10+ compatible. It’s powered by the Samsung Exynos 9825 SoC and the US/China region users will get Snapdragon 855 chipset variant. While the global variants will have Mali-G76 MP12 GPU while the Snapdragon variant comes with Adreno 640 GPU. It offers a 12GB of RAM with 256GB of internal storage for the 4G LTE model only and the 12GB RAM with 512GB internal storage will be for 5G model only. Additionally, the storage is expandable up to 1TB via hybrid SIM-slot.
Samsung has provided the much-powerful S Pen with Bluetooth, up to 10 hours of standby timing, and IP68 certified. The front features a single 10MP Selfie Camera with Dual Pixel AutoFocus, F/2.2 lens, etc. While the rear packs the quad 16MP Ultra-Wide + 12MP Wide-angle + 12MP Telephoto + DepthVision VGA camera lens along with an LED flash. It also features PDAF, HDR, Dual OIS, F/1.5-F/2.4 lens, HDR10+ recording, etc.
The handset comes with a bigger 4,300 mAh battery with Super Fast charging 2.0 with 45W adapter, Fast Wireless charging 2.0, and Wireless PowerShare options. It has Wi-Fi 802.11 a/b/g/n/ac/ax (2.4/5GHz), Bluetooth 5.0 LE, ANT+, USB Type-C, NFC, 5G/4G LTE, GPS, Galileo, GLONASS, etc as the connectivity options. The Note 10 Plus runs on Android 9.0 Pie on the top of One UI out-of-the-box. Meanwhile, the handset packs Ultrasonic Fingerprint sensor, Geomagnetic, Hall, Proximity sensor.
Smartphone Rooting and its Advantages
Rooting will give you the superuser control to use your device over an Android subsystem and system apps. For an Android, it means similar to the jailbreaking the device to get access to the root directory of your android mobile.
Though sometimes improper rooting may brick your device or void your device warranty as well (if applicable). But it will give you some unleash power and access to change or edit the system settings, themes, icons, install other mod files, etc.
- You can get access to all files on your Galaxy Note 10 Plus, even the files which present in the root directory of your phone.
- You can increase the performance of your device by overclocking.
- By rooting you can increase battery life by underclocking device.
- Install the Xposed Framework and Xposed module support.
- Uninstall Bloatware on Galaxy Note 10 Plus.
- You can block Ads on any applications like YouTube, Browser.
- By Rooting Galaxy Note 10 Plus, you can View, Edit, or Delete any system file inside the root directory.
Steps To Root Galaxy Note 10 Plus using Magisk
First of all, you should unlock bootloader on Samsung Galaxy Note 10 Plus device. Then you can continue with the next steps.
Warning
Please Note:
- After Rooting, it may void the warranty of your phone
- Rooting will block the official OTA updates
- Supported model: SM-N975F (Europe); SM-N975F/DS (Global); SM-N975U (USA); SM-N975U1 (USA unlocked); SM-N975W (Canada); SM-N9750/DS (LATAM, Brazil, China); SM-N975N (South Korea)
[/note]
Download Samsung Galaxy Note 10 Plus Stock ROM
Here is the link for the same.
Download Firmware
- SM-N975F: Download Here
- SM-N975U: Download Here
- SM-N975F: Download Here
- SM-N975F: Download Here
Now, once you have downloaded the exact firmware file based on your device model number, you can extract the boot.img file to patch it via Magisk manager app.
Guide to Extract Boot Image File and rename to .tar file
Steps to Create a Patched boot image using Magisk Manager
- Download and install the latest Magisk Manager app.
- Then, connect your device to the PC via the USB cable.
- Copy only the boot.img file from the extracted folder to your device storage.
- Next, open the Magisk Manager app and select INSTALL and choose to install again.
- Tap on “Patch Boot Image File”.
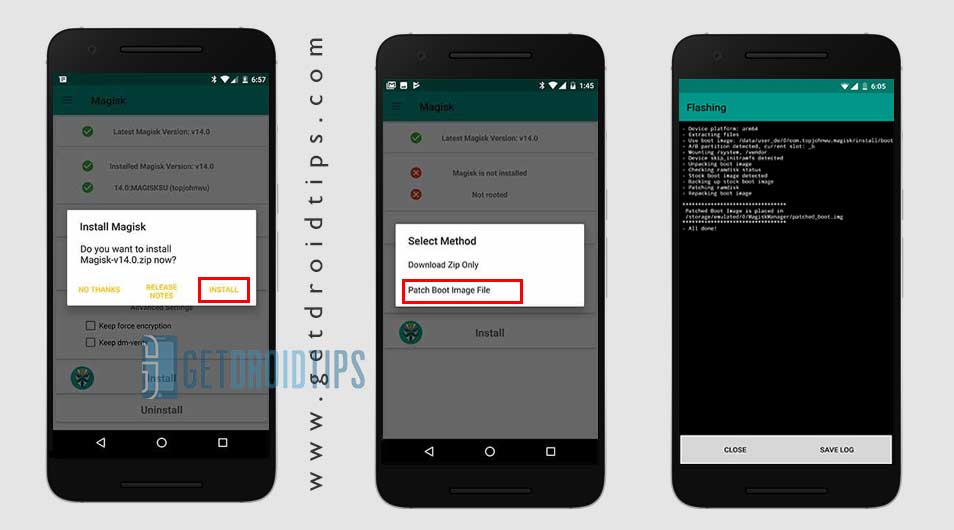
- Go to internal storage and select your device boot image that you moved earlier.
- Now, wait for Magisk to start patching the boot image.
- Once the boot image has been patched, copy the “patched_boot.img” from the internal storage and replace it in the same extracted ROM folder on your PC.
Now, follow the second step to flash the patched boot image file.
- Odin flash tool accepts files in .tar format. So, you have to use 7zip and archive it to .tar format. You can even rename the file as boot.img.tar as shown in the below screenshot.

Steps To Install the Patched Boot Image tar file on Galaxy Note 10 Plus
Now, follow the final or second method to install the patched boot image file on your Galaxy handset. But first, follow the requirements.
Pre-Requirements:
- ROM supported: Samsung Galaxy Note 10 Plus model only. Don’t try it on other devices.
- Charge your device battery up to 60% at least before doing anything.
- Make sure to take a complete backup without Root of phone storage.
- A PC/Laptop and a USB cable are required.
- Download Latest ODIN tool and install it on your PC.
- Copy the patched boot image file into the ADB/Fastboot folder.
- Download and Install the Samsung USB Drivers on your computer.
Instructions to Root Galaxy Note 10 Plus
After following the pre-requirements and unlocking the bootloader, in order to Root Galaxy Note 10 Plus Using Magisk, let’s take a look at the rooting steps.
- At first, reboot your device into download mode.
- Now, connect your phone to the PC via the USB cable.
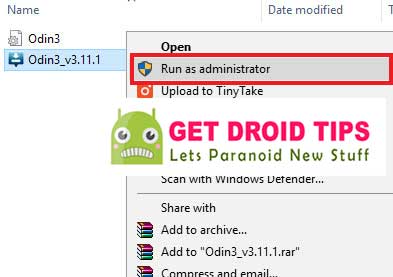
- Once you are connected, now open the downloaded ODIN.exe file.
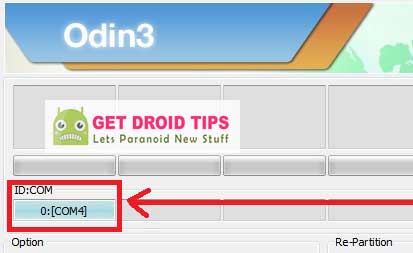
- When you connect the USB cable you will see a blue sign in Odin.
- Now, load the patched boot.tar file in the AP section.

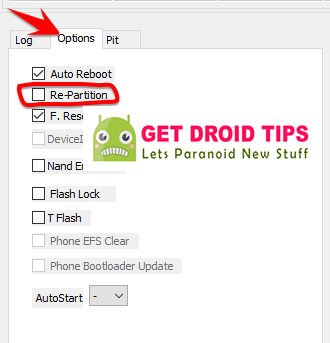
- Go to Option and see whether the Auto Reboot and F-Reset Time selected or not). If not then select these two. Don’t select re-partition.
- Now, tap on the Start button to root your device.
- Once it’s done, your device will reboot.
- Wait for a few minutes as the first boot will take some time.
- You’re done.
Hope you have rooted your Samsung Galaxy Note 10 Plus device successfully and you found this guide helpful. Let us know in the comments below in case any issue.
Discussion
2 CommentsWill this work on the Sprint version?
Will this work on a carrier locked device?