In this guide, we will share with you steps to Root ZTE Blade A6 Max Using Magisk without any custom recovery or TWRP recovery. Rooting is the process of allowing users of smartphones, tablets and other devices running the Android operating system to get superuser control over the system. It offers administrative power and permissions to change or customize the system apps or settings easily. The ZTE Blade A6 Max comes with Qualcomm Snapdragon 636 processor. It runs on Android 8.0 Oreo out-of-the-box.
The smartphone OEMs doesn’t provide you an option to enable root access on your device easily by default. You need to do it via some tweaks. Improper rooting steps or guide may void your device warranty and can brick your device as well. So, take a full backup of your device before doing anything. So, if you’re a ZTE Blade A6 Max device user which runs on Qualcomm chipset and wants to enable root access on your device. Then you’re in the right place.
![Easy Method To Root ZTE Blade A6 Max Using Magisk [No TWRP needed]](https://www.getdroidtips.com/wp-content/uploads/2018/12/Download-Latest-ZTE-Blade-A6-Max-USB-Drivers-and-ADB-Fastboot-Tool.jpg)
Page Contents
Steps To Root ZTE Blade A6 Max Using Magisk
Remember that the files and guide are for ZTE Blade A6 Max device only. Do not use it on any other device. Follow all the guide mentioned here properly.
Pre-Requirements:
- Keep your device battery charged up to 50% for a smoother process.
- As we mentioned earlier, take a full backup of device data (Internal Storage, SMS).
- A Windows or Mac PC/Laptop also necessary to complete the flashing process.
- A USB cable is required to connect your device with the computer.
Download Links:
- Download ADB and Fastboot tool for Windows/MAC.
- Now, download the ZTE USB Drivers and install on the PC.
- You need to download the Latest ZTE Blade A6 Max Stock ROM.
- Download and Install SP Flash tool on your PC.
Extract and Patch Boot.image using Magisk
- After downloading the Stock ROM, extract it to your PC.
- Connect your device via USB cable and copy the boot.img file only from the extracted folder to your device storage.
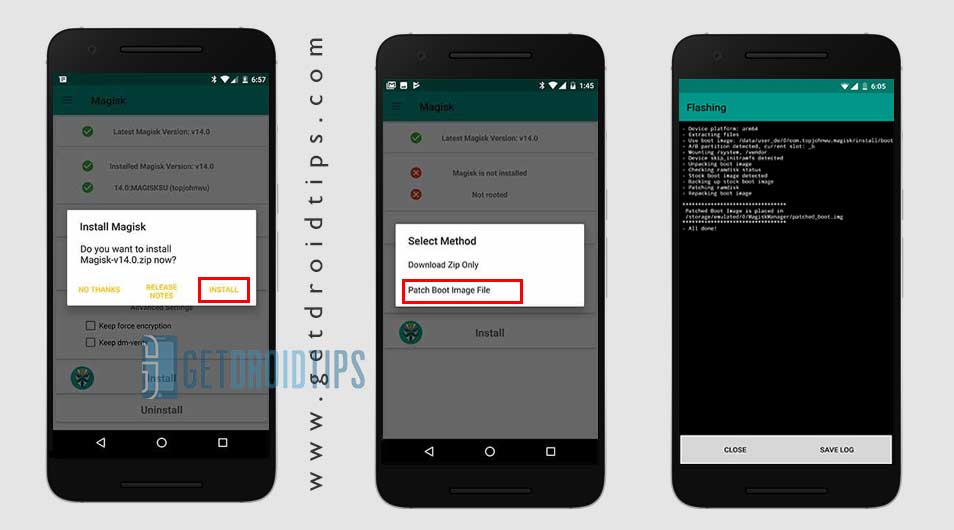
- Open the Magisk Manager on your device. Select Install and again select install.
- Now, tap on ‘Patch Boot Image File’.

- Go to storage where you have moved the image file earlier.
- Now, wait for a couple of seconds and Magisk will start patching the boot image.
- Once the boot image is patched, copy the ‘patched_boot.img’ from the internal storage and replace it in the same extracted ROM folder on your PC.
Now, follow the second step to flash the patched boot image file.
Steps to Install the Patched Boot Image on ZTE Blade A6 Max
- Install the QPST package on your PC and run QFIL. Select Flat build, then navigate the programmer path to your ROM folder. Select the prog_emmc_ufs_firehose_Sdm660_ddr.elf as your programmer path. Next, load XMLs RawProgram0.xml and patch0.xml.
- Let’s begin by booting our phone into emergency download mode.
- To boot into emergency download mode, you need to press and hold Shift Key and Right Click button on the mouse in the empty space. You will see the below dialog box popping up.

- Click on Open Powershell Window or Command window here. Basically, the command prompt opens up upon clicking.
- Type the adb command to boot your phone into emergency download mode
adb reboot edl - QFIL should go from ‘No Port’ to ‘Qualcomm HS-USB QDLoader 9008’.
- Immediately after you see this pop-up, select ‘Download’. This will completely reset your device.
- If flashing was successful, wait a bit then boot your device. You should see a little warning complaining that the software has been altered. Wait a little bit more. You can install magisk manager at this point if it didn’t show up after the flash. Reboot the device again.
- That’s it! You should have a rooted device now.
In some cases, if the above method doesn’t work on your ZTE Blade A6 Max, then try via ADB fastboot method.
- After extracting ADB fastboot tool, you must move the patched boot image to the same folder. Hold the SHIFT key and click on the right mouse button to open the command window/PowerShell.
- Run the following command in the open command prompt.
fastboot flash recovery [filename.img]
Please replace [filename.img] with the name of the TWRP Recovery img file you downloaded followed by the .img extension.
- The flashing process will begin. Once done, run
fastboot reboot
Verify Device Root:
- Download the Magisk Manager app APK file > install it on your device and open it.
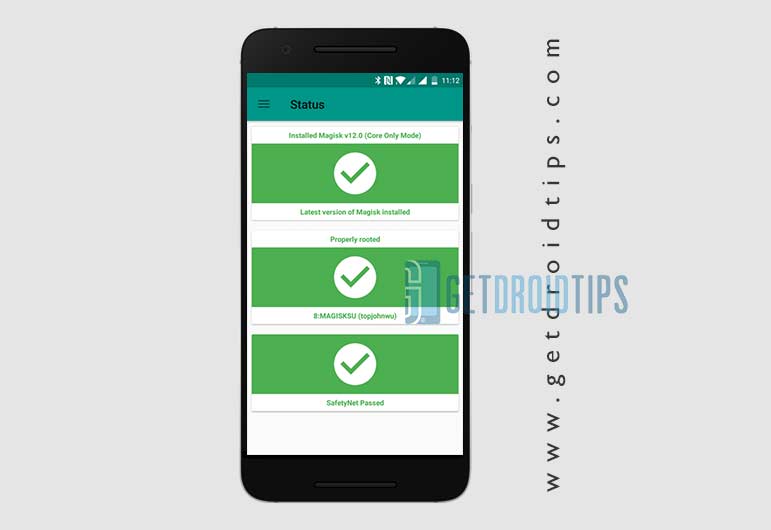
- In order to verify whether you have successfully enabled systemless root, check the status mode. If you see all options are green checked, that means you have successfully rooted.

You’re done. Hope this guide will help you if you want to root your ZTE Blade A6 Max via Magisk. Feel free to comment down below about your thoughts and queries.
