Samsung is looking to mark its presence in the lower mid-range segment of the Indian market. With this plan, just recently, after launching in Germany last week, Samsung has unveiled the Samsung Galaxy M51 in India. This device will go head-on against the Oneplus Nord, and it has a lot going for itself. Samsung fans looking for a phone in this segment now have an excellent choice to consider.
In this tutorial, we will guide you on how to install the official stock firmware image on Galaxy M51. We have shared the complete list of stock firmware with their software update details like date of release, security patch, and OS version.
If you’re a Samsung Galaxy M51 user and waiting for the latest firmware update or missed out on any particular firmware version, then you can easily find out the firmware and download it from the given link. Additionally, we’ve provided the firmware update changelogs, installation steps, requirements, etc. So, without wasting any more time, let’s jump into the device overview below.
Also Read
Page Contents
Samsung Galaxy M51 Specifications

The Galaxy M51 is the much-anticipated successor to the popular Galaxy M31 that Samsung had launched not too long ago. It brings to the board a big 6.5-inch AMOLED display with a hole-punch to the center at the top. It is easy to say that the Galaxy M51 is the best display experience you can get on a smartphone for under 20,000 rupees. While it is still a 60Hz panel, it displays inky blacks and has a good vibrance as expected from an AMOLED panel. The side bezels are also barely existent and the chin is remarkably small as well.
Inside the Galaxy M51, we have the Exynos 9611 SoC powering the phone. While it isn’t known for good performance, it still delivers decent speeds in synthetic benchmarks and casual games. The Galaxy M51 is also backed up by 6GB of RAM and comes with a storage of 128GB that is non-expandable. Pair that with the massive 6000 mAh battery, and the M31s is an absolute powerhouse of a phone. Samsung also bundles within the box a 25W fast charger to quickly juice up your phone in dire situations.
The entire phone is made out of “Glasstic” which is just a fancy way of saying frosted plastic. It does feel rather premium thanks to the engineering that Samsung has put into this phone. The Galaxy M51 comes out of the box with Samsung’s OneUI 2.1 that runs atop Android 10. It is expected to receive the latest versions of Android and OneUI as well. The M31s has a quad-camera setup to the rear with a configuration of 64+12+5+5MP which seems to be an overall good setup for taking photos in well-lit situations. The front camera is a 32MP sensor that takes some really crispy selfies.
Check OTA Update
Samsung always releases firmware OTA updates to its eligible devices in batches based on the server or region. So, it’s quite obvious that most of the users may receive the firmware update notification lately. However, it’s recommended to check for OTA updates manually on your device via the phone settings.
- Settings > About phone > Software updates > Check for Updates
- If the new software update is available, then tap Download now.
- Post the download, tap on Install update to begin the installation.
Make sure to connect your device to a Wi-Fi network and fully charge the battery level. If your device gets the latest software update notification, you can simply grab the OTA by downloading and installing it. But if in case, you want to install any particular update version or want to keep updated with each and every firmware update, you should follow the tracker list below.
Samsung Galaxy M51 Stock Firmware Tracker
We will keep updating the firmware update details whenever a new update will be available. So, make sure to bookmark this page. You will find stock firmware for SM-M515F.
Make sure to download the correct firmware for your device. If you are using SM-M515F, then download firmware starting with SM-M515F.
| M515FXXS5DWG1 | July 2023 Security Patch |
| M515FXXS4DWA3 | January 2023 Security Patch |
| M515FXXU4DVH2 | July 2022 Security Patch |
| M515FXXS4DVF2 | June 2022 Security Patch |
| M515FXXU4DVE1 | March 2022 Security Patch |
| M515FXXS4CUL1 | December 2021 Security Patch |
| M515FXXS4CUL3 | December 2021 Security Patch |
| M515FXXS3CUI1 | September 2021 Security Patch |
| M515FXXU3CUG1 | June 2021 Security Patch |
| M515FXXS2CUD1 | April 2021 Security Patch |
| M515FXXU2CUC2 | March 2021 Security Patch |
| M515FXXS2BUA1 | January 2021 Security Patch |
| M515FXXU1BTK5 (UAE) | November 2020 |
| M515FXXU1BTK4 – India, Middle East, and Africa region | November 2020 |
| M515FXXU1ATJ3 – South American region | October 2020 |
| M515FXXU1ATI1 – Europe and Asian region | September 2020 |
How to Install Stock Firmware on Samsung Galaxy M51 Manually
Ensure to follow all the requirements properly before going to the firmware installation process.
Pre-Requirements:
- Before you go ahead with the procedure, make sure to take a complete backup of your Samsung phone.
- Install the appropriate Samsung Galaxy USB drivers.
- Make sure to charge your device to at least 60%.
- Download the latest version of the Odin tool.
- Make sure to enable USB Debugging:
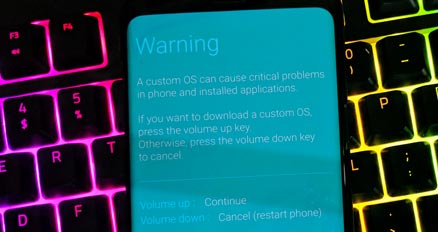
– To do that again, head to the Settings>>Developer Options>> allow USB Debugging. - Enter your Galaxy device into the Download mode by pressing Volume Down + Home + Power buttons for Samsung phones with capacitive buttons and Volume Down + Bixby + Power for newer models.
Download Required Tools:
- How to Download Firmware: Frija Tool | Samfirm Tool | Samsung Firmware Website
- Latest Samsung USB Drivers
- Install the Samsung Kies software on your PC.
- Flash tool: ODIN Flash tool
Instructions to Install
- Download the appropriate Galaxy stock firmware for your phone.
- Extract the contents of the firmware zip file.
- Notice that the extracted files will be in “.tar” or “.tar.md5” format.
- Now download and extract the Odin tool on your PC.
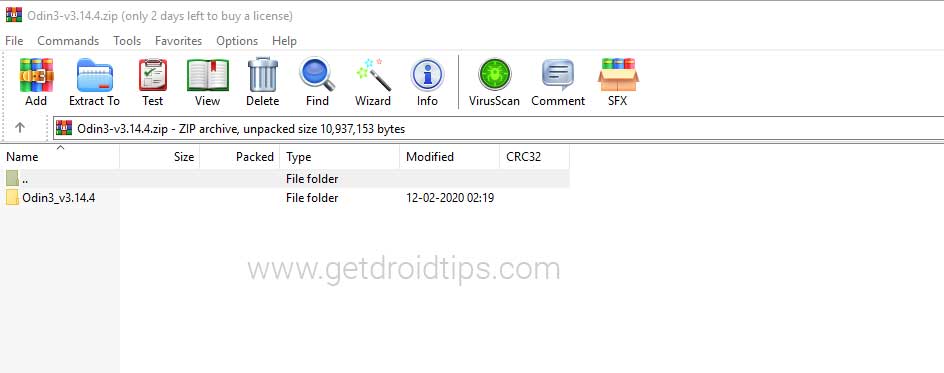
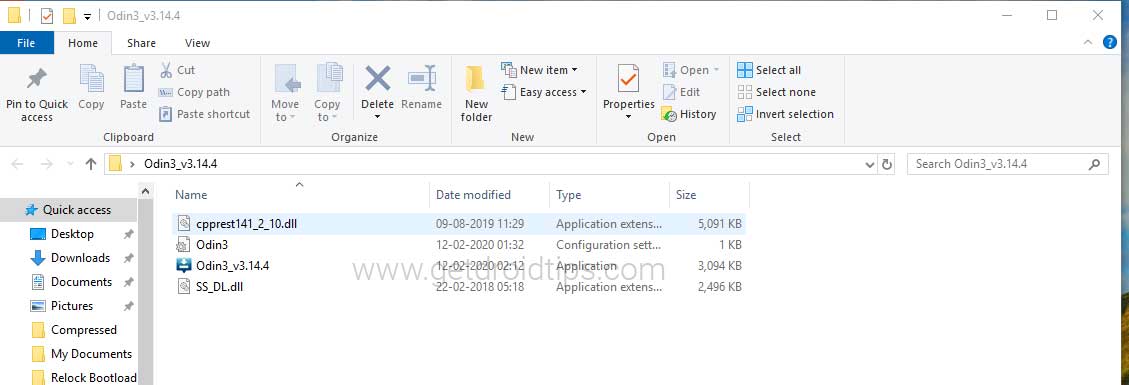
- Open the extracted folder and click on the Odin.exe file.
- You need to connect your Galaxy device to the PC while it is in Download Mode.
- Notice that the CO port will light up on Odin once you connect your phone.
- Click the AP button and select the firmware.
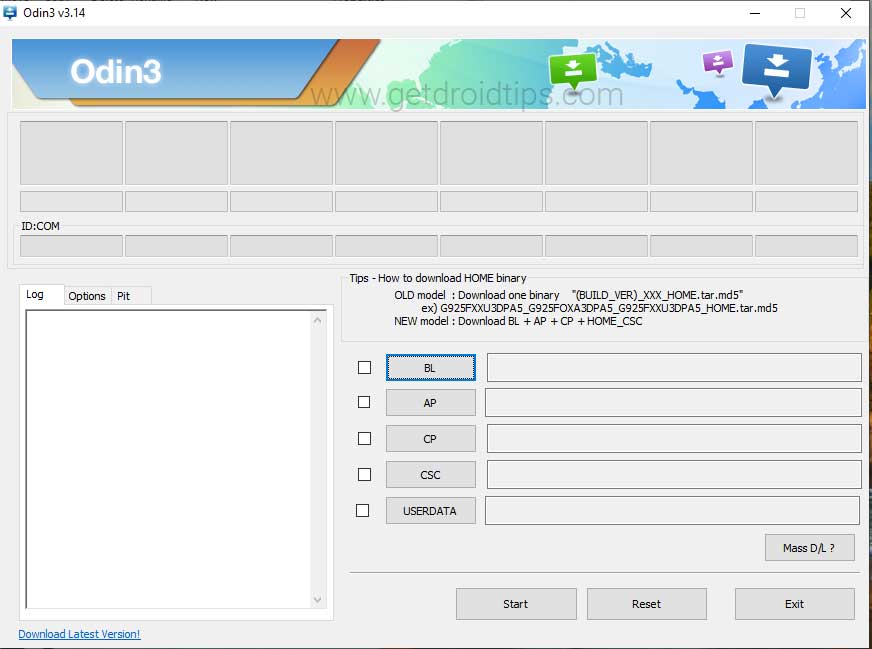
- Do the same for BL, CP, and CSC.
- Keep in mind that the regular CSC file will erase the entire data. In order to save the data select the ‘HOME_CSC‘ file.
- Don’t forget to select Auto Reboot and F.Reset Time in the Options tab.
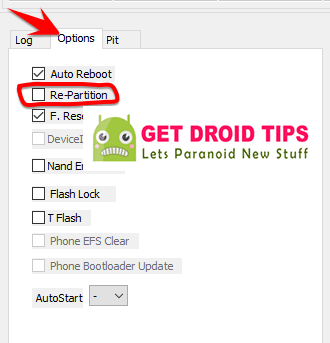
- Click the Start button to install the firmware on your Samsung device.
- That’s it! You will see a PASS message once the installation is complete.

We hope this tracker list and firmware flashing guide was helpful to all the Samsung Galaxy M51 users. If you’ve any queries, you can comment below.
