In this guide, we will show you how to save audio messages on iPhone and iPad. iMessage is the de-facto app for communication in the Apple ecosystem, and the reasons are there for everyone to witness. It allows you to easily send text, voice, photos, attachments, animojis, etc across various iPhone, iPad, and Mac. Along the same lines, many users prefer to send audio messages rather than dealing in plain texts. However, things work slightly differently with these voice notes, as opposed to say, photos and videos.
While the latter two are saved on your device, these audio messages don’t get automatically saved. Once you hit the play button, a two-minute timer starts after which these audio are gone for good. However, there exists a nifty method through which you could prevent these messages from getting automatically deleted after the said time period. Along the same lines, you could also locally save it on your device. In this guide, we will be listing out the instructions for both of them. So on that note, let’s get on with the guide on how to save audio messages on iPhone and iPad.
Also Read

Page Contents
How to Save Audio Messages on iPhone and iPad
First off, we will show you the steps to prevent the automatic deletion of audio messages. Once we are done with that, we will then show you how to permanently save these voice notes to your device. Follow along for the detailed instructions.’
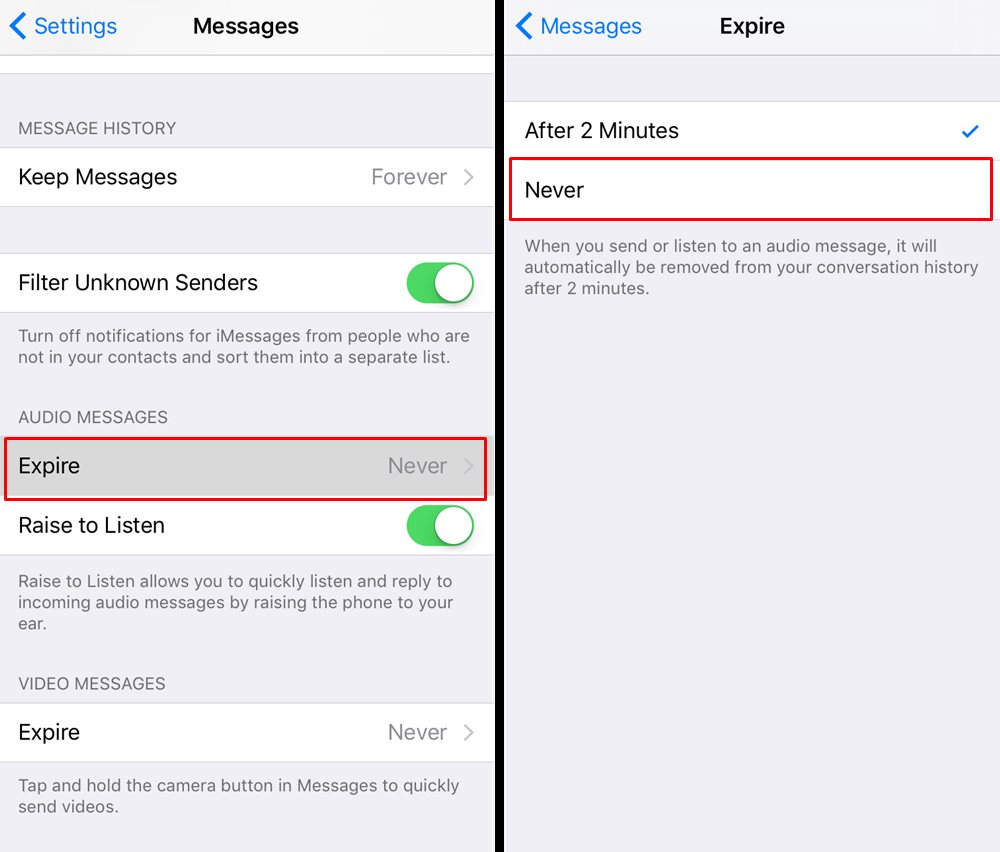
Change Audio Message Expiry Date

- Head over to Settings on your iPhone/iPad.
- Go to Messages and scroll to the Audio Messages section.
- Within that, select the Expire option.
- By default, it will be set to after 2 minutes. Change it to Never.
Saving Audio Messages in iMessage
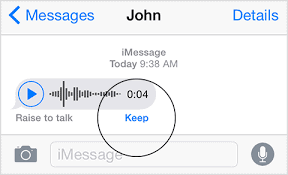
Now when you receive an audio message, you would see the Keep option in the lower right corner. Tap on it and then the associated voice note will be saved. Since we have changed the expiry date to never, these notes wouldn’t disappear after two minutes.

However, they aren’t saved locally onto your device, rather they would remain saved inside the iMessage itself. While it may suffice for some, it might not be for the majority. So if you wish to save these audio messages locally on your device, then the steps are slightly different. Here’s what needs to be done in this regard.
Saving Audio Messages Locally on your Device
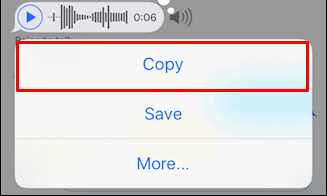
- As and when you get an audio message on your iMessage, long press on it.
- This will bring up a set of options select Copy. (You would see a Save option as well, but that seems to be causing a few issues, so stick with Copy only).

- Once you have selected it, head over to the desired location where you wish to save this file.
- Now long-press in an empty region within that directory and select Paste.
- The audio file will now be saved in the .caf format (Core Audio Format).
If you wish to play it, you would need to use the Finder, or the QuickTime player (or other third-party apps that supports this CAF format). Now comes the question of why we went ahead with the Copy option instead of Save. Well, the latter seems to be causing quite a few issues, especially for users on iOS 12 or above version. Before iOS 12, if you selected Save, it would have been exported to the Voice Memos app.
However, that doesn’t seem to work now for many users, as evident from this Apple Discussions Forums. So as of now, we would suggest you get on with the Copy-Paste method itself. On that note, we conclude the guide on how to save audio messages on iPhone and iPad. If you still have any queries, do let us know in the comments section below. Rounding off, here are some iPhone Tips and Tricks, PC tips and tricks, and Android Tips and Trick that you should check out as well.
Also Read
