Let’s check out the steps to install the system software update on your PlayStation 4. The successor of the popular Play Station 3, bought about tons of new features to the fore. The ability to play games off-console aka Remote play, the option to stream gameplay online, and the feature that lets your friends control the gameplay remotely (Share Play) are just some of the noteworthy features.
Furthermore, PlayStation regularly receives updates in the form of new features, bug fixes, and system stability, and the fourth installment is no different in this regard. However, sometime it could happen that the system software fails to update properly or you fail to enable the Automatic Install of PS4 System Software options. In both of these cases, you will have to manually install the System Software Update on Playstation 4. So without further ado, let’s check out the steps to do so.
How to Install System Software Update on PlayStation 4?
Given below are three different methods to update your PS4. The first section discusses the manual update, the second one discusses the steps using an external drive while the third one talks about the update in Rest Mode.
Also Read
Manually Install System Software Update on PlayStation 4
Follow the below steps to manually update your PS4 console.
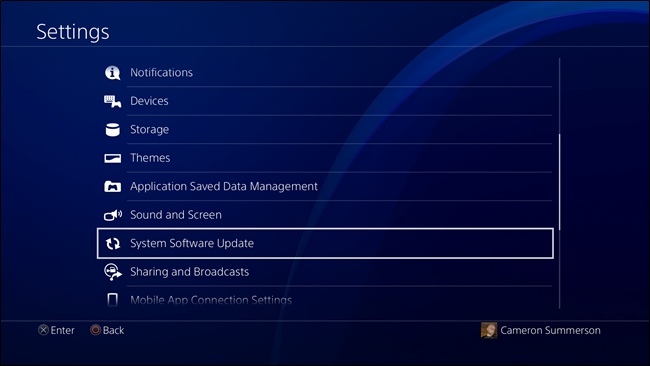
- Head over to the home screen and go to the Settings option.
- Select System Software Update and hit the X button. If any game is running in the background, save its progress, and close it. Then select the Upgrade now option.
System Software Update - You will now see the version number of the new update if it’s available. In that case, select Next and hit the X button.
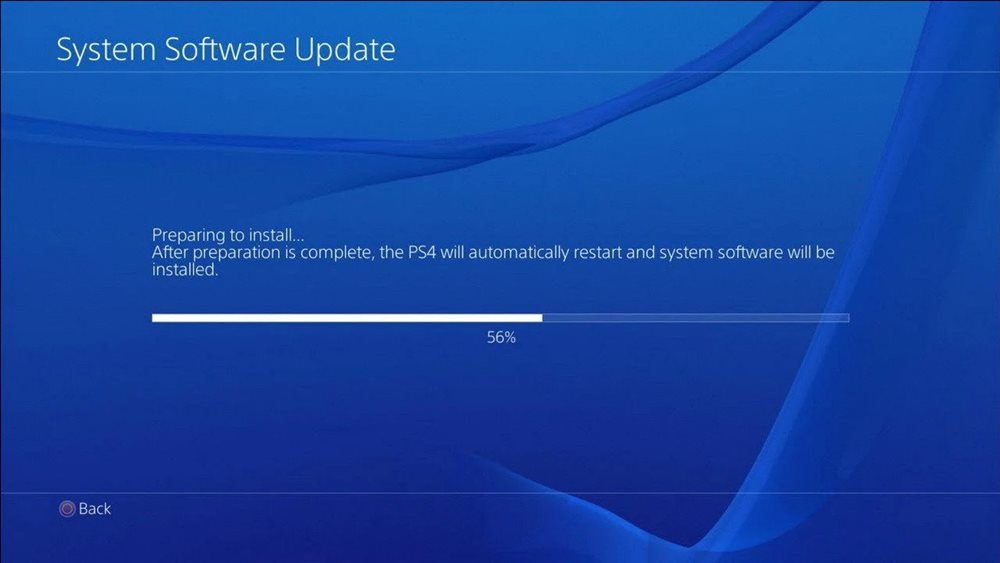
- The download will then begin and once it is done, you will have to agree to the System Software License Agreement. Select Accept and press the X button to confirm your decision.
- The installation process will now begin and will be completed within a couple of minutes. As soon as its done, PS4 will automatically restart.
- After the update has been applied to your device, PS4 will again restart. After which you will have to press the PlayStation button on your controller and then login with your credentials.
- At this stage, you may either sign-in with an existing account or create a new account. For the former, select the Next option.
- On the other hand, new users could select the New User option and then select the Create a New user option. Or if you wish to perform the sign-in at a later stage, hit Skip.
That’s it. You have successfully installed the system software update on your PlayStation 4.
Update PlayStation 4 using External Storage Device
If your PS4 has a system version of 1.5 or higher, then you should go with this method. Or if the above method of manually installed update failed, then also you could give this method a shot. Just make sure you are connected to the internet and are having an external storage device, with 400MB or more of free storage space. With that said, here are the required steps.
- Download the latest version of the PS4 System Software Update onto your external drive.
- Next, plug in this external drive to your PS4. You might get a SU-41350-3-Cannot to find the update file.
- If that happens, then it means that your PC has renamed the downloaded file, because earlier copies of the same file might already be present. If that is the case, then rename the update file to PS4UPDATE.PUP.
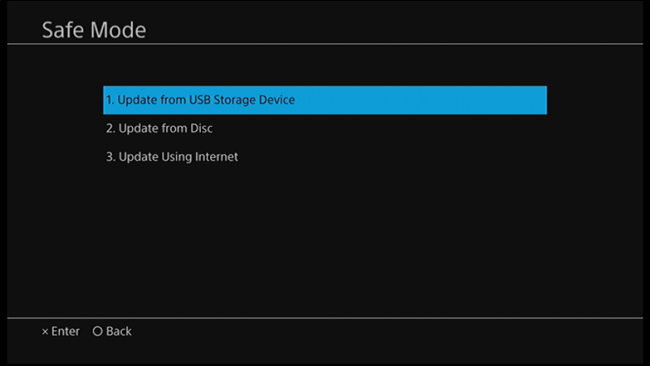
- Now head over to the Home screen, press Up on the D-pad, and visit the Functions menu. Go to the right menu bar, select Settings, and hit the X key.
- Next up, select the System software Update option and press the X button to confirm it. PS4 will now find the update on the connected storage drive.
- After that, you will now have to agree to the System Software License Agreement. For that, press the X button.
- On doing so, the update process will then begin and your PS4 will also restart in this process. After this, the update will be successfully applied and PS4 will reboot once more.
- You will now have to log in with your existing account or signup with a new account. You could also skip this process at this moment and do it later on. That’s it. You have successfully installed the system software update on your PlayStation 4 using an external drive.
Download Updates in Rest Mode
When you are in rest mode, then the automatic download and applying updates are already enabled. This makes the entire process streamlined and further makes it for faster updates. Therefore, it is recommended that you should enable this feature. For that, follow the below steps:
- Head over to Settings and select the Power Save Settings options.
- Now select the Set Functions Available in Rest Mode option.
- Finally, check-mark the following two options, if not done already- Stay Connected to the Internet and Enable Turning On PS4 from Network.
- If both these options are enabled, then just leave your PS4 in the rest mode when not in use. As soon as there is an update, it will be automatically downloaded.
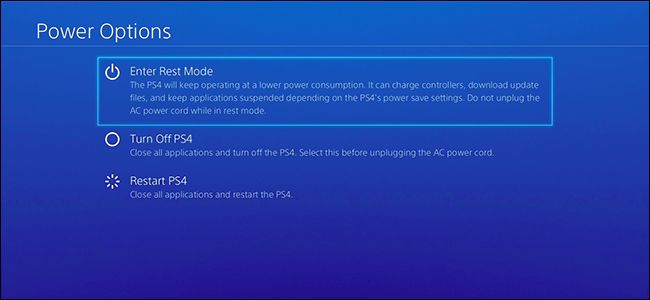
- To enter the Rest Mode, press and hold the PlayStation button and then select the Enter Rest Mode option. Hit the X key to confirm your choice.
Conclusion
That is all from this guide on how to install the system software update on your PlayStation 4. We have shared three different methods for the same. The first one makes use of the manual update, the second one calls for the need for an external storage drive whereas the third one discusses the update process in rest mode. Now that the instructions regarding this are pretty much clear, here are our iPhone Tips and Tricks, PC tips and tricks, and Android Tips and Trick that you should check out as well.