Blizzard is one of the most prosperous and known developers in the world. There are various reasons for becoming the most successful, and one of those reasons is their battle.net launcher. However, recently, the developers rolled out a huge new update for the Battle.net/blizzard launcher, which gained a lot of inducement.
But, you know what, for many users, the installation gets stuck, and they are unable to install Blizzard’s battle.net app on their PC. As per reports, when users are getting stuck on the Updating Battle.net screen for hours and are unable to install Blizzard’s battle.net app. But, there is nothing to worry about as this guide will help you fix this issue. Let’s see how.
Also Read
Page Contents
- How To Fix Unable To Install Blizzard’s Battle Net App
- Fix 1: Reboot Your Device
- Fix 2: Try Installing in Clean Boot Mode
- Fix 3: Check Internet Connection
- Fix 4: Power Cycle Your Router
- Fix 5: Delete the Blizzard Entertainment and Battle.Net folder.
- Fix 6: Flush DNS
- Fix 7: Reset the WMI Repository
- Fix 8: Disable The VPN server.
- Fix 9: Disable The Proxy server.
- Fix 10: Reset the TCP/IP Log
- Fix 11: Disable Antivirus
- Fix 12: Change DNS Settings
- Fix 13: Reset Network Settings
- Fix 14: Reset Network Adapter Driver
- From Author’s Desk
How To Fix Unable To Install Blizzard’s Battle Net App
Well, keeping this in mind, our technical troubleshooting team investigated and gathered some fixes to help you get out of this situation. Therefore, until Blizzard provides any fixes, you can rely on the fixes that we have mentioned here in this guide. So, now without further ado, let’s jump into it.
Fix 1: Reboot Your Device
The first thing that helps a number of users get rid of this error. You can simply reboot your system before trying any of the below-mentioned methods. Well, this will not just reboot your system but also remove the temporary bugs and file that causes the issue and give your PC a fresh new start to work swiftly.
So, it is highly suggested to reboot your system before doing anything. Well, once you did, again try to install the Blizzard battle.net and check if it is now installing correctly or still stuck on the same error. If so, then we suggest you try the other methods mentioned in this guide.
Also Read
Fix 2: Try Installing in Clean Boot Mode
There’s a chance that your system may find it difficult to install it due to the process running on your background. Well, sometimes, the background running process or services take a lot of data which prevents your current app from working properly.
So, in that case, installing the application after a clean boot will be the right choice for you. Many users find this really helpful in fixing this issue. So, you should also try this out, and here are the steps that will help you do so:
- Firstly, press the Win+R button altogether to open the Run box.
- Then, search for the msconfig. This will open the system configuration window.
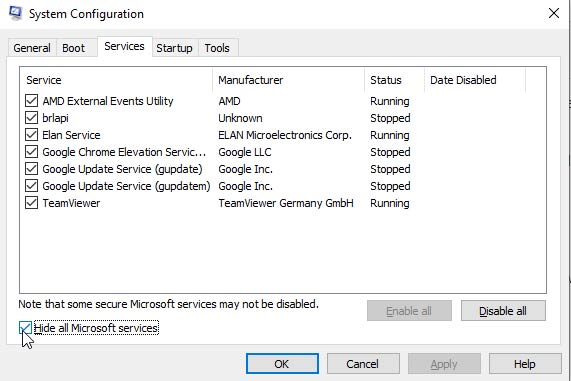
- Now, switch to the Services tab, checkmark the box beside Hide all Microsoft Services, and hit the disable button followed by the Ok. Then, close the Clean Boot window.
- After that, open the Task Manager and in the Startup tab. Then, disable all the high-impacted programs.
- That’s it. Now, once done, reboot your PC and try installing Battle.net to check if now you’re able to do it or not.
Fix 3: Check Internet Connection
Does your Internet work smoothly? Well, this is the question that every time we think about whenever we are trying to access a server-based game. This is because these games need a good internet connection to work fine continuously.
But, if your internet connection is fluctuating or has a poor speed, then you may not be able to access it or even download anything. Also, there are possibilities that due to your internet connection battle.net is unable to install the latest version of the launcher. To check your connection, you must go to the Ookla speed tester website and check your router speed.
Fix 4: Power Cycle Your Router
Well, in case you have checked your router’s connectivity speed and find that it is not giving you the speed that you need. Then, we recommend you power cycle your router and modem as this will remove the bugs and temporary files, if any. The internet issue gets fixed most of the time by just power cycling your router.
However, if in very unfortunate condition, if the internet issue won’t get fixed, then without any further delay, contact your ISP provider and ask them to fix the network issue. Once the internet issue gets fixed by your ISP provider, you’ll see that you are now able to install Blizzard’s battle.net app on your PC.
Fix 5: Delete the Blizzard Entertainment and Battle.Net folder.
This error generally occurs if you previously installed Blizzard’s battle.net app on your device and forget to remove the relics of the app at that time. However, many reports are there in which users reported that they are now able to install it on their device after removing the Blizzard Entertainment and Battle.net folder. So, to do this, here are the needy steps:
- Initially, press the Win+R button to open the Run box and search for %LOCALAPPDATA%.
- After that, locate the Battle.net, Blizzard, and/or Blizzard Entertainment folders and delete them.
- Then, open the Run box again and repeat the same for %APPDATA%, %TEMP%, and %PROGRAMDATA%.
- Once done, check if you are now able to install Blizzard’s battle.net app or not.
Fix 6: Flush DNS
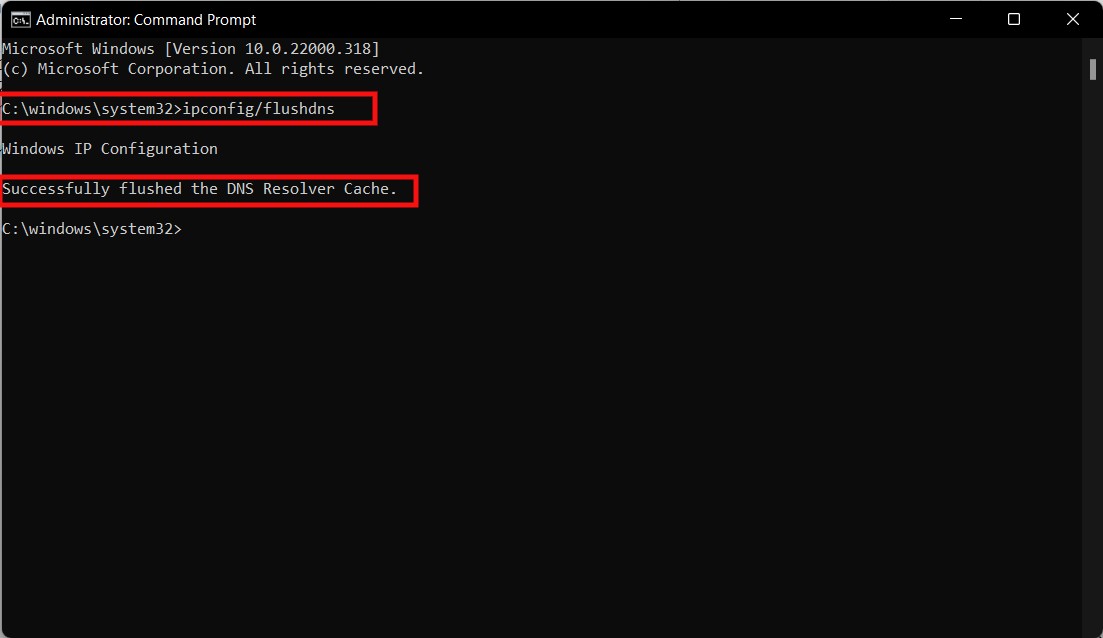
For many users flushing the DNS helped them to fix the issue. So, you should also try this out and see if it helps you too. However, in order to do this, you need to follow these steps:
- Firstly, run the command prompt using admin rights on your Windows PC.
- After that, execute the command:
ipconfig/flushdns
Fix 7: Reset the WMI Repository
There is a chance that there is interference with WMI (Windows Management Instrumentation) component. So, in that case, disabling it will be the right choice for you. However, there are many cases where users find this very useful; therefore, you should also try this out, and here are the steps to do so:
- Initially, open the command prompt using the admin rights.
- After that, execute the command:
net stop winmgmt
- Then, it will ask to confirm your action, press the Y and enter the key simultaneously. Once the above command executes successfully, initiate this command and reboot your PC.
winmgmt /resetrepository
Fix 8: Disable The VPN server.
Most of the server-based applications may not work properly when you connect a VPN service. So, it is suggested to disable it and then try installing Blizzard’s battle.net again on your PC. However, in case you are using the Windows 11 built-in VPN feature, then you have to follow these steps to disable the VPN server on your PC:
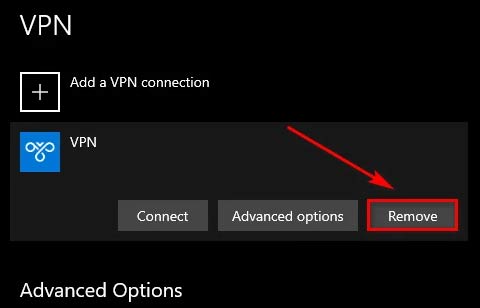
- Firstly, open the Run box and search for ms-settings:network-vpn.
- Now, inside the Settings app, open the VPN tab.
- Then, hit the remove button to remove it from your PC.
That’s it. Now, once the above-mentioned steps are executed properly, you should try installing the battle.net again on your PC.
Fix 9: Disable The Proxy server.
Are you also using the proxy server on your PC? If so, we suggest you disable it as it may also come up as the main culprit behind this issue. So, to do this, you should follow the given steps:
- Firstly, open the Run box and search for ms-settings:network-proxy.
- Now, inside the Settings app, open the Proxy tab.
- After that, navigate to the Manual Proxy Server section, uncheck the box beside the Use a Proxy Server For LAN, and hit the Ok button.
That’s it. The Proxy servers get disabled on your Windows PC, and now you need to reboot your system and try installing the battle.net again on your PC.
Fix 10: Reset the TCP/IP Log
Sometimes, the TCPIP or DHCP parameter will be rooted as the main cause behind this error. This forces the WiFi network to terminate the connection abruptly. So, resetting the TCP/IP log on your Windows PC again will be the right decision for you. Therefore, let’s look at the steps that you need to perform:
- The very first step that you need to do is, open the cmd using admin privileges.
- After that, execute the command:
netsh int ip reset c:\resetlog.txt
That’s it. Now, wait for several seconds until the process gets completed. Once done, again try to install the app on your PC and check if it is now installing or still gets stuck.
Fix 11: Disable Antivirus
Most of the time, we ignore this thing, but knowing unknowingly, our Windows Defender may block the battle.net to install on our PC. This is because it considers it a third-party threat and due to which it won’t get the required resources and fails to install on your PC. Therefore, while installing the launcher, it is better to disable the antivirus. So, let’s take a look at how you do it:
- First of all, press Win+I to open the Windows Settings app.
- After that, go to the Privacy & Settings tab and hit the Windows Security option.
- Then, click on Open Windows Security and toggle the button to turn it off.

Once you successfully disable the Windows Security on your Windows 11 PC, again try installing it and check if the issue gets resolved or not.
Fix 12: Change DNS Settings
Now, if nothing helps, then there’s a huge chance that changing your DNS settings to Google’s DNS will help you fix this issue. So, let’s take a look at how you do it.
- Firstly, open the Run box and search for ncpa.cpl. This will open the Network Connections window.
- After that, on the next page, right-click on the network name that you are using currently and choose the Properties option from the drop-down page.
- Now, if a User Account Control window appears, hit the Yes button to grant it permission.
- Then, on the network properties window, shift the Networking tab.
- After that, tick mark the box located in front of the Internet Protocol Version 4 (TCP / IPV4) situated inside the This connection uses the following items section.
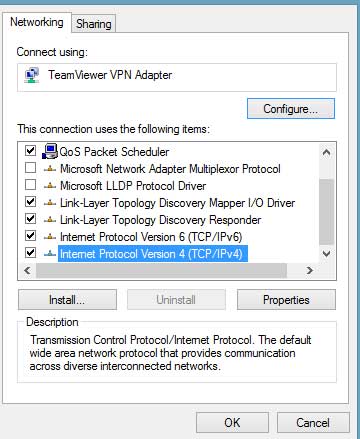
- Then, hit the Properties button, and navigate to the general tab.
- Now, checkmark the box located beside the Use the Following DNS server address and use the following DNS address:
-
- For Prefered: 8.8.8.8
- For Alternative: 8.8.4.4
That’s it. Now, save the changes made, and restart your Windows 11 PC. Then, again check if you are now able to install the battle.net app or not.
Fix 13: Reset Network Settings
If the issue doesn’t get fixed even after changing the DNS settings, then we suggest you try resetting the network setting on your PC. However, to do so, here are the necessary steps that you require to follow:
- Initially, open the command prompt using the admin rights.
- Then, execute the given commands one by one:
ipconfig /flushdns
nbtstat -R
nbtstat -RR
netsh int reset all
netsh int ip reset
netsh winsock reset
Fix 14: Reset Network Adapter Driver
So, if you tried all the fixes as mentioned earlier but still end up getting the same error, then lastly, I will suggest you to once try resetting your network adapter as this may help you because there are many reports that claim that this helps them to fix this type of problems. So, you should also try this out; here are the steps to do so:
- First of all, open the Run Box by pressing the Win+R button altogether.
- After that, search for devmgmt.msc. This will open the Device Manager.
- Then, expand the Network Adapter tab and right-click on the Wireless adapter. Then, select the Properties option.
- Now, switch to the Driver tab and hit the Uninstall Device button.
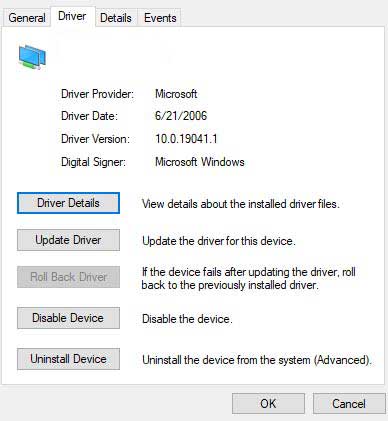
- That’s it. Now, to reinstall it, simply reboot your system.
Also Read: Fix: Battle.net Application Crashing on Windows 11
From Author’s Desk
So, these were methods that you can try to fix if you are unable to install Blizzard’s launcher or not on your PC. We hope the above-mentioned fixes have helped you. But, somehow, if you are still getting the same error, we suggest you contact the Blizzard official support team and ask them for help. However, if you liked this guide, make a sure comment below.
