If you’re using a Xiaomi Redmi 9A and want to breathe new life into your device, installing an Android 16-based custom ROM is a solid move. Google recently released Android 16 for Pixel devices, and developers have already ported unofficial AOSP builds to older phones like the Redmi 9A. In this guide, you’ll learn how to safely install Android 16 on Redmi 9A and enjoy its latest features.

Xiaomi Redmi 9A Overview:
Xiaomi Redmi 9A has a 6.53-inch IPS LCD screen, providing a functional viewing experience with a resolution of 720 x 1600 pixels and a 20:9 aspect ratio, yielding a pixel density of around 269 ppi. The device runs on Android 10, customized with MIUI 12, providing a user-friendly interface. Under the hood, Xiaomi Redmi 9A is powered by the Mediatek MT6762G Helio G25 chipset, featuring an octa-core CPU with Cortex-A53 cores clocked at 2.0 GHz and 1.5 GHz. The PowerVR GE8320 GPU ensures smooth graphics performance for everyday use.
Memory configurations cater to different storage and RAM needs, ranging from 32GB with 2GB RAM to 128GB with 6GB RAM, with expandable storage options via a dedicated microSDXC slot. The main camera is a single 13MP lens with features like PDAF, LED flash, and HDR, capable of recording 1080p videos at 30/60fps. The selfie camera is a 5MP wide lens with HDR support and 1080p video recording at 30fps.
Audio is delivered through a loudspeaker, and the device retains the 3.5mm headphone jack, catering to users who prefer wired audio options. Connectivity options include Wi-Fi 802.11 b/g/n, Bluetooth 5.0, GPS, GLONASS, BDS, and microUSB 2.0 with OTG support. While lacking NFC capabilities, the device compensates with FM radio functionality, offering an alternative for entertainment. Xiaomi Redmi 9A is powered by a robust 5000mAh non-removable Li-Po battery, supporting 10W wired charging for a reliable power supply. This smartphone serves as a practical choice for users seeking essential features and a large battery capacity on a budget.
Android 16 Features:
Android 16 introduces Material 3 Expressive, a refined evolution of Google’s design language for smartphones and tablets. While it doesn’t completely reinvent the interface, it represents one of the most noticeable user-facing changes in the OS. Rather than a dramatic visual overhaul, Material 3 Expressive enhances the foundation laid by Material Design 3 by introducing smoother, more dynamic animations, larger touch targets, and bolder typography.
This update arrives at a perfect moment. Material Design 3, first introduced with Android 13, had begun to feel dated. Material 3 Expressive breathes new life into the interface while preserving the familiar look and feel users have grown comfortable with. Instead of overhyping the changes, Google’s own animations showcase the polish and fluidity of this next step in Android design.
Android 16 introduces a wealth of new features, system optimizations, and UI refinements. Some of the highlights include:
- Live Notifications: Track real-time activities like deliveries or ride status with persistent, interactive notifications.
- Low-Light Camera Enhancements: Improved software-based night photography.
- Pro-Grade Media Support: Includes advanced codecs and battery-efficient audio processing.
- Desktop Mode for External Displays: Better support for multi-window UI on monitors and tablets.
- Accessibility Upgrades: Features like outlined text and improved input customization.
- Performance Boost: Enhanced power management and reduced background CPU usage.
These updates aim to improve user experience across different types of devices, including foldables, tablets, and standard phones.
Although Android 16 is rolling out first to Pixel devices, many brands like Xiaomi, OnePlus, Samsung, Realme, and others will follow soon. If you’re impatient, a custom ROM is the best way to get Android 16 today.
What Works & Known Bugs:
What’s working?
Everything seems to be working fine.
Known issues?
If you spot any bugs, report them along with proper logs to the developer.
Before You Begin: Requirements:
1. Backup Your Data:
Always back up your device before flashing any ROM. This prevents data loss if anything goes wrong. Backup guide here.
2. Battery Level:
Charge your phone to at least 50% to avoid shutdowns during the flashing process.
3. Download ADB and Fastboot Binaries:
You can skip this part if you have already installed TWRP Recovery on your Redmi 9A. For those who haven’t, ADB and Fastboot commands (platform-tools) are required to boot your device into bootloader mode, allowing you to perform the necessary flashing operations. ADB (Android Debug Bridge) establishes a connection between your device and computer, while Fastboot is a more advanced command-line utility for flashing and modifying Android devices.
You can download the ADB and Fastboot Binaries (Platform-Tools) here.
4. Download USB Drivers:
You’ll need the appropriate USB drivers to ensure a successful connection between your Redmi 9A and your computer. These drivers enable file transfers, flashing, and other operations between your devices.
You can download the latest Xiaomi USB drivers here.
5. Unlock the Bootloader:
Unlocking the bootloader of your Redmi 9A. is essential before you can install any custom ROM. Make sure to follow Xiaomi’s official instructions for unlocking the bootloader. Unlocking the bootloader will wipe your device, so back up your data beforehand.
6. Install TWRP Recovery:
You must install TWRP Recovery on your phone to install any custom ROM on your device. After unlocking the bootloader, follow our guide to install TWRP Recovery on your Redmi 9A.
7. Download Android 16 ROM:
You can download the Android 15 custom ROMs for the Xiaomi Redmi 9A from the links below:
| OS | Download Link |
| CrDroid OS | Download |
8. Download Android 16 GApps:
Most AOSP ROMs don’t come with Google apps. You’ll need to flash Android 16 GApps separately.
Note: Flash GApps right after flashing the ROM. Don’t reboot in between.
Warning!
GetDroidTips is not responsible for any issues that may happen to your device if you flash it on another device and brick it. Do it at your own risk.
Installation Guide: Step-by-Step
- Connect your device to the PC via a USB cable. Make sure USB Debugging is enabled.
- Then, go to the platform-tools folder, type CMD in the address bar, and hit Enter. This will launch the Command Prompt.
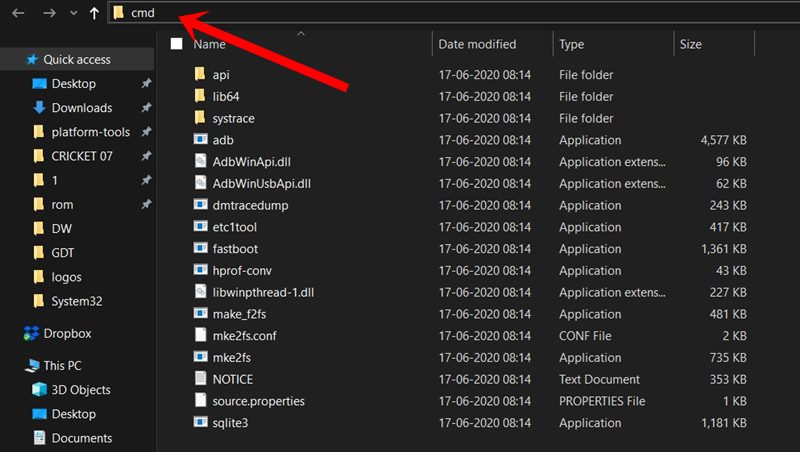
- Execute the below command in the CMD window or enter recovery mode using the Volume and Power button combination to boot your device to TWRP Recovery:
adb reboot recovery
- Now head to the Install section and navigate to the downloaded vendor and firmware. Perform a right swipe to flash it.
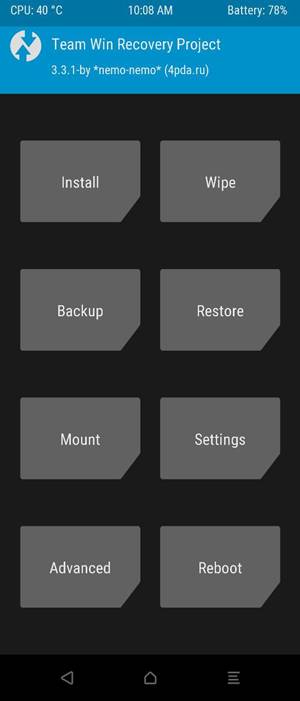
- If you want Google Apps as well, you need to flash it at this instance. Go to Install, select the GApps ZIP file, and perform a right swipe to flash this file.
- When that is done, you may reboot your device. Head over to Reboot and select System.

The first boot after installing a custom ROM may take a bit longer than usual, so don’t panic if it seems slow. After the device boots, you will need to set it up as a new device, just like when you first got it.
Final Words
By flashing Android 16 on your Redmi 9A, you’re extending its life and unlocking modern Android features that Xiaomi may never officially provide. While this is an unofficial AOSP build, early reports suggest solid stability. That said, bugs may still appear, so always report them with logs to help developers improve the experience.
If you have questions or run into issues during installation, feel free to drop a comment. Enjoy your fresh Android 16 experience!