In this tutorial, we will show you the steps to install the AOSP Android 11 onto your Xiaomi Redmi 5 device. Now that the latest iteration of Android is up and running, we are seeing many OEMs in the race to release the update for their set of devices. Likewise, Xiaomi also has seems to cover some grounds in this regard. However, it releases two years of Android upgrades for its eligible devices at the most. As the Redmi 5 was released three years back, it has completed its quota of Android upgrades.
Also Read
However, there seems to be a silver lining among the dark clouds. You could still enjoy the latest Android build onto your device via an AOSP ROM. Recently, the Redmi Note 5 Pro, Redmi 5 Plus, and the Mi 9 were also welcomed to this family, and now the Redmi 5 seems to be the newest addition. So, in this tutorial, we will show you how to install this AOSP Android 11 onto your Xiaomi Redmi 5 device. But first, let’s check out the feature set of this ROM and what all it has to offer to the masses.

Page Contents
AOSP Android 11 for Xiaomi Redmi 5
Before we get on with the instructions, let’s get you acquainted with the device-specific working features of this ROM. After that, we will be listing down the requirements and downloads section. Make sure that your device qualifies all the prerequisites and grab hold of the required files.
What’s Working
- RIL
- Wi-Fi
- Camera
- Microphone
- Torch
- Audio
- USB
- GPS
- Bluetooth
- Camera
- Video recording
- Fingerprint sensor
Prerequisites
- To begin with, create a backup of your device. This is needed as we would be wiping the data partition while flashing this ROM.
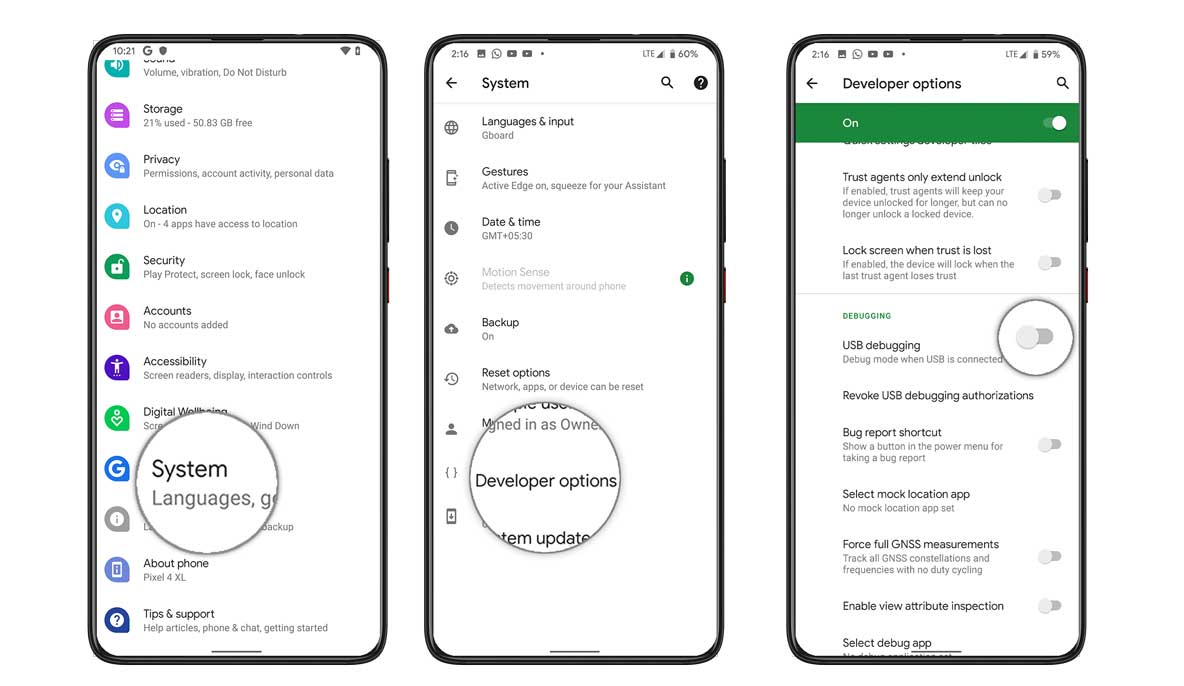
- Next, enable USB Debugging on your device as well. Head over to Settings > About Phone > Tap on MIUI Version 7 times > Go back to Settings > System > Advanced > Developer Options > Enable USB Debugging.
- Download and install the Android SDK Platform Tools on your PC.
- Also, install the Xiaomi USB Drivers on your PC.
- Your device bootloader also needs to be unlocked. If you haven’t done so, then refer to our guide on How To Unlock Bootloader On Redmi 5.
- Likewise, the TWRP recovery should also be installed on your device. As for this ROM, the developer has notified to flash the KewL-TWRP. So download it from the below section and then refer to our guide on How to Install TWRP Recovery on Xiaomi Redmi 5/5 Plus. Furthermore, this guide also has the steps to root your device. This is completely optional and you could skip that part as of now.
Download AOSP Android 11 for Redmi 5
- AOSP Android 11 ROM: Xiaomi Redmi 5 (Credits: XDA Member PratyakshM)
- Lineage OS 18: XDA Development Page
- PixelExperience 11.0: XDA Development Page
- Styx Project: XDA Development Page
- AOSiP 11 Ravioli: XDA Development Page
- Cherish OS 2.6: XDA Development Page
- Evolution X: XDA Development Page
- TWRP: Kewl-TWRP
- Google Apps: GApps Android 11
Transfer the downloaded ROM and GApps package to your device before proceeding with the steps to install the AOSP Android 11 onto your Xiaomi Redmi 5 device.
How to Install AOSP Android 11 on Redmi 5
- Connect your device to the PC via USB Cable. Double-check that you have enabled the USB Debugging.
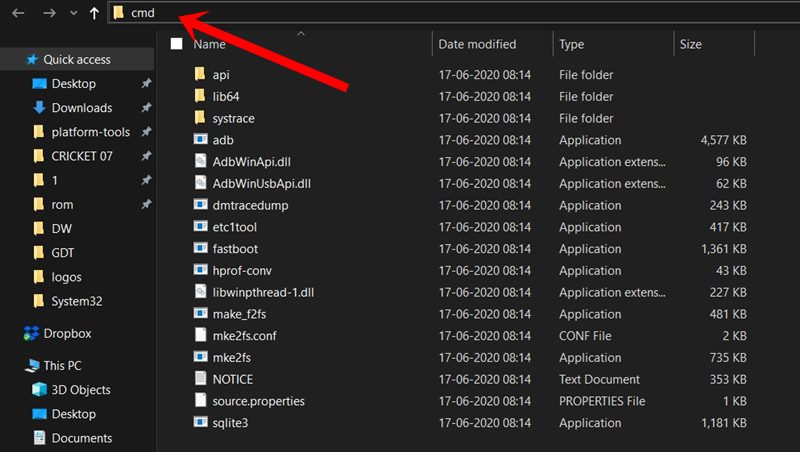
- Head over to the platform-tools folder, type in CMD in the address bar, and hit Enter. This will launch the Command Prompt.
- Type in the below command to boot your device to TWRP Recovery:
adb reboot recovery
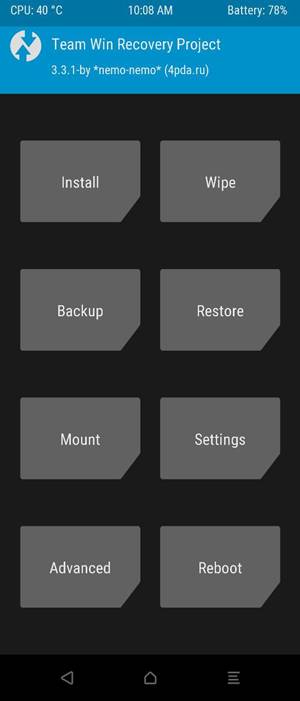
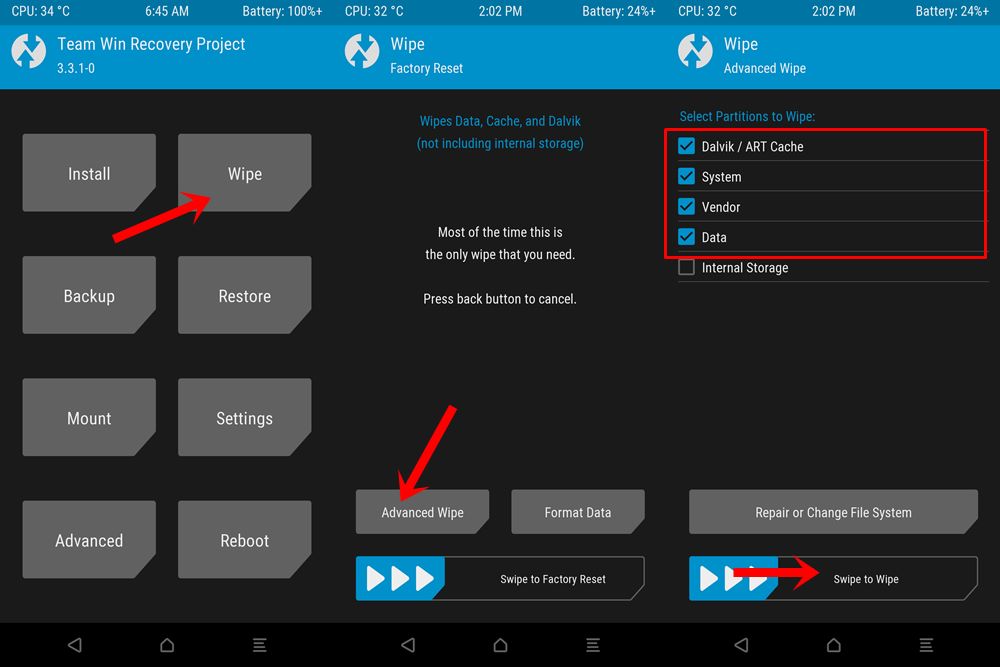
- Once your device is booted to TWRP, head over to Wipe and tap on Advanced Wipe.
- Select system, vendor, data, cache, and the dalvik cache. Perform a right swipe to wipe the selected partitions.
- Now go back to Install, navigate to the RevengeOS ZIP file, and perform a right swipe to install the ROM.
- After this, again go to Install and this time select the GApps ZIP package, select it and install it by right-swiping.
- Go to Wipe > Advanced Wipe and this time only wipe the Cache partition.
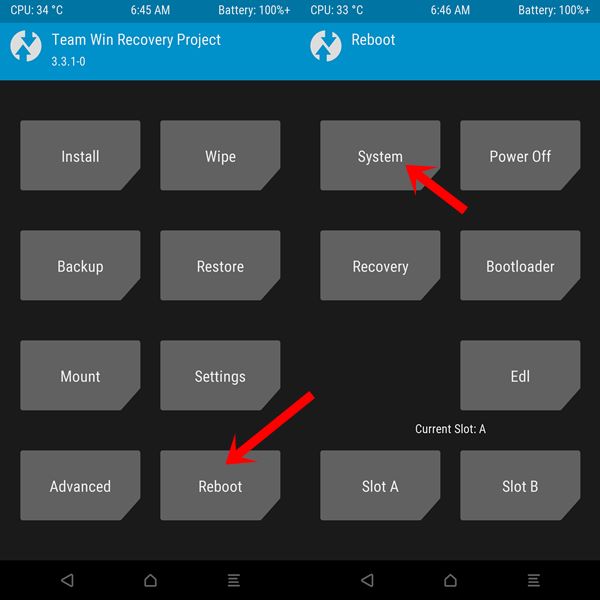
- Finally, go to Reboot and select the System. Your device will boot to the newly installed OS.
With this, we come to the end of this guide on how to install the AOSP Android 11 onto your Xiaomi Redmi 5 device. There are a few points worth discussing. First off, the first boot after flashing the ROM could take up some time. Furthermore, you will have to set up your device from scratch as it has been formatted. Apart from that, if you have any other queries, do let us know in the comments section. Rounding off, here are some iPhone Tips and Tricks, PC tips and tricks, and Android Tips and Trick that you should check out as well.

Redmi 5 system update