DLL stands for ‘Dynamic Link Library’ file in the Windows 10 system that can be shared between programs to run the registry. Bootres.dll is one of them and if this file gets corrupted then you may receive an error message that says “The program can’t start because bootres”. The bootres.dll file can be found in the Windows folder and it’s a part of the boot resource library. Well, if you’re also experiencing any kind of boot execution error related to the Corrupt bootres.dll File in Windows 10 then make sure to check out this troubleshooting guide to fix it.
To be very precise, the Bootres.dll file is a major operating system file that helps the Windows system to boot properly as a part of the Boot Resource Library. Whenever the bootres.dll file gets corrupted, the computer may fail to boot normally and you may receive an error notification something like “Boot critical file \resources\custom\bootres.dll is corrupt”. Although there may be several reasons behind this particular issue, it seems that the improper boot sequence in the SrtTrail.txt file can be a major one.
Also Read
Download Dolby Audio Driver for Windows 11/10/8.1
How To Fix External Hard Drive I/O Device Error in Windows 11/10
Fix: Win+Shift+S Not Working on Windows 11/10
How to Fix DLL File Missing Error on Windows 11/10
How to Fix Msxml4.dll Not Found or Missing Errors

Page Contents
Fix: Corrupt bootres.dll File in Windows 10
Now, without wasting any more time, let’s jump into the methods below.
1. Run SFC Scan
The System File Checker (SFC) is a utility in the Microsoft Windows system that’s located in the C:\Windows\System32 folder. This utility tool or command simply helps users to scan for corrupted Windows system files and restore them (if any). To do this:
- Click on the Start Menu > Type cmd.
- Right-click on the Command Prompt program from the search result.
- Now, choose Run as administrator > If prompted by UAC, click on Yes.

- Type the following command and hit Enter to execute the System File Checker process.
sfc /scannow
- Have some patience until the process completes.
- Once done, close the command prompt window and reboot your PC/Laptop.
2. Use DISM Tool
Using the DISM (Deployment Imaging and Service Management) tool, you can repair the system image that may fix such an issue. To do this:
- Click on the Start Menu > Type cmd.
- Right-click on the Command Prompt program from the search result.
- Now, choose Run as administrator > If prompted by UAC, click on Yes for admin permission.
- Type the following command and hit Enter:

Dism /Online /Cleanup-Image /RestoreHealth
- Wait for a couple of minutes to complete the process.
- Once done, restart your computer and check if you’re still getting Corrupt bootres.dll File error in Windows 10 or not.
3. Use Restore Point
If you’ve previously saved any restore point on your Windows system in its good state then you should use the restore point to go back to that state again. To do this:
- Press the Windows + R keys to open up the Run dialog box.
- Type rstrui and press Enter to open up the System Restore utility.
- You can select the Recommended restore method or a different restore point according to your preference.
![]()
- Select Show more restore points and choose the most recent & best one for system restoration.
- Click on Next > Click on Finish.
However, if that doesn’t help you to fix the Corrupt bootres.dll File in Windows 10, you can follow the next method.
Read Also: Fix Provider DLL Failed to Initialize Correctly Issue? – 0x8009001d
4. Use a Third-Party DLL Repair Tool
Well, if you don’t want to go through all of these hurdles or don’t understand what to do next, make sure to get a third-party DLL fixer or repair tool for your Windows 10 system online. There are a couple of popular tools available for free that can scan your system completely and automatically fix all the missing or corrupted DLL or registry files.
Note: Most of the third-party DLL fixer tools requires a premium pack to completely fix all kind of DLL or registry file issues. Therefore, you may have to upgrade from the free version.
5. Run CHKDSK
You should run the check disk utility on your Windows 10 system via the command prompt method to check for the errors or bad sectors in your disk drive.
- Click on the Start Menu > Type cmd.
- Right-click on the Command Prompt from the search result.
- Select Run as administrator > If prompted by UAC, click on Yes.
- Now, type the following command and hit Enter to execute it:

chkdsk C: /f /r /x
- Wait for the process to complete. Once done, restart your computer.
Note: Here the parameters for this command are as follows:
- /f option will attempt to fix any errors if found.
- /r option will locate for bad sectors and recovery any readable information.
- /x option will force the volume that you’re about to check to be dismounted before the utility begins a scan.
- If the C: drive is in use, you can type Y to run a scan when your PC restarts.
6. Reset your PC
Resetting your PC means you’re trying to restore the system in its default mode. Therefore, you have to take a full backup of your C: drive (installed Windows partition) if there is any important file available. Otherwise, you may lose your necessary data from the Windows partition. To reset your PC:
- Press the Windows + I keys to open up the Windows Settings menu.
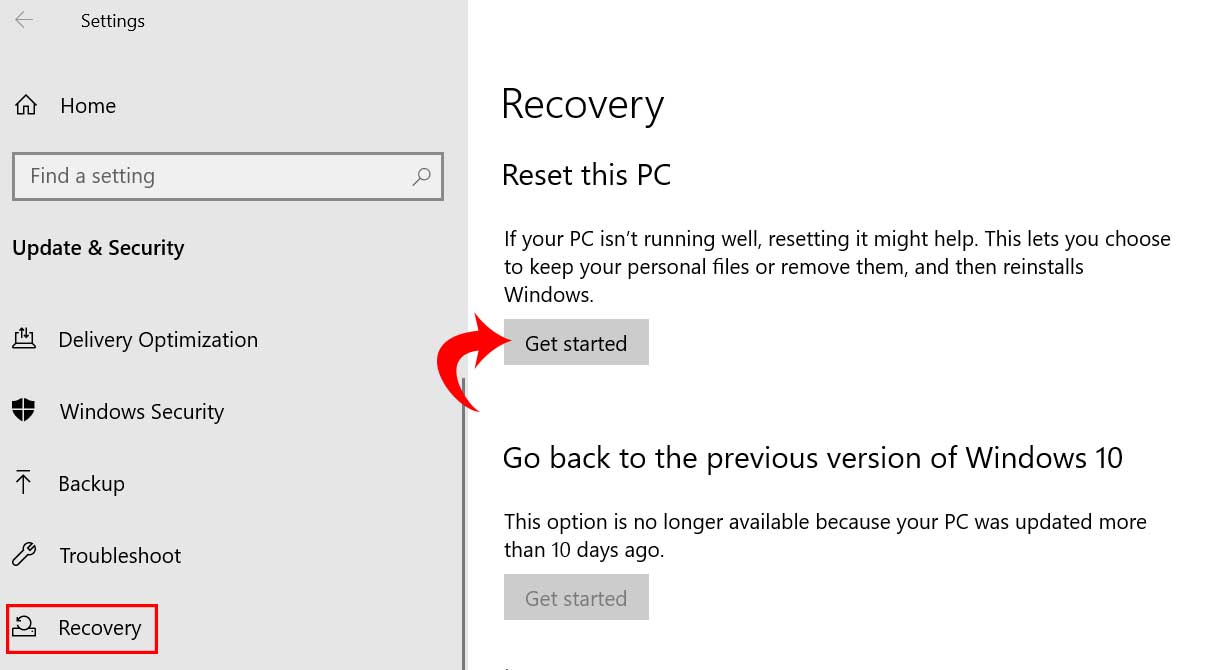
- Click on Update & Security > Select Recovery from the left pane.

- Now, click on the Get started button from the Reset this PC option.
- You can choose whatever option you want like ‘Keep my files’ or ‘Remove everything’.
- We’ll recommend selecting ‘Remove everything’ for a fresh start.
- Follow the on-screen instructions and then wait for the process to complete.
- Finally, restart your computer.
We assume this guide was helpful to you. For additional queries, you can comment below.
