In this tutorial, we will list out all the common Zoom problems, their error codes, and their potential fixes. While the application is nearly seven years old, its true potential seems to have been unlocked during this lockdown. Owing to the work from home scenario, many users and organizations have flocked to this video conferencing app. And with such a plethora of features to offer, its rise seems to be something along the obvious lines.
But at the same time, this application isn’t free from error. Its ever-expanding userbase further adds to their challenges of keeping its servers up and running. Apart from these server issues, the app might also face trouble in updating, permission related issues, or some missing files/ file-path. In this regard, our detailed guide related to all the common Zoom problems, their error codes, and fixes should help you out. Follow along.

Page Contents
Common Zoom Problems, Error Codes, and Fixes
Here are all the Zoom error messages and their associated error codes as well. Do keep in mind that a single underlying issue might be represented by more than one error code. Furthermore, there could be more than one potential fixes for some of these errors. So try all these files until you achieve success.
Also Read
Network Connectivity Issues
This is the most common issue that has been faced by quite a lot of Zoom users. In some cases, you might be able to load the Zoom client without any issue as such but wouldn’t be able to join in a meeting or access the Join link.
The following codes translate to the network issues: 5000, 5003, 5004, 104101, 104102, 104103, 104104, 104105, 104106, 104110, 104111, 104112, 104113, 104114, 104115, 104116, 104117, and 104118. In this regard, there are two different fixes that you could try out, as mentioned below.
Fix 1: Add Zoom to Windows Firewall
It might be the case that Windows Firewall isn’t allowing the app to get the required network access. In that case, you could add Zoom to the Firewall list. Here are the required steps:
- Launch Windows Security by searching it in the Search menu.
- Click on the Firewall & network protection option from the left menu bar.
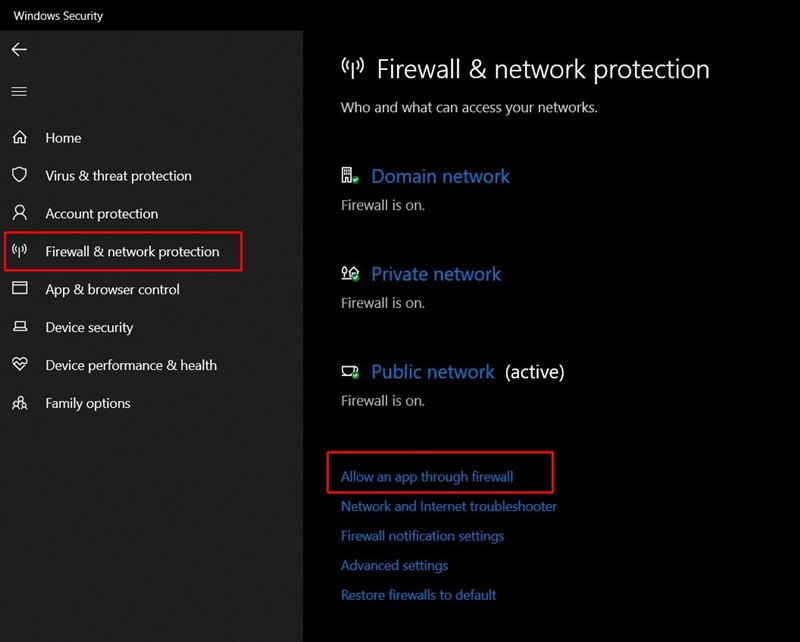
- Next up, click on the Allow an app through the firewall.
- Then click on the Change Settings button situated at the top right.
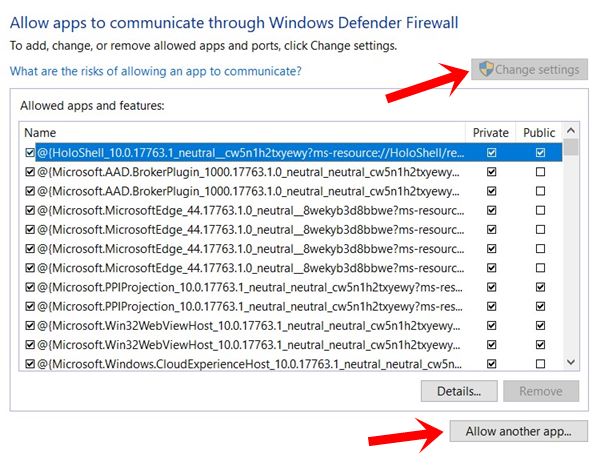
- Find the Zoom app from the list and tick mark both the Public and Private options. If you can’t find the app, then use the Allow another app button and navigate to the Zoom installation directory. Then select the app from there.
- When that is done, click on OK and restart your PC. See if it fixes the Zoom network issues or not. If the latter is the case, then try out the second fix given below.
Fix 2: Disable Virus Protection
The below steps are for the Windows in-built antivirus program. if you use any other third-party software, then you will have to find out the Disable option in that antivirus app.
- Head over to the Windows Security page.
- Click on Virus and Threat Protection from the left menu bar.
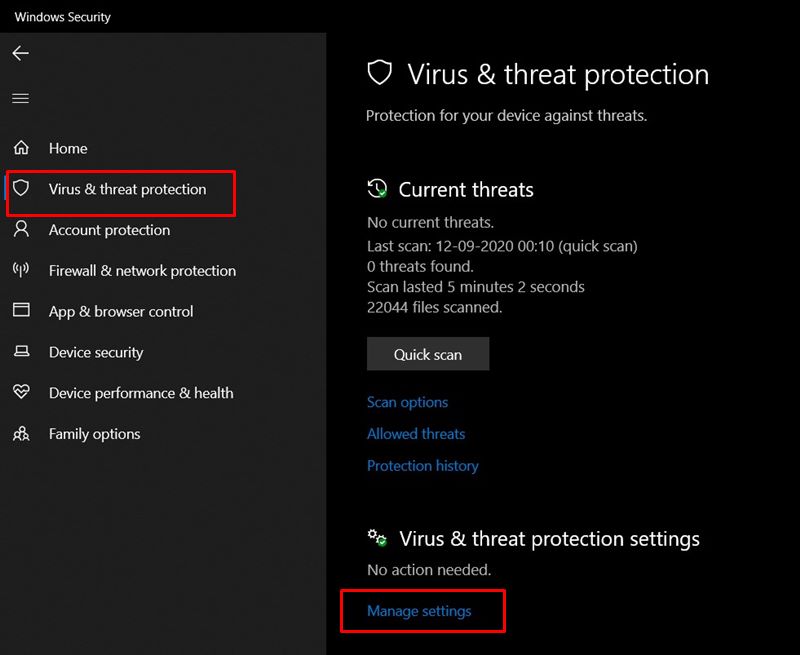
- Scroll to the Virus & threat protection settings and click on Manage Settings.
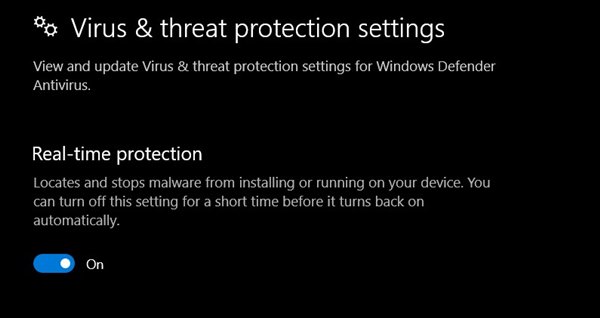
- Disable the Real-time protection toggle. Now launch the Zoom app and the network error would have fixed.
Let’s now check out some of the other common Zoom problems, their error codes, and fixes.
XmppDll.Dll Is Missing
This error is usually shown when the installation is aborted in between or gets corrupted. As a result, the XmppDll.Dll didn’t get installed into the required Zoom directory. The fix for this issue is pretty simple. Just head over to the Zoom’s Download Center and download the latest build of the app. Then follow the on-screen instructions to install it. Once that is done, launch the app and you should no longer face the XmppDll.Dll missing error.
Entry Point Not Found
Some users have also reported facing the “Entry Point Not Found” or “The procedure entry point could not be located” error message. As for this error, the issue stems out from the Microsoft Visual C++. Either it isn’t installed on your PC or some of its files are corrupted. In this regard, an install/reinstall of C++ should be able to rectify this issue. So head over to Microsoft Site and download the latest version of Microsoft Visual Studio 2008 Service Pack 1 (Installer).

Then follow the on-screen instructions to install it onto your PC. The Visual Studio will then install the necessary packages and when that is done, launch Zoom. You should no longer be getting the Entry Point Not Found message. With that said, let’s now turn our attention towards some other common Zoom problems, their error codes, and fixes.
There Is No Disk In The Drive
This is among the most confusing error message for a lot of users. When you face this error, then it will read out as “There is no disk in the drive. Please insert a disk into the drive.” In simple terms, it might look like the error has something to do with the absence of a CD in the CD drive. However, that isn’t the case.
This error is shown when Zoom is trying to look out for a file-path that no longer exists on your PC. More often than not, you will get this error while joining or leaving a meeting. Talking about the fix, it has nothing to do with a CD or its Drive. All that you need to do is uninstall the app and then reinstall it and the error should be fixed. Here are the required steps for that.
- Use the Windows+R shortcut key combination to launch the Run dialog box.
- Then type in appwiz.cply to launch the Program and Features page. Scroll to the Zoom app and right-click on it.

- Then select the Uninstall option and wait for the process to finish.
- Once that is done, head over to the Zoom’s Download Center and get your hands on the latest build of the app.
- Follow the on-screen instructions to install it and then launch it. You will no longer get the No Disk in Drive error message.
Zoom Error Code 3000
This error will be shown when you are installing the Zoom app on your PC and the Installer app isn’t able to overwrite an existing file due to a running process. The fix for this error doesn’t require much to do. All that is needed is to uninstall the existing build of the Zoom app and re-install the latest one. Here is how it could be done:
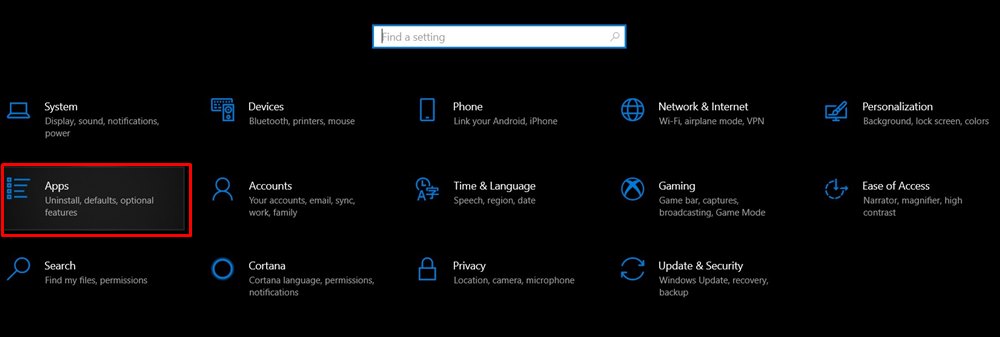
- Use the windows+I shortcut key combination to open the Settings menu.
- Head over to the Apps section and scroll to Zoom. Select it and click on Uninstall.
- Once that is done, reinstall it from Zoom’s Download Center.
- Launch the app and the Error Code 3000 will have been fixed.
On that note, here are some other common Zoom problems, their error codes, and fixes.
Error Code 0, 1002, Or 10006
We have combined all these three error codes under one section as they all occur when you are updating the Zoom app. It could happen because the link for the Zoom installer is broken. In some cases, the Antivirus software could also quarantine the files that you have downloaded by the Zoom installer.
Furthermore, Error Code 0 could also be displayed when you are upgrading from Version 0.9 or 1.0. Along the same lines, the Error Code 10006 could be shown when the target directory is full. In other words, if the installation directory that you have provided to the Zoom Installer doesn’t have the required space. Here are all the required fixes for all these three error codes.
Fix 1: Free Up Space
You could change the directory of Zoom installation to the disk that has free space. If it’s not feasible, then consider freeing up space of your prefered installation directory. Search for and delete all the unnecessary and redundant files, caches, and cookies from the required drive. In this case, our detailed guide on How to Free Up Drive Space on Windows 10 will come in handy.
Fix 2: Reinstall the App
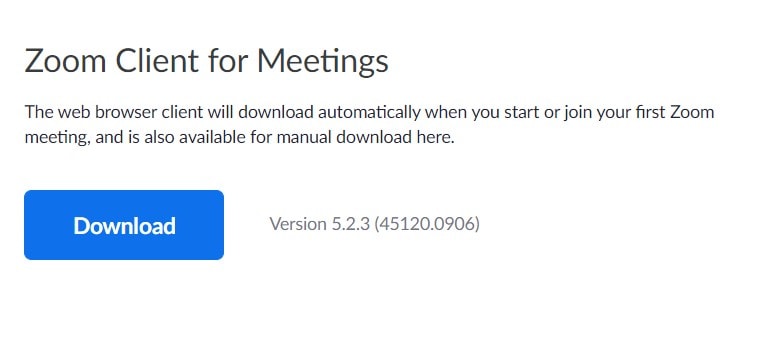
You could also consider uninstalling the app and then reinstalling it. So head over to the Settings page, go to the Apps section, and search for Zoom. Select in and hit the Uninstall button. Then go to the Zoom’s Download Center download the latest version and install it onto your PC. Launch it and see if the error has been fixed or not.
Fix 3: Send Ticket to the Support Team
If both the above fixes didn’t give out the desirable results, then you should consider sending the tucket along with the installation details file to the Zoom support team. Here is how it could be done:
- Head over to the Zoom installation directory (default: c:/users/username/AppData/Roaming/Zoom)
- There you will find installer.txt. Attach this file to a ticket on the Zoom Support site
- Follow the steps that the support team instructs.
Let’s now check out other common Zoom problems, their error codes, and fixes.
Error Code 13003
This error code shows up when the Zoom installer isn’t able to get the required permissions to run. In some cases, outdated audio and video drivers might also be the case of this error. Here are the different methods of rectifying this error.
Fix 1: Grant it the Permissions
- To begin with, it is required that you log in with an administrator account.
- When that is done, head over to the Zoom Installer EXE file right-click on it, and select Properties.
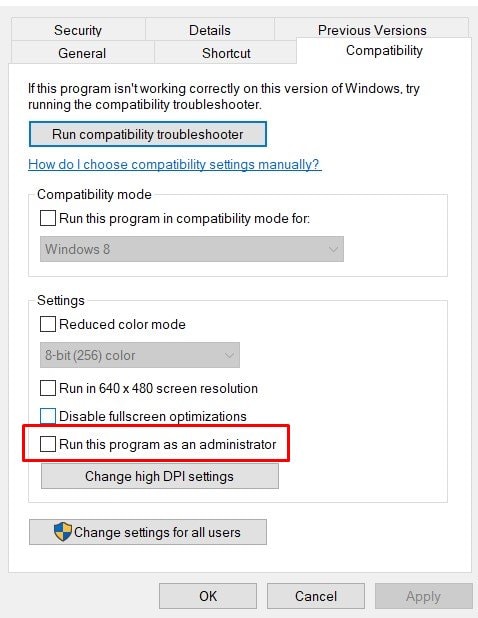
- Then head over to the Compatibility section and tick mark “Run this program as an admin”.
- Click on Appy followed by OK. Then launch the app and see if you can carry on with the installation. If not, then try out the next fix given below.
Fix 2: Update Drivers
Old or outdated graphics or audio drivers might also result in Error Code 13003. So update it right away using the given instructions:
- Right-click on the Windows icon in the taskbar and select Device Manager from the menu that appears.
- Then expand the Audio Input and Output section, right-click on the audio source, and select Update Drivers.
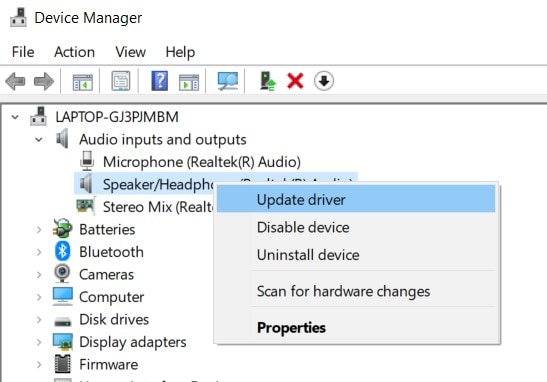
- Click on Search automatically for the updated driver software and wait till Windows find the latest drivers and install it.
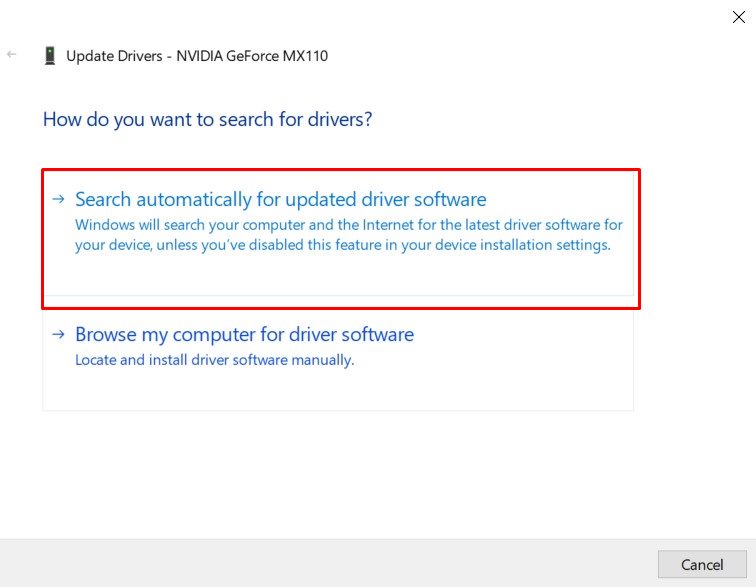
- Along the same lines, click on Display adapters to expand it. Then right-click on your Graphics Drivers and select Update Drivers
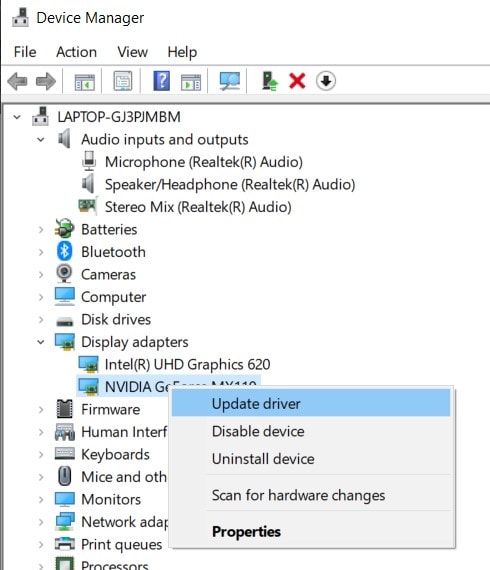
- Take the automatic route as before and wait for the process to complete.
- Once both these drivers are installed, restart your PC. Now launch the Zoom app and the issue should have been fixed with this.
Error Code 2008
This error signifies that the Webinar license has not been applied to the user. Or you might also get this error if the applied license is no longer valid on the account. The accompanying error message reads out as “The meeting has an unexpected error.” To fix this issue, you will have to visit the User Management as an account owner or admin. Then assign the required webinar license to the user and the issue will be fixed.
With this, we conclude the guide on common Zoom problems, their error codes, and their potential fixes. If you still have any queries, do let us know in the comments section below. Rounding off, here are some iPhone Tips and Tricks, PC tips and tricks, and Android Tips and Trick that deserve your attention as well.
