A cache is a temporary file that enhances the speed of the 2application to fetch data from the system’s memory. In other words, the Cache is remembering the output and the process every time we do any task on our system to increase the speed. Almost every system has dedicated memory for the temporary file, but sometimes it takes a huge amount of memory that impacts our system performance.
A cache is sometimes handy for completing the task faster than before. Still, sometimes it will show outdated information, consuming huge storage and slowing down the system’s performance. Also, there is no harm in deleting the display cache from your system, and it will take a few minutes to delete all the display cache files and clear all temporary bugs. So here we know some different ways to delete the Display cache in Windows 11.
Also Read
How to Fix Scanner Not Working Issue on Windows 11
How to Fix If Alt+Tab Shortcut Not Working on Windows 11
Fix: Windows 11 Context Menu Is Slow, Missing Item, and Not Working
Fix: Windows 11 Multi Display Not Working
Fix: Mouse Scroll Wheel Jumps Up and Down on Windows 10, 11
Fix: Windows 11 Won’t Wake Up From Sleep With Keyboard or Mouse
How to Enable New CoPilot AI in Windows 11 23493

Page Contents
How to Delete Display Cache in Windows 11
Display Cache is used to remember all display-related data whenever we connect single or multiple external displays in our system, like display resolution and other modes. It saves time to apply the display settings again and enhance the performance. But sometimes, if the external display may not work or any settings-related issue, we have to reset or delete the display cache in Windows 11.
For example, if the external or the main display takes time to open any file, folder, or web page, it is clear that some of the display cache files get corrupted or outdated. So we have to delete the display cache files from OS to fix the issue. But before deleting the display cache, you have to log in to the account as an administrator in Windows 11.
Clear Display Cache in Windows 11
- Open Run application from the Start menu or press the Window + r key.
- Now type or paste Regedit and then press Enter key to open the registry application.
- Next, click on Yes on the User Acess Control tab to authenticate.
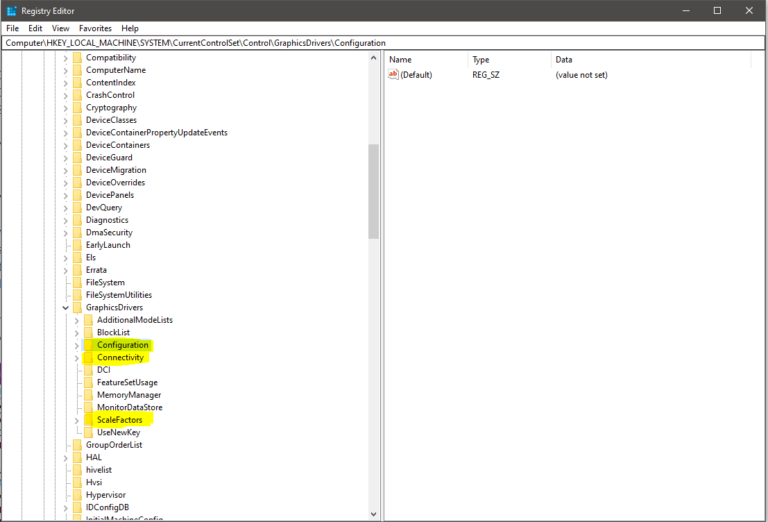
- Then navigate to the below path.
HKEY_LOCAL_MACHINE\SYSTEM\CurrentControlSet\Control\GraphicsDrivers\
- After that, go and right-click on the Configuration option and select delete to clear or reset the Display cache.

- Repeat the above task for the Connectivity and ScaleFactors tab and restart the system to apply changes.
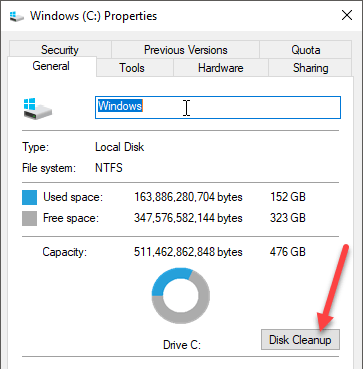
Perform Disk Cleanup
- Open Disk Cleanup from the Start Menu by searching Disk Cleanup in the search box.

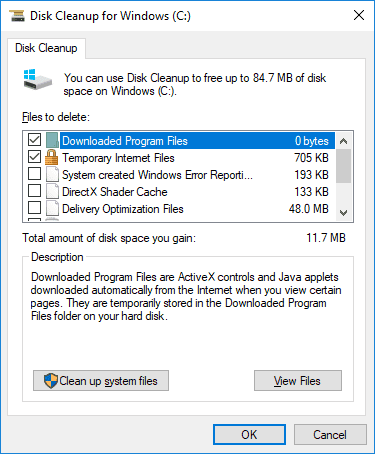
- Now select the C Drive, then select Ok.

- After that, click on the check box in front of Temporary files and click on OK to confirm.
Conclusion
Here are some solutions for any issue with your primary or external display. Then you can follow the above step to fix the issue. We hope you can now delete the display cache and treat the other display as new. Apart from that, deleting the cache file from your system is an important task that should be repeated every fifteen days to keep your system healthy and enhance performance.
Also Read
