Magisk is a tool for Android smartphones, and it is the best alternative to Chainfire’s SuperSU. In this post, we will show you how to install Magisk and root your Galaxy S10, S10E, and S10 Plus.
At this moment, Google enforces all the smartphones running Android 9 Pie to use system-as-root as part of the so-called Project Treble. More recently, Samsung added its own touch over the implementation. Now, Samsung uses the A-only system-as-root setup. That means the boot image possesses only the kernel binary without the ramdisk. That also indicates that we can just install Magisk on the recovery partition.
Before installing Magisk on Samsung Galaxy S10 smartphones, you should note that Magisk will trip Knox, and, when installing it for the first time, you’ll have to perform a full data wipe. Accordingly, you should backup your data before installing Magisk. Also, you’ll have to unlock the bootloader on your device.
Undoubtedly, it sounds difficult, but if you follow the instruction we present to you below, you’ll install Magisk and root your Galaxy S10, S10E, and S10 Plus without any problems.
Also Read
Page Contents
How to Install Magisk and Root Your Galaxy S10, S10E and S10 Plus
Unlock bootloader
Usually, unlocking bootloader is not an operation that can be revealed. However, here are some useful tips you will need to follow to unlock bootloader:
- Enable bootloader unlocking in the Developer options -> OEM Unlocking section
- Turn off your Samsung Galaxy S10 device, then press and hold the Volume Down and Bixby buttons, and connect your smartphone to a computer to allow it to enter Download Mode
- Press and hold Volume Up key to unlock bootloader – the operation will wipe all the data on your device
- Once the task ends, the smartphone will reboot
Also Read
Install Magisk
- Download Magisk firmware for your smartphone
- Unzip the file and copy the AP tar file to your device
- Go to Canary Channels and download and install Magisk Manager on your Galaxy S10, S10E, or S10 Plus
- Go to Magisk Manager -> Install -> Install -> Select and Patch a File
- Then, select the AP tar file you’ve copied on your device – Magisk Manager will patch the firmware file and place it in [Internal Storage]/Download/magisk_patched.tar
- Copy the tar file to a computer and put your Samsung Galaxy S10 into Download Mode
- Flash the file as an AP in ODIN (remember to disable Auto Reboot option in ODIN)
And that’s is how to install Magisk on Galaxy S10, S10E, and S10 Plus. However, there are some more steps you have to follow to use your smartphone with Magisk as usual:
- Once Magisk is flashed on your device, go to Recovery Mode and perform a factory reset – press Volume Down and Power keys to exit Download Mode and once the device is off, press and hold Power, Bixby, and Volume Up keys to force your device to boot to the recovery partition
- Continue by pressing Volume Up until the stock recovery screen appears
- In that menu, go to “Wipe Cache / Factory Reset” and select Factory Reset and confirm your selection
- Now, you can boot to the system partition with Magisk – choose Reboot Now, and then immediately press and hold Power, Bixby, and Volume Up keys and release them once the bootloader warning screen appears to allow the device to boot to the system
- When the device boots for the first time after Magisk installation, the smartphone will reboot automatically, so, don’t worry, is normal
How to replace recovery with TWRP Recovery on Patched AP tar file?
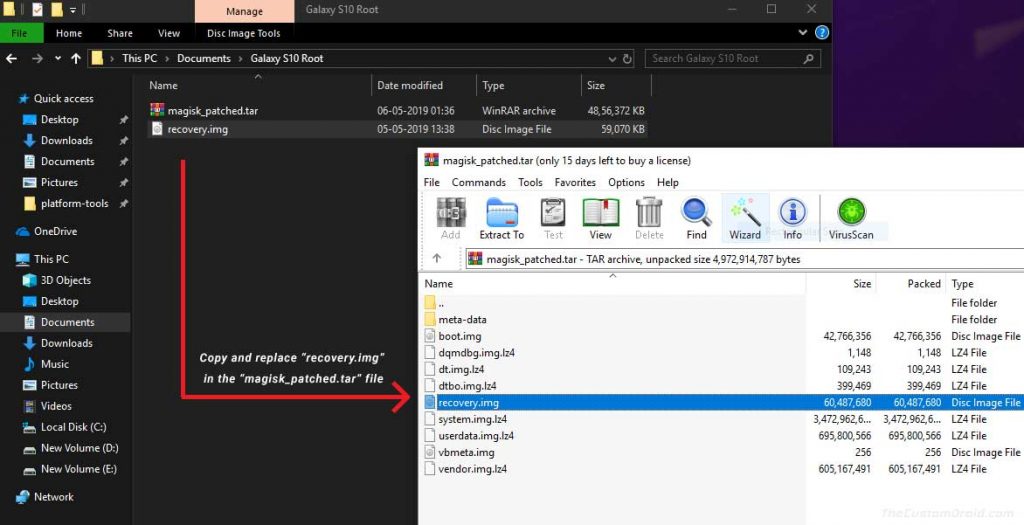
- If you want to install TWRP Recovery on your Galaxy S10 series, then move the TWRP recovery image to Magisk Patched AP tar file.
- Open the tar file and then replace the recovery image file with TWRP Recovery image file like shown in the image below.

Credits to thecustomdroid.com - That’s it! you have successfully replaced the file and you can repeat the step from 7 in the install Magisk.
Set up Magisk
Once Magisk is up and running on your Galaxy S10, S10E, and S10 Plus, you’ll have to perform the initial Magisk setup. The next step will show you everything you’ll need (just remember to activate the Internet connection on your smartphone):
- Magisk Manager will appear in your app drawer, but if it’s not there, you can manually install it via the APK file that you’ve downloaded earlier
- Then, the app will ask you to do some extra set up – follow the on-screen instructions and allow Magisk Manager to do its job
- Once the app finishes the setup, the device will reboot
And that’s everything you have to know about how to install Magisk on Galaxy S10, S10E, and S10 Plus.
