In this tutorial, we will show you how to install TWRP Recovery on Samsung Galaxy S20, S20+, or S20 Ultra (Exynos). The flagships from Samsung have set up the bar for others to follow. All these three devices boast some of the most impressive specs sheets. If we talk about the Ultra variant, it has a huge 6.9-inch screen with 1440 x 3200-pixel resolution, with a 120Hz refresh rate. Under the hood, the Global variant has Exynos 990 chipset, while the USA build comes with Qualcomm SM8250 Snapdragon 865.
The former has a Mali-G77 MP11 GPU, while the latter comes with Adreno 650. Furthermore, it comes in three different variants, with the top-end coming in 512GB 16GB RAM. Then there is a quad 108+48+12+0.3MP rear camera setup followed by a 40MP front-facing camera. Having an under-display fingerprint, the device beholds a mammoth 5000 mAh battery that supports 45W fast charging and a 15W wireless charging.
Also Read
However, this is just the tip of the iceberg. You could try out a plethora of other tweaks once you step into the custom development. For that, one of the major prerequisites is having a custom recovery like TWRP installed. And in this guide, we will help you achieve just that. With that said, here are the steps to install TWRP Recovery on Samsung Galaxy S20, S20+, or S20 Ultra. Remember that the below steps are only applicable for the Exynos variants of these three devices.

Install TWRP Recovery on Samsung Galaxy S20, S20+, or S20 Ultra (Exynos)
TWRP is a custom recovery that provides the user with a plenitude of options that one couldn’t carry on with a stock recovery. These include the ability to flash ZIP and IMG files, flash custom ROMs, or even flash Magisk ZIP files for root. You could also take a complete Nandroid Backup and restore it as and when required along the same lines. It also provides a handy platform to wipe off the device partitions. Likewise, for the advanced users, they could use the Fix Recovery Bootloop, Terminal Command, among other functionalities.
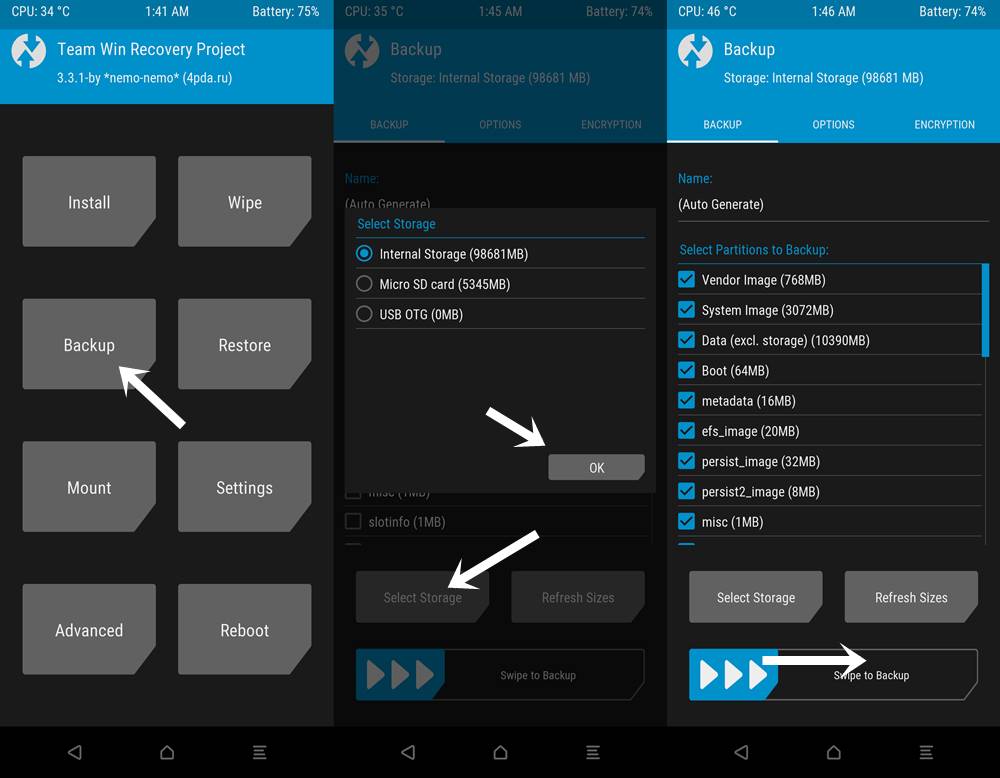
You could also use the Mount functionality of the recovery to connect external USB drives via OTG cable. So with such a long list of advantages, there are no brownie points in guessing why people are looking to install the TWRP Recovery on Samsung Galaxy S20, S20+, or S20 Ultra (Exynos). And in this guide, we will help you with just that. But before we list out the steps to flash the TWRP recovery, there are a few important points worth discussing. Make sure you go through each one of them and then only proceed with the installation steps.
Points to keep in mind
- You could only flash this TWRP on the Global variants of Galaxy S20, S20+, or S20 Ultra with Exynos 990 chipset. The US and Canadian variants of these devices that come with the Qualcomm Snapdragon 865 chipset don’t support this TWRP.
- Furthermore, the process will also trip the KNOX warranty and hence will void the device warranty.
- Also, subsequent OTA updates will be disabled.
- Another thing to keep in mind is that you will have to disable encryption as well. For that, you will have to wipe the data partition. This will wipe off all the data on your device.
- MTP is also broken in this initial TWRP build; however, you could still disable MTP in TWRP Mount settings and then use ADB to transfer files to and from your PC.
- Although the TWRP build is stable, yet it is an unofficial one.
These all the important points that were needed to be discussed. You could now proceed with the instructions to install TWRP Recovery on Samsung Galaxy S20, S20+, or S20 Ultra (Exynos).
Warning
Prerequisites
- Create a complete device backup as the unlocking and flashing process will wipe off all the data on your device.
- Download the S20/S20+/S20 Ultra (Exynos variants) TWRP Recovery from the below link. We want to thank XDA Senior Member geiti94 for this recovery: Download TWRP Recovery.
- Download the Encryption Disabler ZIP file.
- You could also download the Magisk Installer ZIP file if you wish to root your device.
- Also, download and install the Odin Flash Tool on your PC. This will be needed to flash TWRP Recovery on your S20 device.
Steps to Flash TWRP on Galaxy S20, S20+, or S20 Ultra (Exynos)
The below instructions are broken down into separate sections for ease of understanding. Follow the same sequence as mentioned.
STEP 1: Enable OEM Unlocking
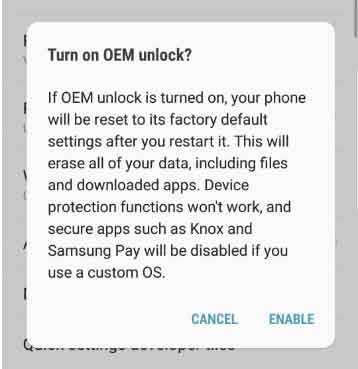 To begin with, you will have to enable OEM Unlocking. For that, head over to Settings > About Phone > Tap on Build Number 7 times > Go back to Settings > System > Advanced > Developer Options > Enable OEM Unlocking. Or refer to our detailed guide on USB Debugging for the detailed instructions on the said topic.
STEP 2: Boot to Download Mode
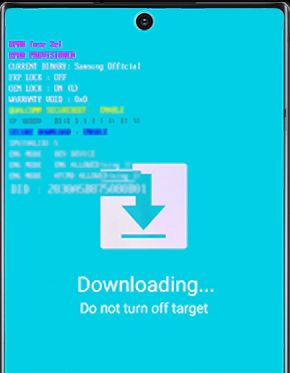
Now power off your device and boot it to Download Mode. For that, make use of the Power + Vol Down buttons and plug in your device to a USB cable, which in turn should be connected to the PC. You could also make use of our detailed guide to Boot into Download mode on Galaxy S20 (Plus) and S20 Ultra.
STEP 3: Unlock Bootloader
Once your device is booted to Download Mode, you will see the option to long-press the Volume Up option for unlocking the bootloader. So use the Vol Up key to begin the unlocking process, which will also wipe off all the data from your device. On that note, you could also check out our guide on How to unlock the bootloader on Samsung Galaxy Phones.
When that is done, boot up your device and connect it to the internet. No need to set it up with your Google account, as we will again have to wipe off all the data later on.
STEP 4: Install TWRP Via ODIN
Again, boot your device to the Download Mode and connect it to the PC via USB cable. Then launch the ODIN Tool as an administrator on your PC. You will now have to add the TWRP Recovery .tar file that you had downloaded earlier. For that, click on the AP button to load it.
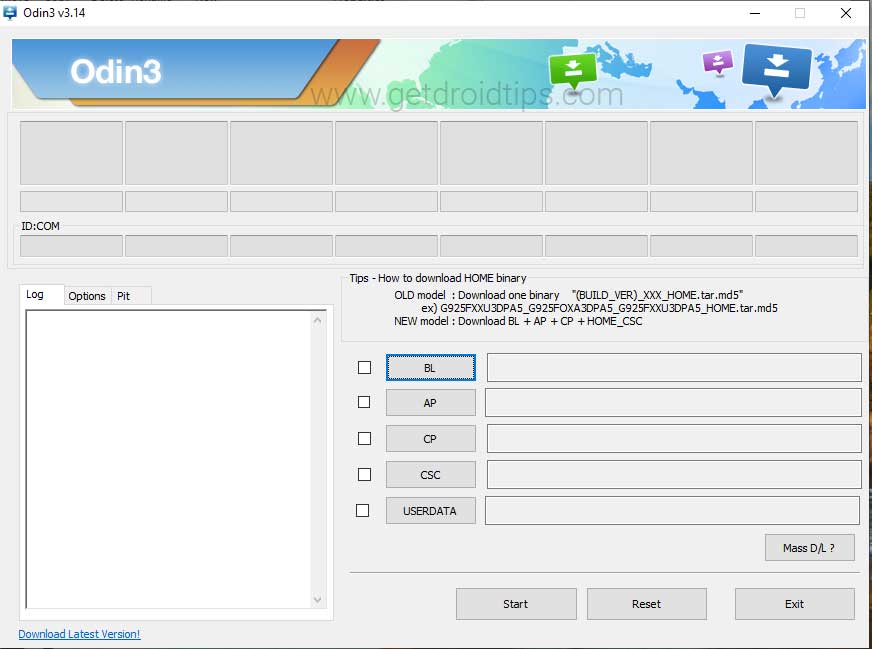
Then click on the Start button to begin with, the flashing part. Also, keep pressing and holding the Vol Up + Power button while Odin is flashing the TWRP Recovery. Do so until your device is booted to the recovery. Once your device boots to TWRP, you may release the buttons.
STEP 5: Disable Encryption
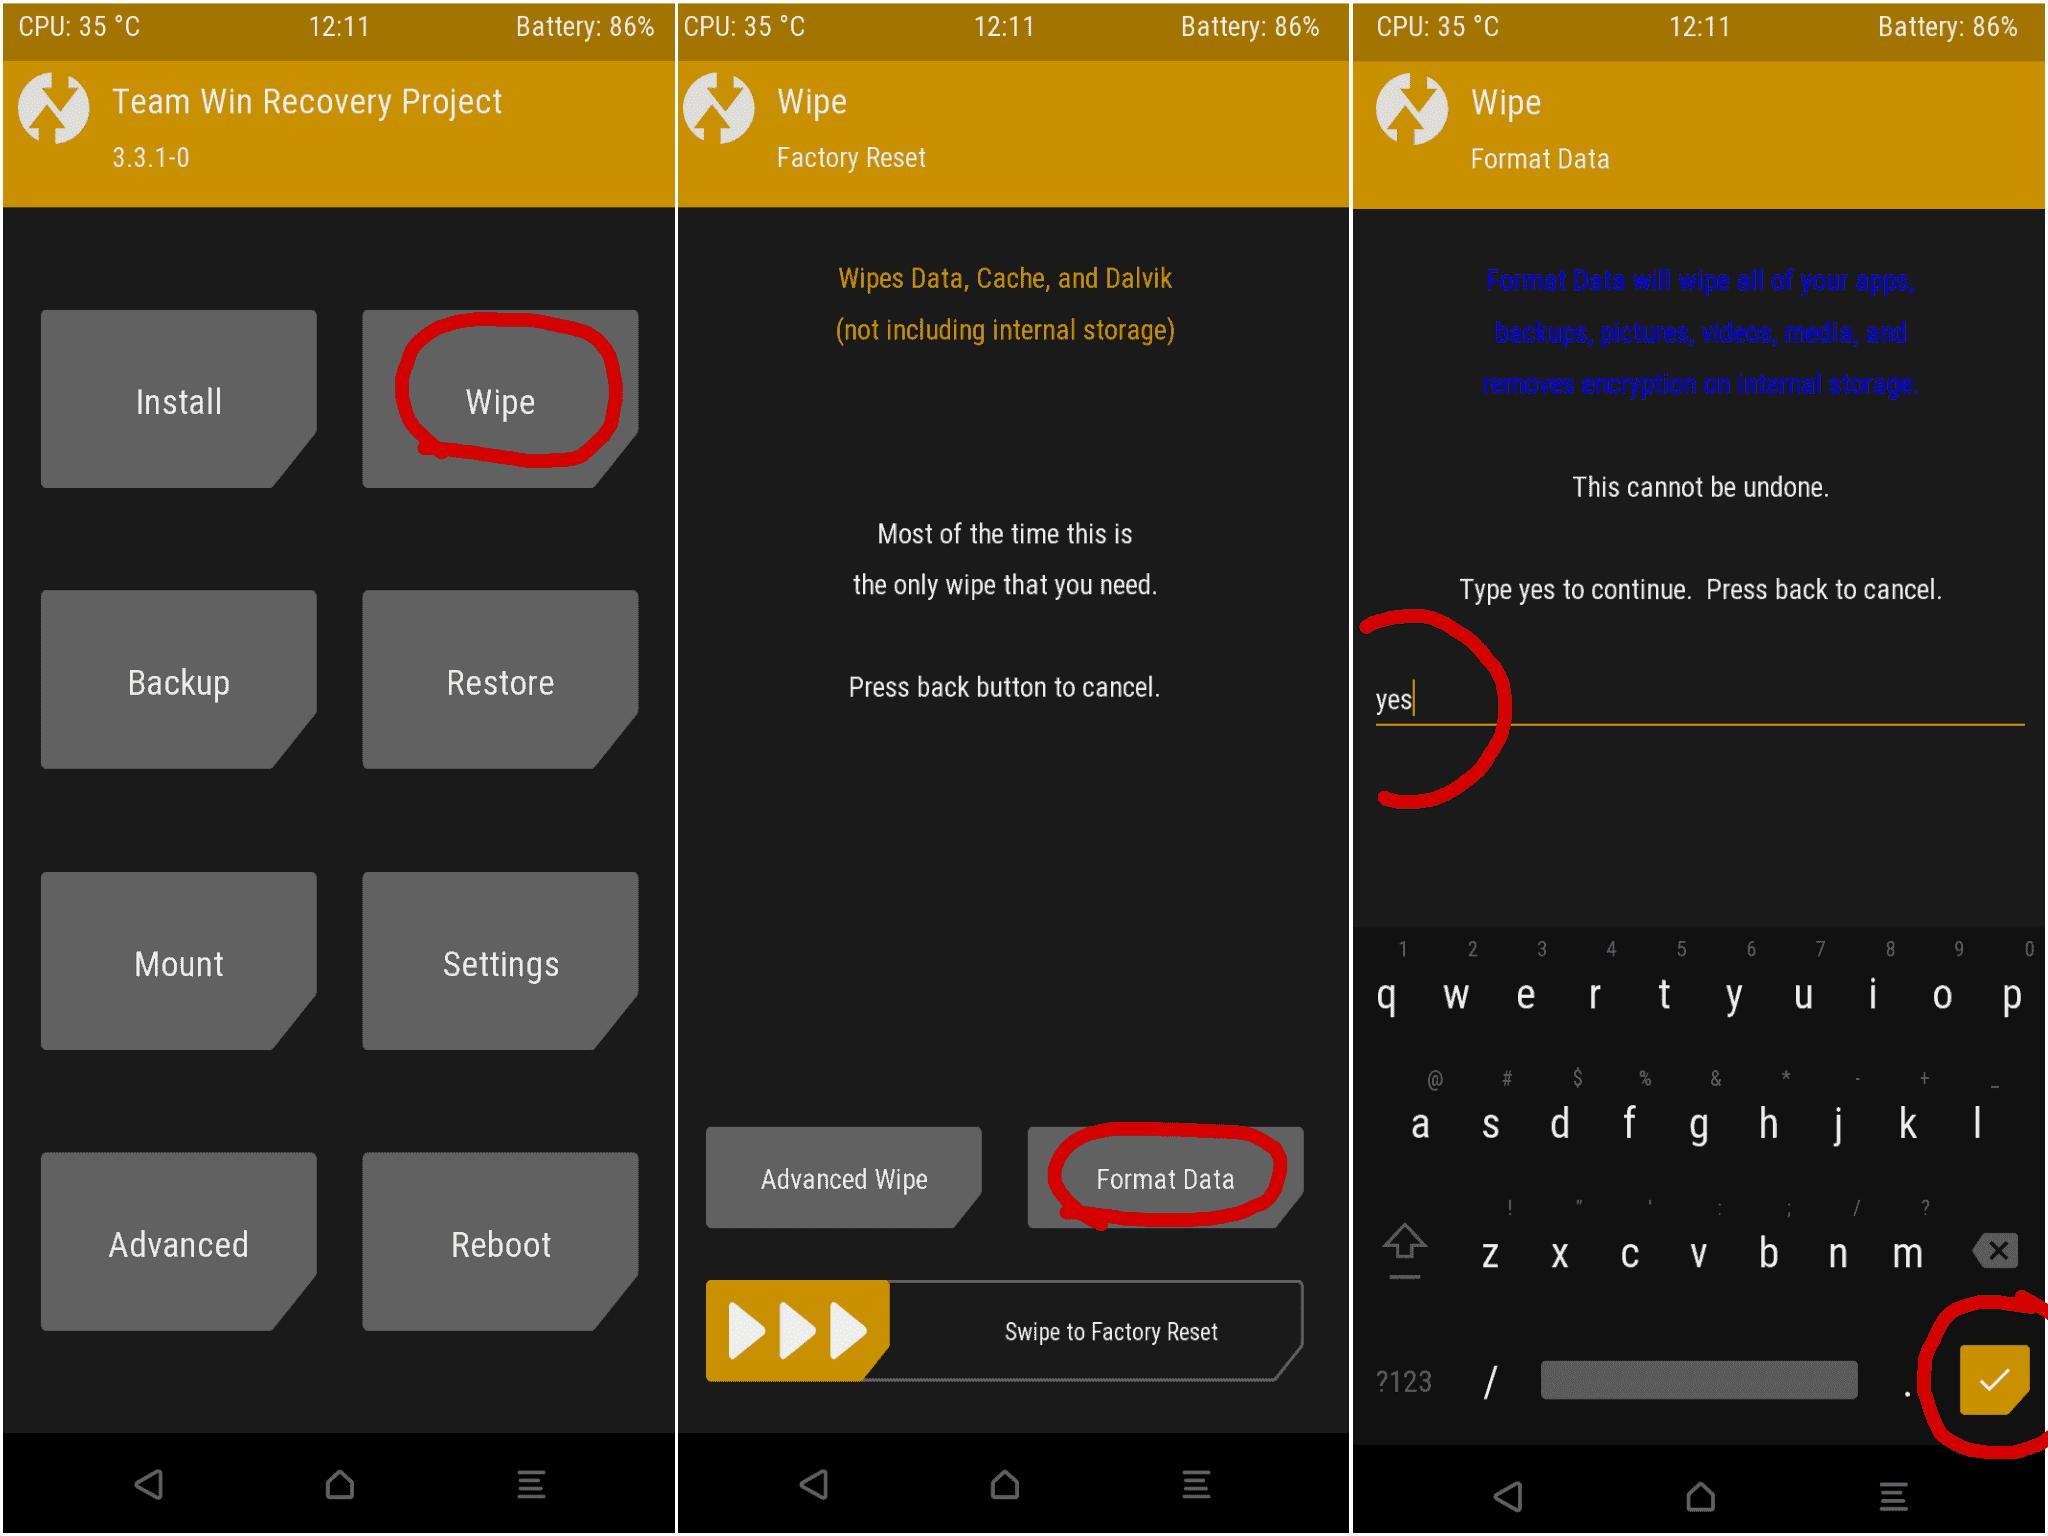
You will now have to disable encryption as well. For that, you will have to format the data partition from TWRP. So, within the TWRP main menu, head over to Wipe and tap on Format Data. In the subsequent field that appears, type in YES and tap on the tick icon situated at the bottom right. The formatting process shall now begin and will be completed within a few minutes. When that is done, you will have to flash the Encryption Disabler ZIP file as well. For that, head over to Install > Select the Encryption Disabler ZIP file and perform a right swipe to flash it.
STEP 6: Install Magisk
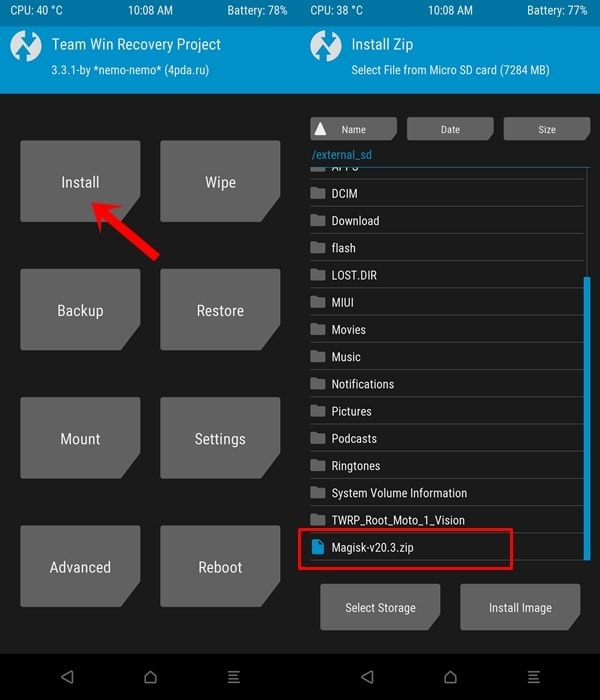
Furthermore, you could also flash the latest Magisk Installer ZIP file if you wish to root your device. For that, head over to Install, select the Magisk ZIP file and perform a right swipe to flash it.
STEP 7: Reboot to Android OS
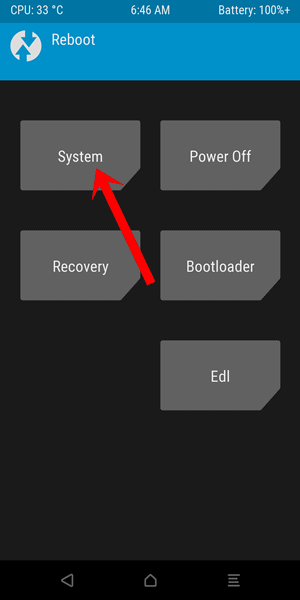
Once that is done, you could reboot your device to System. For that, head over to the Reboot option from the TWRP home screen and tap on System.
That is it. These were the steps to install TWRP Recovery on Samsung Galaxy S20, S20+, or S20 Ultra. As mentioned before, the TWRP build is only for the Exynos variants of these three devices. On that note, if you have any issues concerning the above steps, do let us know in the comments section below. Rounding off, here are some iPhone Tips and Tricks, PC tips and tricks, and Android Tips and Tricks that you should check out as well.
Also Read: Samsung Galaxy S20 Stock Firmware Update

Hi!
There is a little problem with your guide:
It seems you can no longer download “Encryption Disabler ZIP file.”
Tried it with 3 Browsers and a smartphone but always got an error message.
Perhaps you can reupload the zip file?
Would be great!