In this tutorial, we will be listing the instructions to create and restore Nandroid backup on TWRP supported device. The Android ecosystem beholds a plentitude of options at hand. Thanks to its open-source nature, the possibilities are endless. By default, every manufacturer ships the device with a locked bootloader to stop the users from tweaking the device’s OS.
However, there are many tech enthusiasts who go a step ahead and explore the unhidden territory. All that is needed is an unlocked bootloader. After that, you could install many different types of custom ROMS, flash a custom recovery like TWRP, root your device via Magisk or try tons of modules or frameworks.
But every side has two coins. And same is the case with the above-mentioned tweaks. Making direct changes to the device’s system partition and the root directory is always risk-taking. Just a slight error and you might end up in a boot loop or even worse, a bricked device. In a normal scenario, you could easily use the backup and restore option that’s baked into your device. However, if your device doesn’t even boot up, then all these features will be of no use.
Then what else could be done? Well, there is exists a pretty easy method to deal with such cases. You could easily create an entire device backup, including data, boot and even the EFS partition (that holds your IMEI), right from the TWRP recovery itself. Let’s check out the concerned steps.

Page Contents
How to Create and Restore Nandroid Backup on any TWRP Supported Device
The backup created by TWRP is known as the Nandroid Backup. The best part about this backup is the fact that even if your device doesn’t boot to the system, even then access this backup and restore functionality could be accessed. If you wish to do the same, then there are a couple of prerequisites that need to be met.
First off, your device should have an unlocked bootloader. Likewise, there should be a working TWRP recovery installed on your device. Apart from that, make sure that you are having a considerable amount of free storage on your device. With that said, here are the required instructions to create a Nandroid backup using TWRP Recovery.
How to Create a Nandroid Backup via TWRP Recovery
- So start by booting your device to TWRP Recovery. Either use the hardware key combinations for your device or use the below ADB Commands. For the latter, open the command prompt window inside the platform tool folder (part of Android SDK and Platform Tools). Then connect your device to PC via USB (with USB Debugging enabled) and enter the below command:
adb reboot recovery
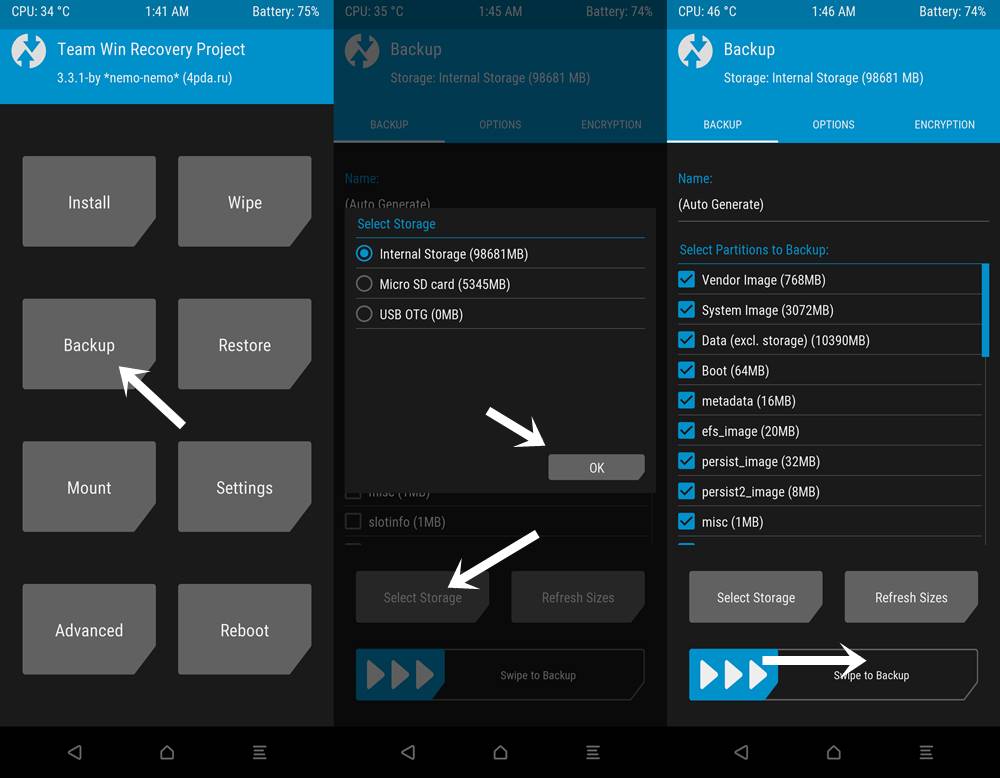
- Inside the TWRP Recovery, tap on the Backup option.
- Next, select the partitions to backup. It is highly recommended to select all the available partitions. Although the Data partition will be quite heavy, yet it holds the data of all the system and preinstalled apps. Therefore, it is advisable to select that as well.
- You could also change the backup location. By default, Internal Storage is selected. To change it, tap on the Select Storage option and choose Micro SD Card or USB OTG (if supported).

- If you wish, you could also change the name of the backup that is about to be created. just tap on the Auto-generate keyword right below the Name field and enter the desired name.
- So with all the partitions selected, perform a right swipe on the Swipe to Backup button situated at the bottom. You will now have to wait for quite some time, depending on the size of the partitions, the backup process might take some time (especially the Data partition takes a lot of time).
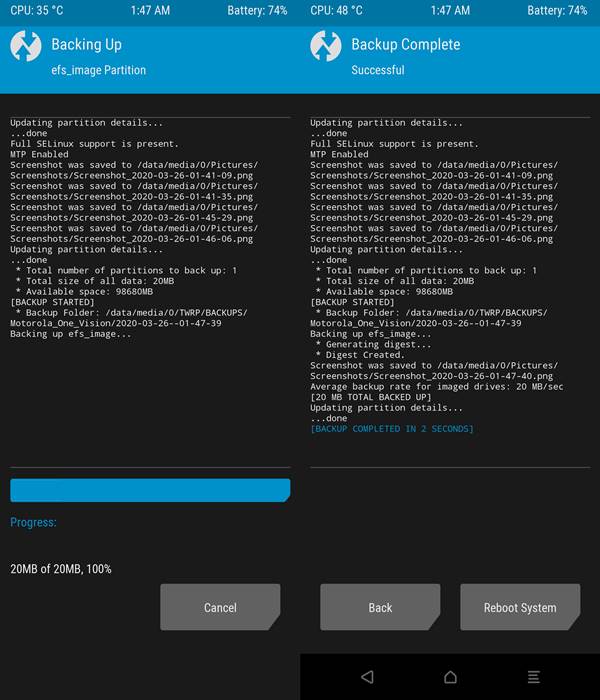
- Once done, you could see the <Backup completed in x seconds> message. After that, you could now boot your device back to System.

Nandroid Backup in Process
So these were all the required steps to create a Nandroid backup via TWRP Recovery. It is highly recommended to make a copy of this backup on the SD Card or in a pen drive (if you have a USB OTG cable). This is because if your device ends up in a boot loop or gets bricked, it might be quite difficult to access the internal storage and hence the backup.
Restore Nandroid Backup via TWRP
Now that the backup has been successfully created, let’s check out the steps to restore this Nandroid backup via TWRP recovery.
- First off, boot your device to TWRP recovery via hardware key combinations. Or you could also enter into the fastboot mode, then use the Volume key to bring about the Fastboot option and Power key to confirm the selection.
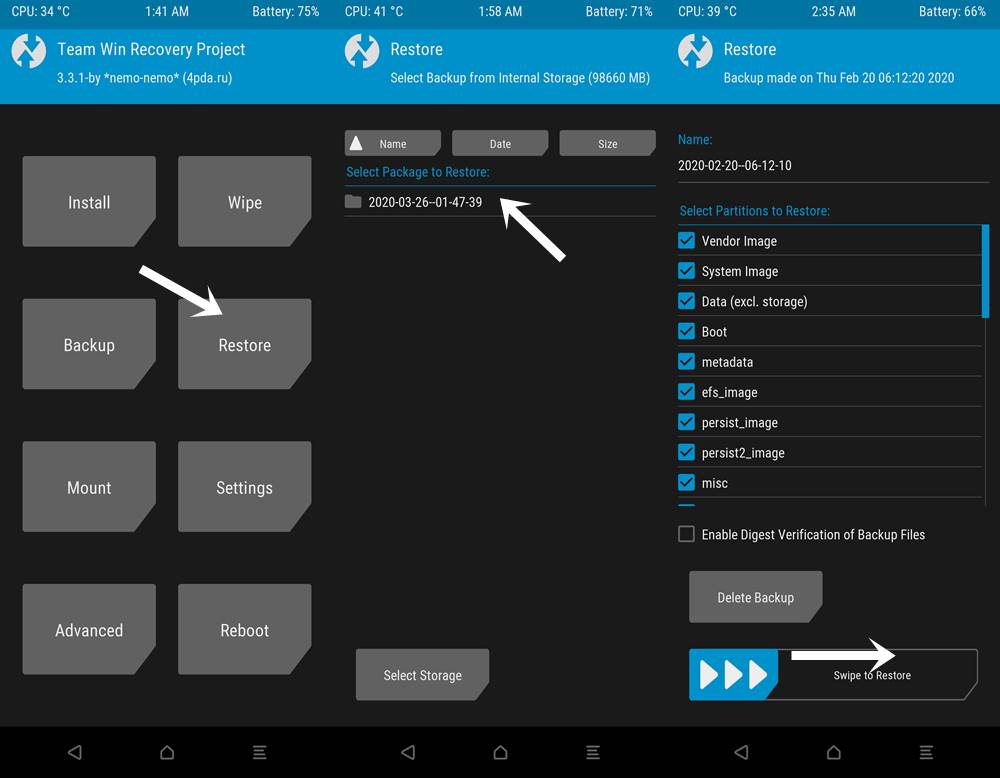
- Inside the TWRP Recovery, tap on Restore. Under Select Package to Restore, choose your desired backup. If the backup is placed in SD Card or USB, tap on Select Storage and select the desired storage.

- Now make sure that all the partitions have been selected for restoration. Once done, just perform a right swipe on the Swipe to Restore option and wait for some time.
- This Nandroid Restore via TWRP recovery will also take some time to complete. Once it does, you could now boot your device back to System.
Conclusion
With the above steps, you have now successfully learned to create and restore the Nandroid backup created via TWRP Recovery. So as soon you unlock the device bootloader and install TWRP, creating a Nandroid backup should be on top of your bucket list. Anytime you end up in a boot loop or brocked device, just follow the above steps to restore the Nandroid backup and make your device working again!

It worked!!!
Nice