In this tutorial, we will outline the steps to take a complete backup of your stock or custom ROM using TWRP Recovery. One of the biggest perks of having an open-source OS like Android spells out to be the ocean of customizations. The everyday users head over to the Play Store and try out different types of themes, icon packs, and custom launchers. But to be fair, this is just the tip of the iceberg. There exist a plethora of other advanced functionalities that could be carried out on your device.
There is just a single restriction put in place by your smartphone manufacturer, and that is a locked bootloader. Once you have bypassed this restriction, you have literally opened the gates to the plentitude of customizations. For example, you could install an altogether new OS based on Android in the form of Custom ROMs. Similarly, the ability to flash ZIPs, IMGs, and other such files also become a possibility. Not to forget the tons of Magisk Modules, Xposed Frameworks, and Substratum Themes, and you are in for a treat.
Likewise, you also get in a position to gain administrative privileges and carry out system-level modifications. This is made possible by rooting your device Magisk. But while all these do sound good on paper, there are quite a few risks associated with these customizations. The risks of things going south and your device getting end up in a bootloop or bricked state is always there. Therefore before you embark on this journey, first and foremost you need to have a complete backup of your stock or custom ROM using TWRP Recovery. In this guide, we will help you achieve just that. Without any further ado, here are the required instructions set.

Page Contents
The Need for a TWRP Backup of Custom/Stock ROM
Every Android device comes with a Backup and Restore functionality baked inside the Settings menu. So why would one need to take a slightly complicated route of a backup via a custom recovery? Well, there exists a plethora of reasons why you should go for the TWRP backup rather than the default device backup. To begin with, the latter simply creates a backup of data and some device settings, and that is it. The TWRP backup on the other hand makes a backup of all the partitions of the device.

These include the Vendor Image, System Image, Data, Boot, Meta Data, EFS, Persists, Misc, and other such partitions. All in all, the backup created by TWRP is an entire device backup, including every bit of data. There is another and a more important reason as to why one should create a backup via TWRP Recovery and not the stock option. The biggest issue with the later is that you could only access this backup and restore feature when your device is in proper working condition.
Unfortunately, that isn’t always the case. More often than not, while carrying out the aforementioned tweaks, there exists a high chance of your device getting bricked or in a bootloop state. If that happens, the stock backup feature will be of no use whatsoever. However, if you could access the TWRP Recovery, then you could easily access the backup created via it and hence restore the same with ease. It is due to all these reasons that users straight away go for the TWRP backup, whether they are on a stock ROM or custom ROM.
How to Backup Complete Stock or Custom ROM using TWRP Recovery
So now that you are aware of the advantages of the TWRP backup, here are the required instructions on how to create the same. The feature is known as a Nandroid Backup and the steps are the same for creating a custom ROM or a stock ROM backup are the same. There are just a few requirements that your device needs to qualify. Once your device meets these criteria, you could proceed with the instruction steps.
Requirements:
- First and foremost, your device’s bootloader should be unlocked. You could refer to our guide on how to unlock bootloader on any Android device via Fastboot.
- Likewise, it should also have the TWRP Recovery installed. If that is not the case, refer to our guide on how to install TWRP Recovery on any Android device.
That’s it. Now proceed with the steps to backup complete stock or custom ROM using TWRP Recovery. Just make sure your device currently has the said OS installed of which you are about to take a backup.
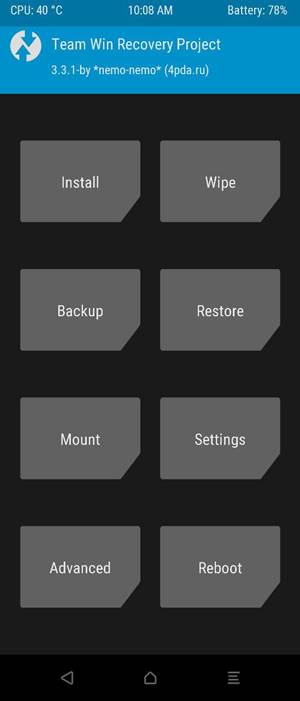
Step 1: Boot your device to TWRP Recovery
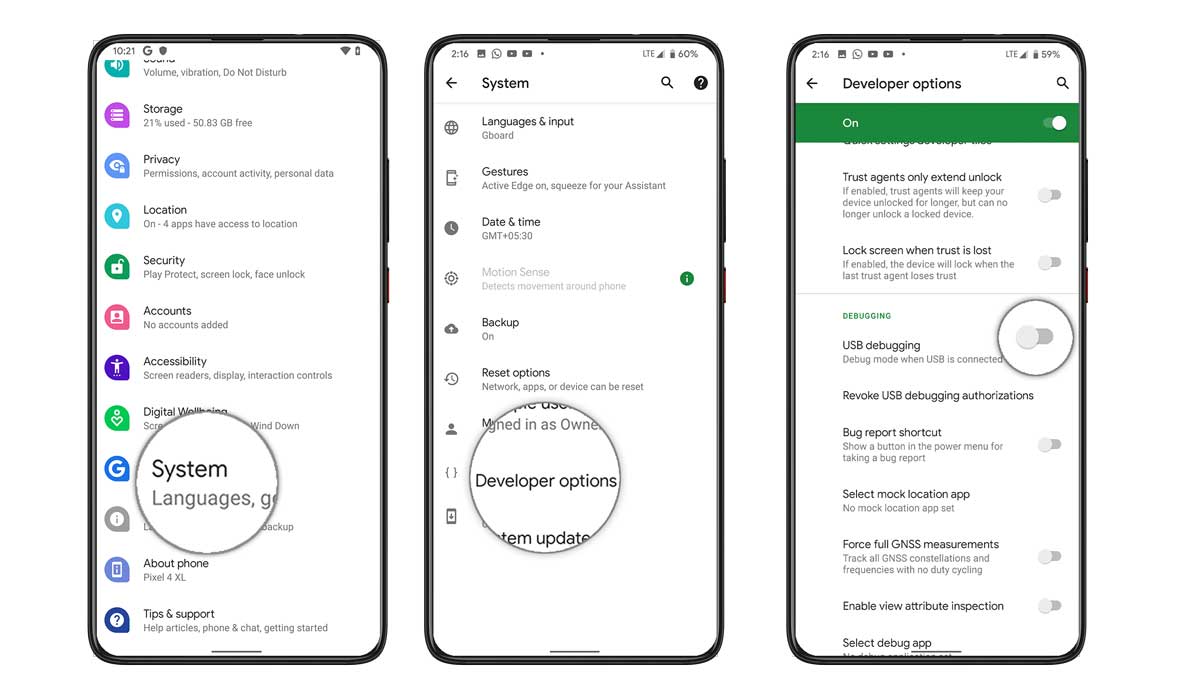
- To begin with, you will have to boot your device to TWRP recovery. If you know the hardware key combinations for the same well and good. If not, there are a few more requirements that you should meet. First off, enable the USB Debugging on your device. For that, head over to Settings > About Phone > tap on Build Number 7 Times > Go back to Settings > System > Advanced > Developer Options > Enable the USB Debugging Toggle.

- Next up, download and install the Android SDK Platform Tools on your PC.
- Now connect your device to PC via USB Cable.
- Head over to the platform-tools folder, type in CMD in the address bar, and hit Enter. This will launch the Command Prompt.
- Execute the below command to boot your device to TWRP Recovery. You might also refer to our detailed guide on How to Boot into Recovery on any Android devices [Stock and Custom]
adb reboot recovery
- Your device should now be booted to the TWRP Recovery. Now proceed with the below steps to create a custom ROM or a stock ROM backup via TWRP Recovery.
Step 2: Creating the TWRP Backup
If you are about to create an entire device backup, including Internal Storage, then you will be needing quite a lot of free storage space. In that regard, you could use a Memory Card or a Pen Drive via OTG cable. If you proceed with the latter, make sure to first mount the Pen Drive onto your device via the TWRP Mount option. You may then proceed with the below steps:
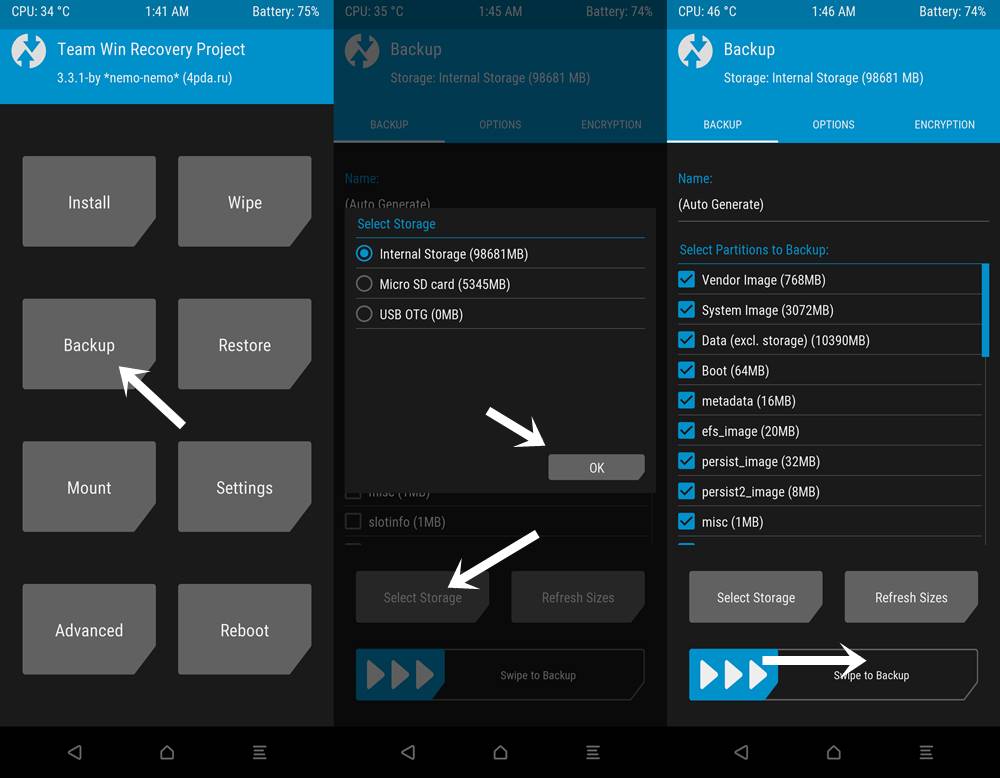
- Inside the TWRP main menu, tap on the Backup option.
- Then tap on Select Storage and select Internal Storage, Micro SD, or USB OTG, as per your need, and hit OK.
- Next up, select the partitions of whom you need to have a backup. it is highly recommended that you select all the partitions. You could also tap on the Auto-Generate keyword and give this backup a name (optional).

- Finally, perform a right swipe over the Swipe to Backup button and wait for the process to finish. The entire process generally takes around 10-15 minutes, depending on the number of partitions you selected and the data inside each of these partitions.
- Once the process has been completed successfully, you should get a <Backup completed in x seconds> message. After this, you could hit the Reboot System to boot your device to OS.
Step 3: Restoring the Backup
As and when you wish to restore this Nandroid backup due to any reason whatsoever, then follow the below steps.
- First of all, boot your device to TWRP Recovery. If you cannot access your device, then you wouldn’t be able to enable USB Debugging and hence execute the adb reboot recovery command. In that case, you will have to boot your device to TWRP Recovery via the hardware key combinations only.
- Once your device is booted to TWRP, connect the storage media that holds the Nandroid backup. If you are using the Pen Drive via OTG cable, make sure to mount it via the Mount option of TWRP.
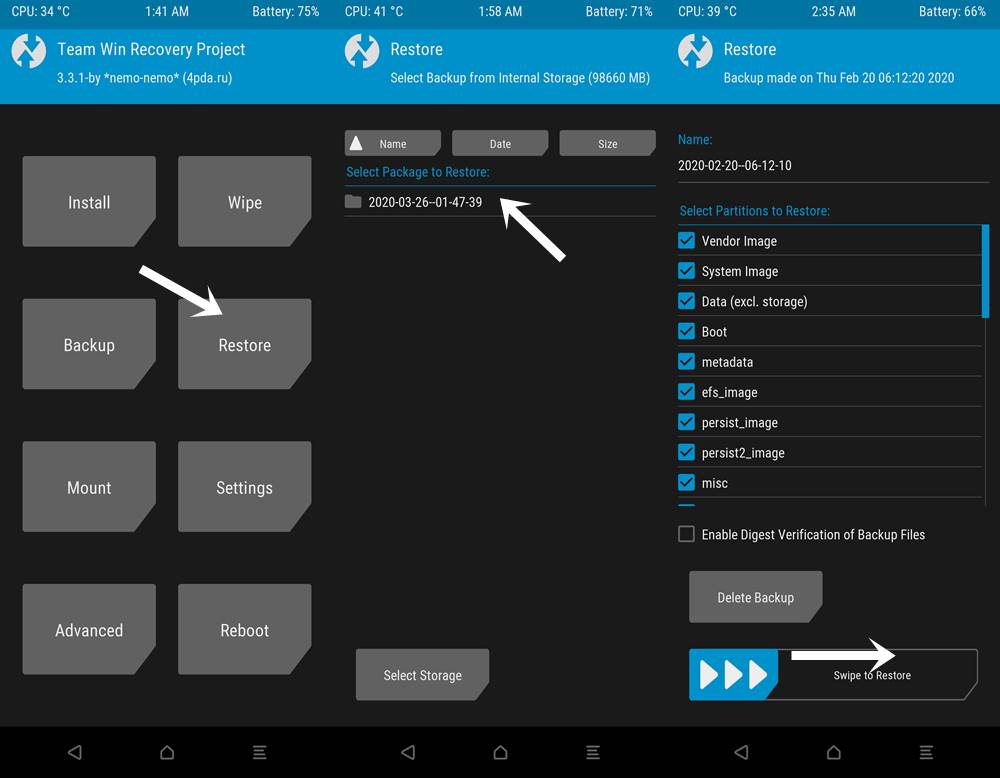
- Next up, head over to the Restore option and tap on the Select storage button situated at the bottom left. Select the storage that holds the backup and hit OK.

- Then select the package name that needs to be restored. Make sure that all the partitions of that package are selected.
- Finally perform a right swipe on the Swipe to Restore button and wait for the process to finish. Again the entire process will take some time, depending on the package size and the partitions that are been restored.
- Once that is done, hit the Reboot System button to reboot your device to the just restored OS.
That is it. These were all the required steps to create a backup of the stock or custom ROM using the TWRP Recovery. We have also outlined the steps to restore this backup as well. If you have any doubts concerning the above steps, do let us know in the comments. Rounding off, here are some iPhone Tips and Tricks, PC tips and tricks, and Android Tips and Trick that you should check out as well.

very useful , thanks
Thank you very much!, btw i am not bot okay