Virtual assistants are very useful tools that help to execute tasks easily. Cortana is a popular assistant on Windows devices. Still, some users may not need it. So, they can disable Cortana on their Windows PC and laptops. Later, if they change their mind, they can re-enable Cortana on their gadgets. I always find such assistant apps really helpful in reminding me of tasks. I even use voice commands to access various apps and folders. In this guide, I have explained three easy ways to enable Cortana back on your device.
Normally, users disable Cortana by making changes in the Windows registry. So, if we remove that then Cortana will be back on the device. Also, by renaming the program via Task Manager we can re-enable Cortana. Another way to re-enable Cortana is by making changes in the Windows component under the Local Group Policy Editor. Though this may sound a bit technical, I assure you that the steps are pretty simple. Let’s check all the methods out.

Page Contents
Re-Enable Cortana after Disabling it
First, you can try to rename the program path.
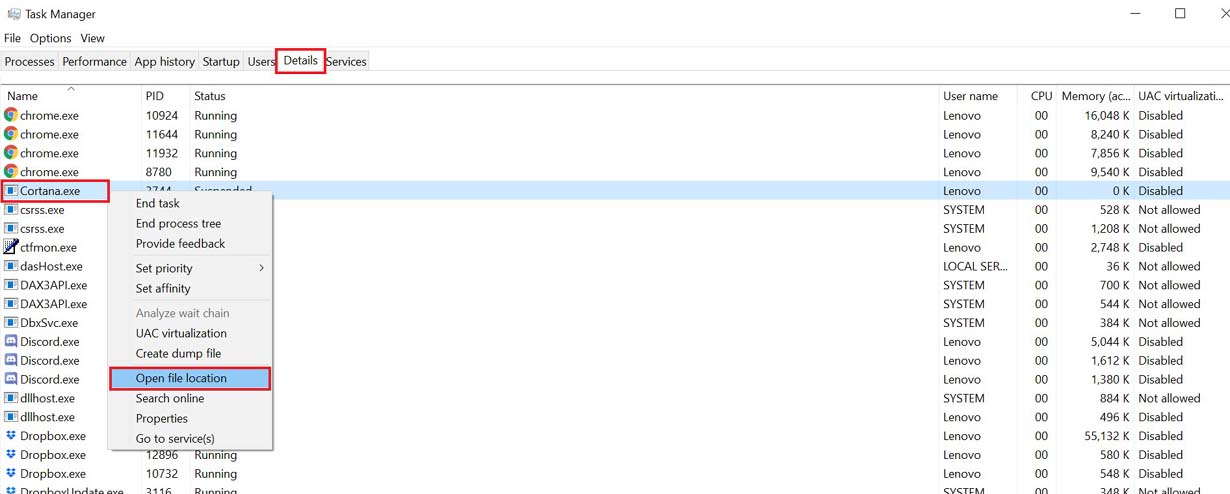
Program Path Rename Using Task Manager
- Press Windows + R
- In the Run dialog box, type taskmgr and click OK or hit enter
- Otherwise directly use Ctrl + Alt+ Delete to bring up the Task Manager
- Click on the Details tab
- Then in the list of programs navigate and look for Cortana.exe

- Right-click on it and from the menu select Open File Location
- Look for the folder Microsoft.Windows.Cortana.bak
- Right-click on the folder and select Rename
- During renaming remove the dot bak suffix from the folder name and save that.
Modify Windows Registry to Enable Cortana
- In the type here to search box, type registry editor
- Click Open in the matching result which will show Windows Registry
- Look at the left-hand panel.
- Follow the folder path : Registry Editor > HKEY_LOCAL_MACHINE > Software > Policies >Microsoft>Windows
- Under Windows search, you will see Allow Cortana
- Double click on it to tweak its registry value
- You have to set the registry value as 1. This will re-enable Cortana on the Windows device
- Once done, close the Windows Registry
- Restart the PC to put the changes into effect
Make Changes in the Group Policy Editor to Re-enable Cortana
Here are the steps to make changes in the group policy editor to re-enable Cortana on your Windows PC.
- Press Windows + R to trigger the Run dialog box
- Then type gpedit. msc and hit the Enter key
- Go to Local Computer Policy
- Under that go to Computer Configuration
- Navigate to Administrative Templates
- Now click on Windows Components
- Next, go to the folder Search > under that click on Allow Cortana
- Click on the radio button Enabled
- Now Cortana is enabled on your Windows PC
- To confirm the changes, click on Apply > click OK
- Make sure to restart your computer
So, these are various easy methods to re-enable Cortana on the Windows computers. Virtual assistant makes life easier by executing various tasks as per your command. So, in my opinion it is good to have Cortana on your Windows device.
Checkout More Guides,
- How to Fix: Cannot Enable Hey Cortana on Windows PC
- Cannot Hear Cortana Speak on Windows 10: How to Fix
- How to Change Cortana’s Default Search Engine
- Top 10 Cortana Tips and Tricks You Must Know
